![]() Ever wonder how you could get a solid Security Enhanced Enterprise Grade Linux Router/Server with ftp, apache, traffic shaping, pop-up blocker, content filter, intrusion detection/prevention, and other nice handy tools that every robust server should have…and here’s the kicker…installed and running in about 30 minutes in your home? I know quite a few friends of mine that went out and bought routers from brand names like Linksys, Dlink, and Netgear and then bragged about how cool their new router was (especially concerning ‘gaming routers’. Good lord that’s a con). I then showed them that their router was hackable within a few minutes because most of them didn’t change their default password. It’s interesting also that their routers didn’t do a whole heckuva lot other than route traffic…without throttling or intrusion prevention/detection. On those that were wireless…after some intense packet sniffing, I logged into their network and began surfing the web.
Ever wonder how you could get a solid Security Enhanced Enterprise Grade Linux Router/Server with ftp, apache, traffic shaping, pop-up blocker, content filter, intrusion detection/prevention, and other nice handy tools that every robust server should have…and here’s the kicker…installed and running in about 30 minutes in your home? I know quite a few friends of mine that went out and bought routers from brand names like Linksys, Dlink, and Netgear and then bragged about how cool their new router was (especially concerning ‘gaming routers’. Good lord that’s a con). I then showed them that their router was hackable within a few minutes because most of them didn’t change their default password. It’s interesting also that their routers didn’t do a whole heckuva lot other than route traffic…without throttling or intrusion prevention/detection. On those that were wireless…after some intense packet sniffing, I logged into their network and began surfing the web.
The bottom line is…most routers, if not configured correctly and used to full potential, are wide open and provide only a few functions. If you’re like me, this just won’t do. To combat this in the past, I used to use Red Hat 7.2 on a PI 75Mhz like an appliance to provide DHCP addresses for the LAN and a tidy firewall via ipchains and later iptables. Now there is a Linux distro that is more robust, more organized, and much more dynamic than most Linux router/server configured systems and it provides MANY functions. That distro is ClarkConnect. Today, I’m going to take a look at ClarkConnect 3.2 and show you how you can secure your network using its web interface and excellent administration tools.
ClarkConnect is based on CentOS 4.X and offers a very robust set of tools organized into easy to navigate administration pages. The administration pages are very similar to those that you would find with IPCOP and Smoothwall. However, ClarkConnect throws in extras such as the ability to use Samba and set it up as a PDC (Primary Domain Controller), 2 click updates, a caching dns server, a transparent proxy to speed up web surfing, a pop up blocker built into the proxy, dansguardian with blacklisting, online log viewer…there just is a list of features WAY to long to list here. So I’ll link to the features page and you can read a few more things for yourself. Also, if you’re wondering Point Clark Network’s take on community and open source, please read this page. They’re committed to community AND open source.
I started using ClarkConnect at version 2.0. Back then, they used Red Hat Linux as their base. Today, they’ve ported over to CentOS packages…which are Red Hat Enterprise Linux binaries repackaged by the CentOS project. All in all, I’ve been extremely pleased with the performance and handy web interface ClarkConnect provides which enables me to monitor my home network from afar. One thing that truly impresses me is that the home version remains free and open source despite the rise in business that ClarkConnect is currently enjoying. The people at Point Clark networks have a strong sense of community and they are continuously helping in the forums. They are to be commended for keeping this version available to home users! Any problems you might have with CC can be and will be addressed in the community forums. If you get lost or need to understand something better at anytime, please check the userguides at clarkconnect.com. You can also download the Quickstart Guide to get things rolling as well.
You can download and burn the 3.2 Home version of ClarkConnect (or CC as it is commonly referred). When installing, you’ll be greeted by a variation of the old Red Hat Anaconda text installer. It’s relatively easy to follow and hardware detection is superb…although I’ve found some older computers (think 266Mhz 🙂 ) do have a bit of trouble with the newer kernel (2.6 branch). I’ll assume that you can get it installed and up and running. Please be advised that in order to route traffic on your LAN, you’ll need at least two Network Cards in the computer you’ll be installing ClarkConnect on (see requirements)…one for internal and one for external traffic. Please also be advised that if you do install ClarkConnect onto a computer, it will wipe the entire hard disk of all operating systems. After installing, point your browser in a computer on your LAN to the IP address you assigned CC during install (should be an internal IP address). So you’d point your browser to https://192.168.1.X:81. The port number 81 and https are important…81 isn’t a standard web port and https means this is a secure transaction of information.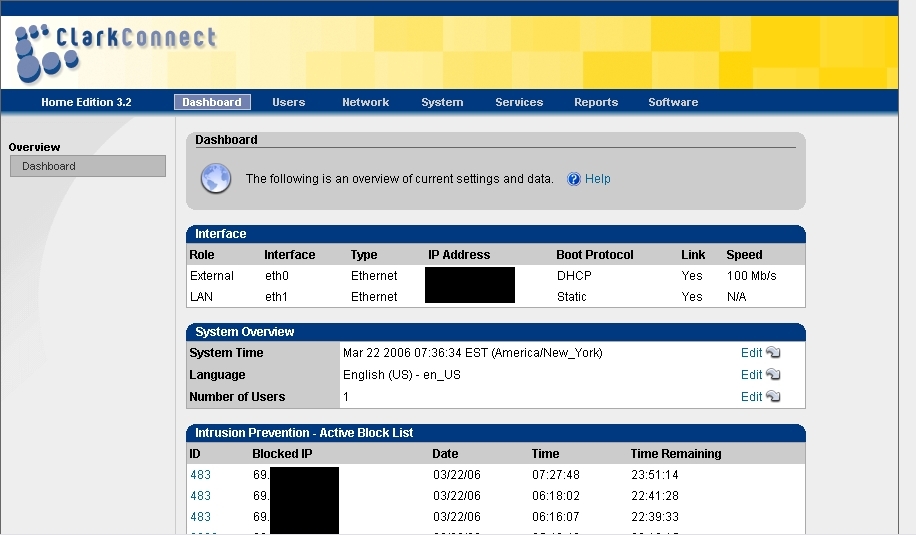
You should be greeted by the dashboard screen. –>
The dashboard tells you what your two (or how ever many you have) interfaces are (LAN and External Internet, DMZ, whatever) as well as gives you the opportunity to set languages, set system time, and see a quick overview of current intrusion attempts. Navigating to other areas is a snap with the menu bar at the top of the screen.
Updates
First, let’s move over and update the system. To do this, we’ll have to register with Point Clark Networks (who develop ClarkConnect) using their built in registration. Registering gives you a dynamic domain name (yourname.pointclark.net but hey, it’s automatically configured and allows you remote access to your box from the outside world). You can also piece together other services should you decide to purchase them. Of course, since I use the home version, I choose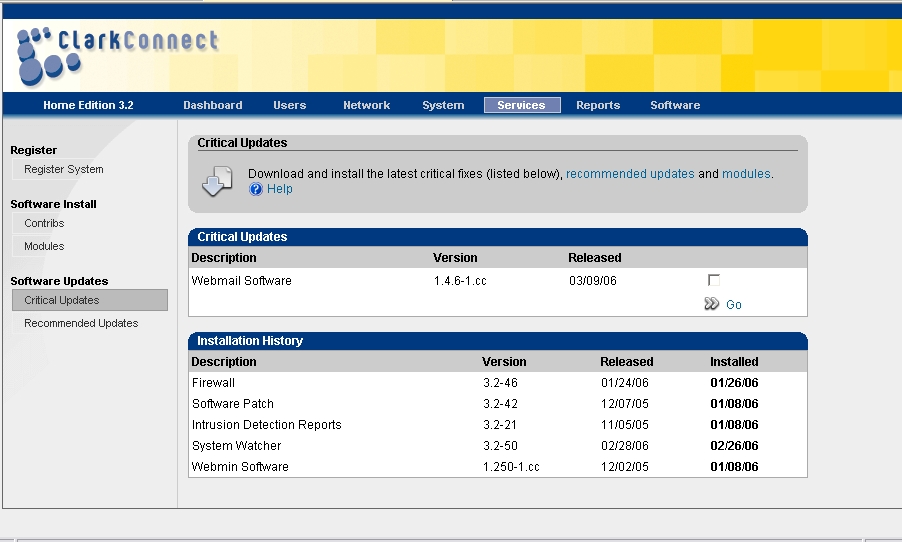 only the dynamic DNS service which is free so that I can connect from work to my box at home. So, back to updating the system. After you register, click on the sidebar item “Critical Updates”. Any updates that are critical to the system, including kernel patches, will update themselves here. To install the updates, turn off your popup blocker for this site, toggle the checkmarks, and click “go”. A window will pop up and show you apt-get progress. Close it when it states it is done. Feel free to browse other updates and install them at any time.
It’s important to note that all updates are pushed through this interface. This includes major updates to new versions as well. Updating to new versions is therefore extremely easy. The upcoming ClarkConnect 4.0 release is currently in beta and ClarkConnect is looking to release this in the very near future. Look for some new packages including Horde Webmail, Kollab groupware, ClamAV, and others.
Another handy thing that ClarkConnect does is keep track of those patches you’ve installed (as long as you go through the services tab on this webconfig). You can also update via apt and the shell (soon to be yum with the next release 4.0)…I use putty to connect via SSH to the box and update from time to time. You can cycle through other updates as well and even see some of the handy community contributed modules. Install any you’d like and head to the various resources that clarkconnect has to get you started such as the forums, the newbie guide, and Ya-FAQ.
Users
 To take a look at the users present and to have control over whether or not your users have shell accounts available, etc. Head over to the users tab. Here you have ultimate control over all the users on your system. This makes it handy in situations where you’d like to setup a user for VPN but don’t want that user to have a shell account (for security reasons). I leave one user and make the password as complex as I possibly can. I also change the password about once every 3 months to keep things secure. Whatever your security policy is, the web interface makes things easy to administer and easy to use.
Reports

Now that we previously updated the system, let’s take a look at the overview of all hardware. Click on the reports tab and make sure “current status” is selected. This gives us a graphical overview of all hardware and current performance. As you can see from the screenshot, you don’t need a fast computer to power your ClarkConnect install (pictured is my emachines Celeron 900). I’ve had over 194 days of uptime with this current install of ClarkConnect (version 3.2). I don’t see any reason why it won’t continue other than a hardware fail. Overall, ClarkConnect is stable, secure, and the most handy server distro I’ve ever used. I trust it so much after using it these years as my main workhorse server that I’m prepping to start a side business installing and configuring ClarkConnect boxes for small businesses. Point Clark Networks is doing a great job helping small businesses have the functionality they need at an affordable price. Anyway, back to the review.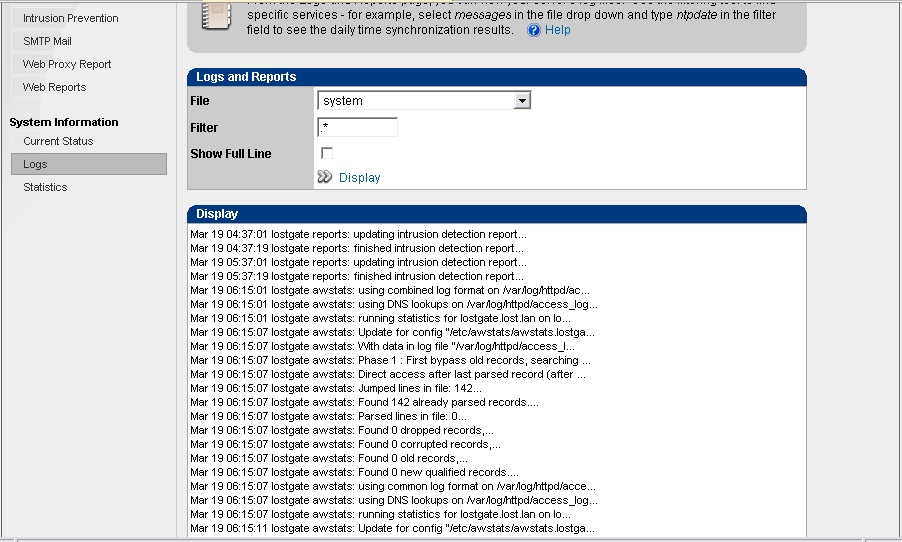
Back to the reports tab; In reports, you’ll be able to check out all the logs on your server. This makes reading logs less of a hassle and something you can do without cracking the shell.
Services
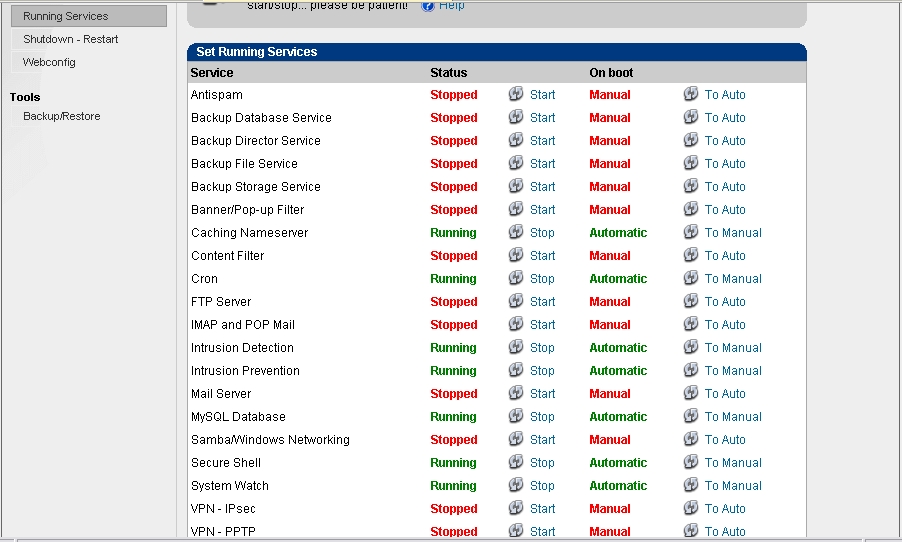 Click the services tab. In this view, we should be defaulted to “Running Services” which is the handiest page in the admin section. Here you will find a service listing of all the system services/software that can be toggled “on” the CC box. You can start, stop, enable at boot, or disable at boot any single service you see in this view. The color scheme will tell you what is enabled (Green) and what service is disabled (red). Take a look to make sure you have running what you need to have running…since CC defaults are safe, we can leave everything as it is or turn on whatever it is we need.
Backups
 Next, let’s make a quick backup snapshot of all our settings. You can do this by staying in the services tab and clicking “backup/restore”. From there, you can backup all your settings in CC. This is handy if, like me, you’re thinking of starting a business. One click snapshots means less configuring. It also makes things nice if you are planning on reinstalling. You can take this backup snapshot you’re creating and upload it to a fresh install to restore settings. Please be advised though that this backup is configuration files only (in /etc and /usr) and only for CC default apps. If you install something else, CC won’t backup that install without hacking.
Proxy Server
How about setting up a transparent proxy server to speed up your web browsing? Point Clark and CC have you covered in a couple of point-clicks. Head over to the Software tab. Select “Web Proxy” on the left side menu. From there, select the proxy to auto start if you’d like it to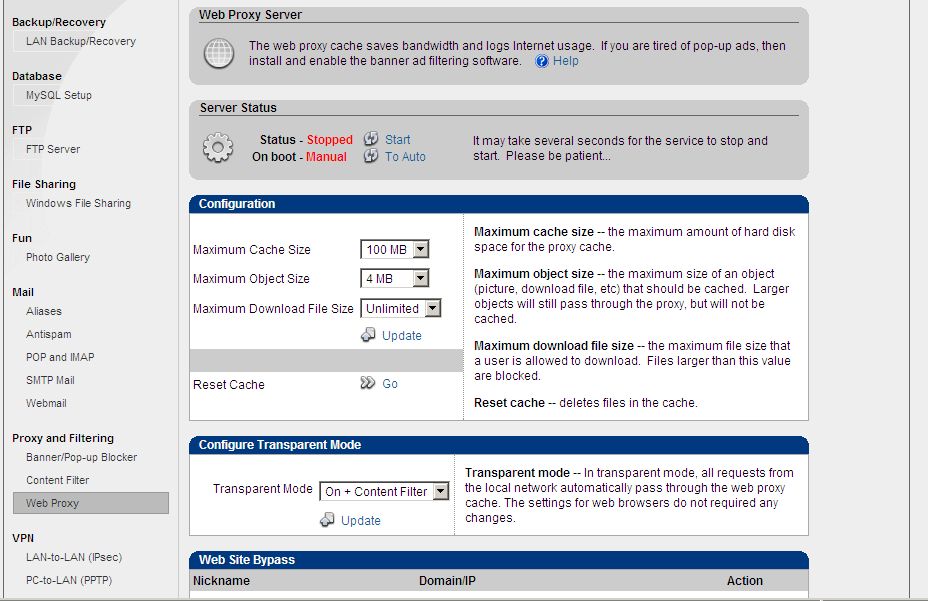 start at boot, then select to start the service. You can setup cache space, enable download size limits, and set maximum object size. Let’s set all to defaults for now…just make sure that if you plan on downloading larger files to set the maximum download file size to Unlimited. Also, if you want to use content filtering along with our transparent proxy, select “transparent + content filter” in the selection box titled “Transparent Mode.” You can clear your proxy out anytime by selecting “Reset Cache.”
Pop-Up Blocker
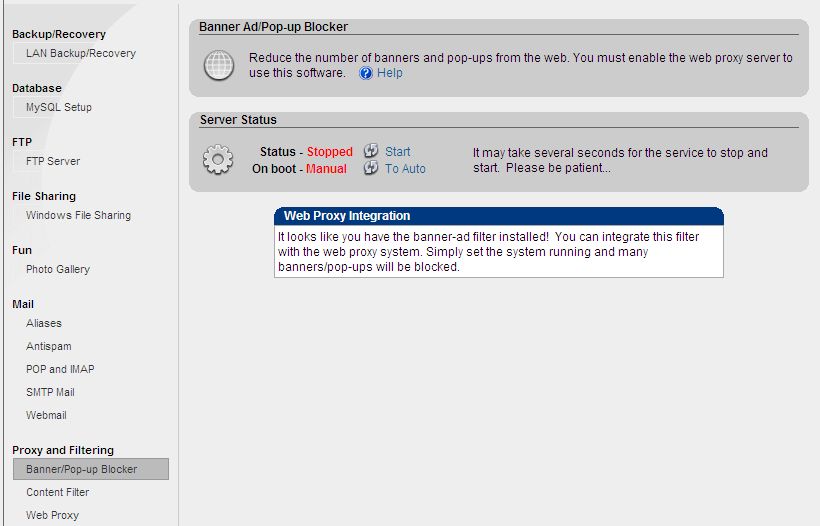 Now that you have the web proxy setup, let’s put the pop-up blocker on and look at content filtering. Select “Banner/Pop-up Blocker” from the menu on the right. Start it up by clicking on the links (Autostart if you choose). That’s it! Pretty simple eh? Let’s move over to content filtering. Click on “Content Filter” on the left side menu.
Content Filter
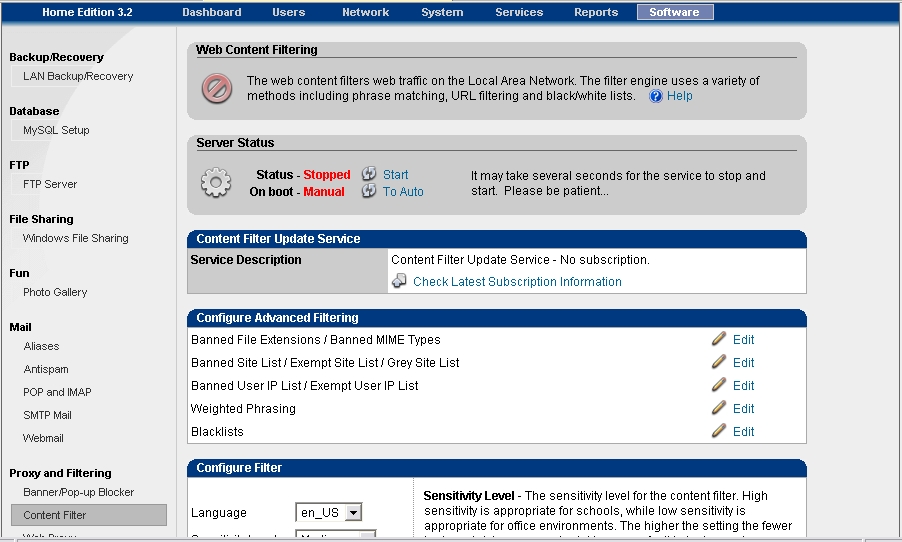 Now CC will automatically update your blacklists for content management for you. However, you’ll have to upgrade to one of the service levels to do so. Since I’m a home user and someone who’s run DansGuardian (the content filter system they use) for quite some time…I do my updates manually and pass on the upgrade in service. Point Clark networks has no problem with this, they simply have this in place to cater to their business clients to provide no-hassle management of their servers. Let’s get our update in place. Head over to the folks at URLBlacklist.com, specifically their download section. Download the bigblacklist.tar.gz. This is a one time free download for personal use. This is an up to date blacklisting that we can drop into our dansguardian
![]() directory to make sure that it is running with the latest and greatest. Drop all the contents of bigblacklist.tar.gz inside the /etc/dansguardian/blacklists directory. Remember, you will need to either purchase a subscription through dansguardian, urlblacklist.com, or go with purchasing the personal gateway service through clarkconnect to have a completely updated dansguardian blacklist. I’ve found that I don’t really need an up to date box…it does quite nicely on it’s own and I can add and remove sites as I see fit. Plus, you can do well to check out dmoz and their urlblacklists for squidguard which translate nicely into dansguardian (for advanced users only). You can enable dansguardian with a couple of clicks and set options for it on the Software Tab >> Content Filtering Menu.
directory to make sure that it is running with the latest and greatest. Drop all the contents of bigblacklist.tar.gz inside the /etc/dansguardian/blacklists directory. Remember, you will need to either purchase a subscription through dansguardian, urlblacklist.com, or go with purchasing the personal gateway service through clarkconnect to have a completely updated dansguardian blacklist. I’ve found that I don’t really need an up to date box…it does quite nicely on it’s own and I can add and remove sites as I see fit. Plus, you can do well to check out dmoz and their urlblacklists for squidguard which translate nicely into dansguardian (for advanced users only). You can enable dansguardian with a couple of clicks and set options for it on the Software Tab >> Content Filtering Menu.
Network
![]() Now that we’ve seen some of the wizbang features built into ClarkConnect, let’s take a look at the rest of the tabs. You can see from the screenshot to the left of this paragraph that there is plenty other software that you can configure in CC, but let’s move over to the
Now that we’ve seen some of the wizbang features built into ClarkConnect, let’s take a look at the rest of the tabs. You can see from the screenshot to the left of this paragraph that there is plenty other software that you can configure in CC, but let’s move over to the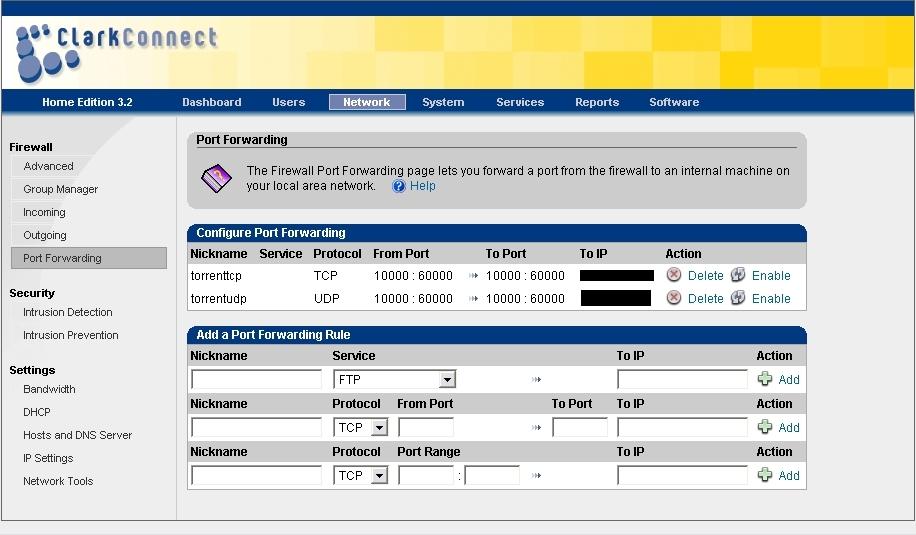 other tabs to show you just what you can control using the web interface. Click on the “Network” tab. ClarkConnect can operate in gateway mode (which is ‘router’ style mode with ipmasquerading, etc.), DMZ mode if you want to have a DMZ (demilitarized zone), standalone with firewall, and standalone without firewall. You can set these anytime you’d like to and control all of your network interfaces here. You can also go straight to DHCP configuration which will allow your CC box to give computers connected behind it a network address.
 One thing that is a definitive plus for CC is the firewall manager. You can control incoming, outgoing, and port forwarding all from the web interface. I specifically like the group manager. Why? Because it is handy if I want to use torrents, I setup a group to open up ports 10000-60000 and forward to my desktop behind my CC box. When I’m done, I turn it off by disabling that group of rules. Handy eh?
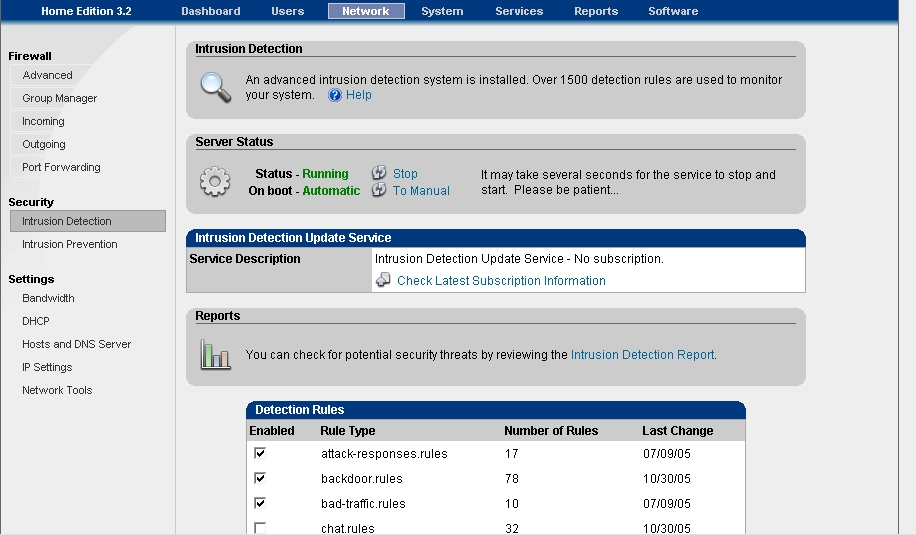
Intrusion Detection/Prevention
Also contained in the network tab is intrusion detection and intrusion prevention. I enable both of these but will enter into the intrusion prevention exempt list my work IP address and all the addresses of my LAN. That way I don’t have my CC box thinking that I’m trying to break in and dropping my connections to it as I test things or connect to it using various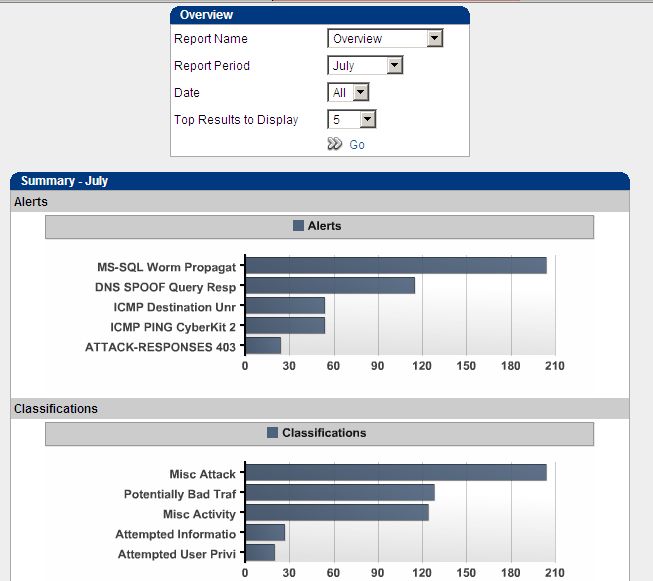 methods (ftp, ssh, web, vpn, etc). Intrusion detection rules can be updated through Point Clark Networks by upgrading to gateway service level to SOHO which is around $10 USD a month. I just enable mine and let it go :D. Seems to do a fine job using the default rules and as long as I keep a watchful eye on my firewall rules, I’m just as safe as if I had a Security Enhanced Linux Fedora box running things. To read your intrusion detection and prevention logs, head over to your reports tab and then select the appropriate area on the left.
Bandwidth Management
One other area of interest here in the network tab is bandwidth management. Select “Bandwidth” from the left menu area. In this menu, you can enter in upload and download limits for bandwidth and take control of your network. Very handy if you have a multiple computer LAN and a teenager that downloads EVERYTHING. Play around with the settings and when you’re satisfied, let’s cinch things up with samba, ftp, and webserver.
Samba
CC comes ready to operate as a PDC (Primary Domain Controller) for your LAN. If you only operate a small LAN (1-2 computers) having a PDC is really for bragging rights only. Instead, you might want to configure your samba shares using CC’s handy web interface. Head over to the “Software” tab and click “Windows File Sharing”. ClarkConnect has common shares already in place for you. You can enable these or disable them. You can even add your own. It’s up to you. Starting samba is once again just a point click away. There is also an advanced setup option for those of you who are a bit more experienced with samba.
Personally, I don’t use the samba interface from ClarkConnect. I instead use Network Attached Storage which automatically is detected on my network by all my desktops (easy as connecting to another PC) so I haven’t found the need to implement samba on my CC box. In the future, when I expand to include a computer for my son, I will implement a PDC with roaming profiles so that all settings are backed up to ClarkConnect. Thus, if a computer fails, I still have all settings saved server side.
We’ve covered a varying amount of information in this review and I won’t cover everything that CC has to offer either. But two other areas I wanted to discuss was ftp and webserver. CC uses proftp for their ftp server and apache 2 for their webserver. One thing I’ve found of value for the webserver (which I’ll discuss first) is their virtual host creator.
FTP and Webserver
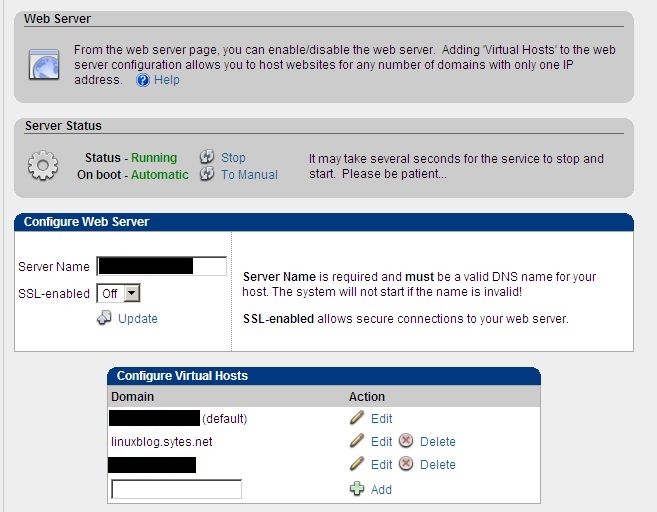 The webserver interface is handy. Very handy. You can enable SSL for Apache by toggling a setting. You can setup a virtual host by typing in the webaddress. Dead easy. I’ve found that setting up virtual hosts via this interface is better than doing so through webmin because it configures all defaults for you a bit better than webmin does. No idea why, but I’ve had trouble with webmin in the past with vhosts. I usually create a vhost with CC on their web server interface…such as linuxblog.sytes.net shown in the picture. This was my old blog location when I hosted it at home (2004 with CC 2.2 I think). I now have a virtual host setup so that all requests for linuxblog.sytes.net go through my CC box…I’ve written a rewrite rule to forward all traffic from the old blog to this current blog. Handy and easy with ClarkConnect. Like I said, I create the vhosts with CC and then hand them off to webmin for more detailed configuration. It’s important to note that you can install webmin through your “services” tab.
If you notice in the picture in the previous paragraph, I have linuxblog.sytes.net as a virtual host. I use the no-ip service I previously blogged about to register this name. If you plugin the topic to that article with a ClarkConnect install…you can see that they’d be a fine fit together and that you can have your own webserver running in a matter of minutes. Put that together with Gallery, which CC is bundled with, and you’ve got yourself a family photo album!
 Lastly, let’s look at the ftp server in CC. Click on the “Software” tab and then select “ftp server” from the menu on the left. You are a few clicks away from having a fully operational ftp server. Change the details you’d like to using the form provided by the web interface, then click to start and autostart the service. By default, CC shares /var/ftp. It is also open to anonymous connections. You’ll have to edit /etc/proftpd.conf to your liking to get your ftp server up and operational for other directories and users. Please see the proftp homepage for more details.
Summary
We’ve taken a semi-detailed look at ClarkConnect Home Edition 3.2 and how you can benefit both from the vast amount of software/programs already enabled on it and the ability to have an up and running router/server in as little as 30 minutes. Combine this with my previous article on using a no-ip domain and there isn’t any reason why you shouldn’t be able to show off a gallery or ftp server to your friends and relatives. If you have any problems, please head over to the ClarkConnect forums and ask…but not before using their search tool to see if the topic has been covered. As previously stated, there are two websites you can also connect to Ya-FAQ and the Newbie Portal. These two sites can provide you with good info as well as How-Tos made by the community.
I’d also like to take the time to let everyone know that I am in NO WAY being compensated for this article. I’ve used the software for quite some time and felt that I might be able to repay the people at Point Clark Networks by giving them props through this review. Whenever a new user is looking for a quick server oriented distribution, I always point them to ClarkConnect. In my opinion, it is the best distro out there to have for your home LAN. Hopefully, you’ll give it a test drive and come to the same conclusion.
I have been using cc for years now, it was the first linux distro I ever tried. I really learned a lot from it. I even showed it to some friends with no linux experience at all, who are using it very happily now. one as a router, one as a home LAMP solution.
If you’re looking for an easy and secure linux server, this is the one.
i am using CC3.2 Home Edition and it works perfectly, almost to perfect since I never have to do any maintanence 🙂
Next time I’ll install ubuntu server so I can learn a bit more about ip-tables, config-files, etc.
Can we use this with a wireless LAN ?
Yes…turn your router DHCP off and have it set with a static IP. Then it is used as an access point. Put it’s IP address and hostname on the ClarkConnect 3.2 hosts page (Network >> Hosts and DNS). Now place this wireless LAN separate from your normal LAN if you choose…it will make it be a DMZ of sorts. You can also keep it on the same nic card as your normal lan depending on topology.
I’ll answer any more questions you might have…I’m sure I haven’t been completely clear.
Hey, this looks just like the CommGate product.
Take a look at http://www.commgate.net/products.htm and play “spot the difference”.
🙂
Well, as far as I can tell, the difference is…
ClarkConnect came up with a product and offer a free version of said produce which was first released in November 2000. CommGate thought this was a good idea and rebranded this product to sell under their own name in 2001 (source: copyright information, they don’t actually state when they firt released their product) without offering a free version.
This is further supported by the fact that CommGate appear to be using kernel 2.6.9-19.cc, the “cc” part referring to ClarkConnect I believe.
http://www.pointclark.net/news/news_12172004.php
They’re a partner. techworx = commgate
It’s probably also worth mentioning that CC offer a free dynamic DNS service so if you have an IP address that changes often you can always use http://yourboxname.pointclark.net
Well I am impressed with the dashboard and it was easy to install , and I was able to logon to the server from my main computer “but” for the life of me, I can’t figure out how to access the file system of the server to put a page in /var/www/html. And please don’t tell me to try
vi /var/www/html or nano. Tell me “where” I put that command and how. Please…..
Are you using a Windows Box or Linux Box to connect to CC?
If windows, go and get WinSCP to connect to your CC box. That will connect via Secure connection to Clark Connect with your root account and password and you’ll be able to drop files into CC.
If you’re using Linux…KDE is what I use so I’ll give you that solution. I don’t know Gnome…so you’ll have to look for an alternative. But in KDE use fish.
Open Konquerer. Then use:
fish://user@hostname
Let me know how what happens 😀
Thank You for the reply. I did manage to get that to work once or twice but now it returns an “unable to connect error” after about 4 or 5 minutes. I did discover I am able to upload files files by ssh with gftp. Is this an acceptable method? Everything seems to be working. I even got the email server running. Thank you again for your help.
thag
Goodbye to my old Linksys router wannabe and hello world! Now routing works. Not many routers are able to route 50mbit or more, unless you _pay_ for them. Why not use a standard Linux? Well, simply beacuse you get tired of finding the proper config file, making small changes, and reloding the right prosess all the time. Setting up a mailserver is nothing but a walk in the park. In fact, setting up everything is too simple. Though I realize that after installing the home edition and fiddling with for one day, I GOTTA have the enterprise. Smart.
Though, as mentioned further up, the possibility of setting a custom user home dir for uploading files would be nice. (If you’re gonna have multiple web sites and users, and since you already can limit access to only FTP and so on.) Though I don’t know if I’d want other users to access my preciousss..
Can I use a parent proxy wih Clark Connect proxy server?
You mean can you use a proxy in front of ClarkConnect?
You bet. Just don’t turn on the proxy service in the admin side of things and make sure you configure it just like you would another Linux box for proxy.
“Enterprise” level server that only supports 10 mailboxes. — And charges $20 PER MAILBOX after that?!?! I don’t think so.
In my state there are laws against rape.
My article only stated that you get an enterprise level server not enterprise services. Most home users can’t run mail servers my friend…ISPs block dynamic IP pools from operating as a mail server…because that is what most spammers do. So if you personally have more than 10 people who need email in your home environment, perhaps you’ll need to look elsewhere. If not, ClarkConnect is your distro.
hey i just finished installing clarkconnect gateway, i can ping both interfaces eth0 and eth1. i’m connected to the internet usind ADSL my problem is, i cant get internect access. Anyone who knows who might be the problem?
Did you enable the DHCP Server? It is disabled by default. After that it should become active.
Regarding 10 mailboxes.. the have stated in the forum that they will extend the mailbox limit for home users and non-profit organizations that needs it.
Adyton
This sounded like exactly what I needed to replace and aging (!) network server running internal DNS and DHCP services. I’d also like to have it act as a Samba PDC. Question, though…
I tried to install ClarkConnect in a Parallels virtual machine on my mac to try it out and, while it appears to install fine, after the reboot all I see is a black screen in my vm window and a lot of CPU being eaten.
I can’t find anything in the ClarkConnect or Parallels forums and Google gives me nothing so, out of desparation, I thought I’d ping here.
I’d like to test drive this distro, but a virtual machine is the only way I can do that.
Thanks.
Never messed with parallels here…wish I could help but I can’t 🙁
Clark is good. But I wonder if we can add those good PCLinuxOS apps to it. Because I love PCLOS just too much. Any idea?
On the Clark box you can type ALT F2 to go to a shell, or you can use ssh from your main computer
How I find Guide Book, Manual of Clarkconncet. to learn Step -by-Step.pls. chai400@hotmail.com
http://www.clarkconnect.com/help/
it is very very useful article thank you.
Hello, I was just reading this and thought I would take the time to
write a short note to inform you all that we offer blacklists tailored
specifically for Squid proxy native acl, as well as alternative formats
for the most widely used third party plugins. So we invite you all to
check us out. We take a great deal of pride in the fact that our works
offer a higher degree of quality than the freely available options. Our
lists are also compatible with UrlFilterdb.
Quality Blacklists Tailored For Squid Proxy – http://www.squidblacklist.org