I previously interviewed the creators of JARVYS, a Linux backup solution that makes backups and restores as easy as a single command. I wanted to post a follow-up to show just how easy it is to setup and use on a Linux system. I’ll be using a virtual server running Debian 7 as my test environment and I’d like to disclose that JARVYS is a sponsor of this blog.
Sign-up to Back-up
If you haven’t registered to receive a free account with JARVYS, head over to their plans page and signup. Please note that if you checkout with the coupon code “linux-blog” you’ll get 20% off any paid plan. However, I know most of you will want to test drive the car before purchasing so the always free plan is a good starting point that will give you 3 backups that you can restore from. Once you’ve done that, head back here and let’s get started.
60 Seconds to Lift-Off
After verifying your email, Log-in to your account at JARVYS and you’ll land on your user dashboard. Your dashboard is where all the information regarding your backups will be contained. At the very top, there is a curl command that you can copy and paste onto the system you want backed up. Execute that command which should look similar to this:
sudo curl --silent --data '{"user_api_key":"long_hash_value_with_numbers_
and_letters_unique_to_your_account"}' https://v1.jarvys.io/setup/ > jarvys-setup.sh && sh jarvys-setup.sh
In between the quotes above will be a long hash key that is unique to every user account. Obviously, you’ll need curl installed on your system and you’ll need to have sudo privileges to initiate the command (or root access). You’ll also need a few other things: tar, ssh-keygen, and rsync. Most systems already have those installed so most will be ok…but if you’re on a bare server like me, you might have had to install one or two of those first.
Once you’ve initiated the curl command, that’s it. JARVYS is installed and configured to run backups. JARVYS will run an initial backup within 1 hour of the installation command above and there are sane defaults on what it backs up. As an example, it won’t back-up your /proc or /sys directory…but it’s possible you might want to hone in on a single directory tree to backup. In this case, doing some more post configuration will help and I’ll go over that below.
 For those of you who just want everything backed up, you’re done. You initated the command and BOOM! That’s it. JARVYS will backup daily for you and with the free plan, you’ll have 3 backups that you can restore from. You’ll be able to setup email notifications on your dashboard for each system you have backing up (see left). You’ll also be able to see how much space you’re using with your snapshots. Please keep in mind that each time the backup runs, it rotates the oldest snapshot out of existence.
If you want to initiate a manual backup, the command is jarvys backup. Pretty simple stuff. For those of you who would rather not backup EVERYTHING, let’s move on to configuration below.
Advanced Configuration of JARVYS
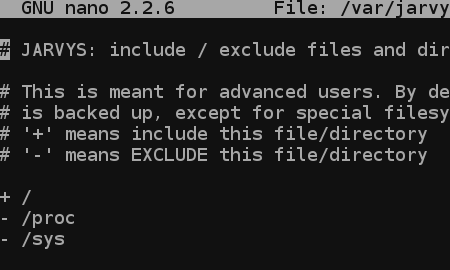 JARVYS tries to keep it simple with advanced configuration. If you look at /var/jarvys/etc/include you’ll find that directories listed with a minus sign in front of them will not be backed up and directories with a addition sign will be. By default, JARVYS backs up everything except /proc and /sys as you can see inside of the configuration file (see right).
You can add other directories you don’t want to backup or ones that you do…just keep in mind that this is for advanced users. For me, I want to backup everything inside of /var/www/ as all of my web stuff is there. In this case, I’d exclude comment out the three lines shown in the picture above. Next, I’d add the directories I want to backup in the corresponding section of the configuration file:
+/var
+/var/www
+/var/www/**
This means that the only directories I’m backing up is all files in the /var/www path. Next, I’d uncomment the line that states:
# - *
The line above, if commented with the ‘#’, will not be read…uncommenting it means we delete the ‘#’ and then save. This means JARVYS will exclude everything except what you have listed with a + symbol. In our case, it will exclude all things except those listed above in /var/www and the sub-directories. So my finished configuration page will only have the following lines uncommented:
+/var
+/var/www
+/var/www/**
- *
If you have further questions on how to do this, please leave a comment below and refer to the JARVYS documentation page.
Restoring Files with JARVYS
Let’s go through what a restore with JARVYS is like. I’m going to manually perform a backup right now of my newly configured JARVYS install that I just configured in the ‘Advanced Configuration’ section above. So I’ll initiate a command:
jarvys backup
Now I’m going to do something either really smart or really dumb depending on how you view it.
rm -rf /var/www/linux-blog.org/logs
The command above removes all of my error and access logs for my website. Now I’m going to restore these files with JARVYS:
jarvys restore /var/www/linux-blog.org/logs/ 1
JARVYS will make sure you are absolutely certain that you want to do the restore and then will restore your files into the directory /root/jarvys-restore and from there you can move your files in their entirety from there. It’s as simple as that.
Are There Any Caveats?
Sure there are. There always is! For one, you can’t delete snapshots from a host that is no longer valid. As an example, if you have 2 Linux servers…perhaps one as Test and one as Production…and you destroy the Test box after a few months of testing…you cannot get rid of this system from your JARVYS status page. This means that the last 3 snapshots from that client are never going away. I contacted JARVYS support about this and they said they could manually remove it for me. They also said that features were in the works to give you granular control over your backups/snapshots including removing clients. We’ll have to see what happens.
Secondly, I didn’t notice where JARVYS restored my files the first time I restored them. I think part of the reason was the scrolling text on the screen but also because my eyes weren’t drawn to the text stating where they were restored. I also mentioned this to JARVYS support and they stated that they would pass this along and thought it was a really great idea to highlight the restoration folder.
In closing, the support is fantastic and they are open to suggestion to improve things…which is great for any product. It’s easy to get started and is really a ‘set it and forget it’ backup solution. The company puts Linux front and center which is a nice change for backup solutions. If you’d like to give JARVYS a try, head on over and signup for their free plan. If it’s everything you hoped it would be, you can use the code ‘linux-blog‘ during checkout and you’ll get 20% off for the lifetime of your subscription. Thanks again for reading!