Fix VMWare Player Resolution with Solus (All Versions)

Beggars Can’t be Choosers

Recently, in my “all Windows all the time” job I have felt the need to have some virtual desktops on my Home PC that I can spin up in a few moments notice so that I can scratch the Linux itch.  Dual boot won’t work because I have to stay connected to my VPN and we don’t support Linux for this 🙁  Obviously, this is where virtualization software comes into play.

State of Virtualization 2020

However, virtualization software seems to want to make running a Linux desktop in 2020 problematic with their programs chock full of buginess.

Hyper-V?  Not if you run Windows Home and no support for graphics.  Not to mention, you’ll have to gut install it via powershell and when it fails, gut it via powershell and elect to go with another option.  Hyper-V is an afterthought by Microsoft now as well for desktop players.

How about Oracle Virtualbox?  It works great for simple things like Ubuntu and Debian…but you can no longer change resolutions for most because it doesn’t support older formats of Display drivers.  Often times for things like Solus, you boot to a black screen and can do little else, let alone install anything even with additions installed.

None of the aforementioned solutions are able to go full screen on every Linux distribution I take for a spin.

Enter VMware Player.

With some light hacking to get VMware tools installed on Solus, full screen magic can be had again.  I’m going to walk you through how to get any flavor of Solus up and running with VMware Tools installed and therefore, magnificent, full screen splendor.

VMWare Tools Installation on Solus

I’m going to assume you were able to get Solus installed on VMware Player and you’ve just booted up to a fresh desktop.  Install any updates required through the software center and if you need to reboot for a kernel update, please do so.

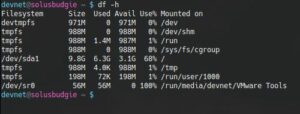
Once you’re at the desktop, select Player >> Manage >> Install VMware Tools.  Click “Yes” when prompted.  After this, launch a console and ensure that VMware Tools has mounted as a separate device (I use df- h to make sure it’s mounted).  If they haven’t mounted, launch the file explorer utility and click on the VMware Tools device in the left hand pane.  They should mount and you should be able to see them inside the console as follows:


Navigate to that location and list the contents.  You should see a file named something like  “VMwareTools-10.3.21-14772444.tar.gz”.  Copy this file to a location of your choosing.  I copied it to my documents.


Next, unzip and untar the files:


Once the files are extracted, enter into the directory and run the following command (use sudo if you aren’t in root group like I am) to see what we need to do:


Follow the prompts pressing return for default values and you should hit a snag on the following:


So VMware Tools is looking for rc directories, but they don’t exist on Solus (for good reason!).  So let’s give VMware Tools what it wants.  Control-C to drop out of the installer and let’s create those files as root:


Run the installer again, pressing return for all defaults.  Let it fail on “Unable to copy the source file /usr/lib/vmware-tools/configurator/pam.d/vmtoolsd to the destination file /etc/pam.d/vmtoolsd

Since that path doesn’t exist, let’s create it


Now let’s run that command to install the tools again (vmware-install.pl) and select all defaults by pressing return.

VMware Tools should finish installing completely at this time.  Reboot the VM.  Log back in.

Attempt to change the resolution and things should be right as rain at this point in time…before the tools install, not so much.  Make sure in the VM settings in player that you have the 3D acceleration checkbox checked and you should have quite a nice experience running VM’s using VMware Player.

Questions? Concerns?  Please do let me know below and I’ll attempt to help in any way I can.  Opinions?  I like those too!  Let me know how crap I am below!  Thanks much for reading!
When Life Gives You Lemons…

Image by John Harper

Make Lemonade?  What About When You Can’t?

Sometimes, life gives you lemons.  Dried up lemons that you’re not going to be able to make lemonade with.  You are then left with some old, dried up rinds that are brown and withered that look like tiny catchers mits.

Life did this to me in September.

I was laid off.  This is something that never happened to me before.  I worked for a financial institution supporting production software running on Linux.  It was a GREAT job and one that I did for 4+ years.  I was able to work with RHEL and SUSE Linux servers on the daily.

This is the first time in my life that I haven’t had a job.  The last time I didn’t work was 1998.  These past 6 weeks have been not much fun at all and I’m dangerously close to running the distance of my severance package in the next 3 weeks.

On top of those nasty old lemons…I have yet to find a job.  I’ve had plenty of attention for my resume but it seems people are looking for specific titles that didn’t exist 5 years ago when I was looking for work.  The IT industry changes so quickly.  So the traction I got 5 years ago is gone.  Instead, it’s like I’m using bald tires on black ice….it’s just spinning around.

I rewrite my resume weekly now.  Update it with recruiters.  Update it on websites.  Apply to new jobs.  Lather, rinse, repeat.

It’s especially scary when The New York Times is reporting that there is a lot of job hunting going on right now, but no job, despite low unemployment.  Hopefully, all things will sort themselves out in the next few weeks.

What’s Next for Here?

This post is just a quick update on why there have been crickets here for the past few weeks.  I still have a review of OpenMediaVault prepared…all the nifty screenshots are taken.  But I haven’t written it yet.  Job hunting is taking all of my time currently.  I’ll probably need to take a break from the grind of job hunting so I should get that out sometime in the next few weeks.  Wish me luck on the job hunting front!

Solus – The Current Distribution

Currently I’m running Solus 4.0 for my distribution on my main laptop.  What I like about it is that it gets out of the way…everything seems to work out of the gate.  It’s quite elegant in that everything works out of the gate and Budgie is just dead easy to use…and quite stable.

Music works right away.  Videos work right away.  YouTube plays with no issues.  Updates are seamless.  Everything just works(tm).  Honestly, I haven’t had a distribution with this few problems since I tried Linux Mint…and while I’m definitely high on Linux Mint…I get tired of Debian at times.  I know, I know…how dare I!  But, sometimes, I want to challenge myself…just because I know I need to.  In this case, Solus isn’t based on ANYTHING at all in that it has its own base and its own package management and its own packaging system and its own EVERYTHING.  Yet it still is somehow ultimately stable, ultimately fast with great performance, and ultimately fun to use.

I feel I’ve found a home for the time being and I plan on learning to package a bit using the package management system Solus uses (PiSi).  More to come this next week as I’ve got a how-to on establishing a quick software RAID system using Open Media Vault which is my go-to distribution of Linux for all NAS activities.

Happy 16 year Anniversary YALB

I’ve been here for 16 years.

That’s right, Yet Another Linux Blog has been around for 16 years.  The oldest post you find on this blog was in December of 2004, but I lost quite a few other posts previous to that one in various migrations to different content management systems and blogging platforms.  Back then, WordPress didn’t even have automatic plugin and platform upgrades…it was pretty awful.  I finally settled on Serendipity for my platform since it had automatic updates for plugins and used the Smarty template system so theming was a snap.  No migration path for them back then and I didn’t want to manually retype all those articles.  So it’s been roughly 16 years of Yet Another Linux Blog.  Guess that makes me one of the oldest Linux blogs out there.

I started off with fervor; I posted frequently about random things as I tried to feel out my voice for the blog.  Recently though, I’ve posted less and less.  I took a few moments to ask myself “What’s the reason for that?”  There seems to be a couple of reasons why I found myself blogging less.

Simplicity Breeds Complacency

I’ve been involved in many different communities of Linux.  Most notably, PCLinuxOS and Unity Linux where I was on the development teams for both distributions.  During those times, I became quite familiar with the development processes that go on behind the scenes and what it takes to produce a usable product.  I gained knowle on what it takes to motivate people toward a common goal…how to empower people and keep them moving forward despite all of their real life commitments.  I’m much more of an organizer than I ever was a coder.

Sometime around the release of the 2.6.X/2.4.x kernel, Linux started to become less interesting to me.  I’m pretty sure I know why.  Things were easier…devices installed automatically and you really didn’t have to lift fingers all that much to make things work.  Linux had become much simpler to use than it ever had been in the past.  Distributions just started working…and working quite well.  Hardware detection no longer became a sticking point when you popped a livecd in…I became accustomed to the it “just works” mentality.

When things just work, there is less that one has to do to keep things running.  Much like a reliable car engine that only requires an oil change to keep moving.  Not having issues meant that I was less inclined to blog to share non-existent solutions to non-existent problems.  When this happened, I lost my drive to blog and found myself less motivated to even distribution hop.  I even stopped trying new desktop environments and keeping up with Linux news!  I know, I know…the horror!

Moving, New Jobs, and Family

Around this same time (appx 2014/2015), I got a new job and moved a few states away.  The new job was working with building high availability storage arrays using Microsoft Server.  I dove in and put my nose to the grindstone.  Linux took a backseat.  My mother passed away during that time.  I kept moving…working with Windows, building virtualized servers for the clients of the MSRP I worked for.  I wasn’t extremely happy…even thought he work was challenging and new.  Then in 2015, I was able to get a new job working with Linux!  Huzzah!

Now I work for a financial institution and support their electronic trading environments working with Solaris and Linux.  It’s challenging and different every single day.  I’ve worked at this company now for almost 4 years and couldn’t be happier.

So what took me so long to come back here?  Why the false start in 2017?  Lack of motivation.  Suffering from information Overload.  Shirking online resources/social media and working on myself and making sure to put my family first.

I went through therapy to get my head right.  My son went off to college.  My wife helped me become a better husband, a better step-dad, and a better human being.

All of that takes time and effort and that time and effort isn’t given or shared with blogging or trying out new distributions of Linux.  Excuses are just that and as you can tell at this point of time I’m full of them.  The bottom line is that I wasn’t motivated to blog and I had just enough things to work on in my real life that my focus was removed from Linux.  I’m a better person for it overall so it’s definitely a positive thing in my life.

Where From Here?

So here we are.  2019.  The blog is turning 16 years old.  I used to host it on a Pentium II 350Mhz PC with PC133 RAM and use no-ip.com to make my dynamic DNS work.  Think about how far computing has vaulted forward in that time.  It’s amazing.

So where do I go from here?  What’s on the horizon for Yet Another Linux Blog?  Believe it or not, I’m thinking of making another thrust forward in the Linux realms.  I’ve built a new NAS machine to replace my aging Zyxel 2 bay NAS that I’ve constructed out of spare parts from an old HP Desktop and because of that, I’ve got a how-to brewing for OpenMediaVault that will show you how to setup a 2 disk software RAID array for data redundancy.  I’ve got some SBC (single board computers) that will provide a nice distribution hopping experience in future posts.  There are some fantastic one liner tips and tricks I’ve stumbled across while working with Linux every single day at work searching for trade identifiers, prices, yields and quantities.  My motivation is slowly returning and my curiosity to push the boundaries of Linux is once again there.

Contrary to popular belief, blogging is not dead.  So reader, thank you for reading.  Thanks for being a part of the Linux community.  Thanks those of you who remember me from 16 years ago…heck, thanks to any of you who remember me and this blog at all!  Thanks for your interest in Linux…without all of these, Linux would have died a long time ago.  Stay tuned and thanks!

After the Long Hiatus

Hi everyone.  It’s been a while since I posted.  Real life happens sometimes.  I moved to a new state, have had two new jobs and am finally stable enough in my professional position that I can write again.  With that being said, I should be writing quite a bit more as I’ve landed in a position that deals with Unix and Linux every single day.

Please accept my apologies on being gone for so long.  I promise 2017 will be a much better year for this site as I plan on posting reviews, more tips/tricks, and even a bit of commentary as I’ve done in the past.  Thanks for sticking with me for so long and thanks for reading!

Getting Started with JARVYS Backups

I previously interviewed the creators of JARVYS, a Linux backup solution that makes backups and restores as easy as a single command.  I wanted to post a follow-up to show just how easy it is to setup and use on a Linux system.  I’ll be using a virtual server running Debian 7 as my test environment and I’d like to disclose that JARVYS is a sponsor of this blog.

Sign-up to Back-up

If you haven’t registered to receive a free account with JARVYS, head over to their plans page and signup.  Please note that if you checkout with the coupon code “linux-blog” you’ll get 20% off any paid plan.   However, I know most of you will want to test drive the car before purchasing so the always free plan is a good starting point that will give you 3 backups that you can restore from.  Once you’ve done that, head back here and let’s get started.

60 Seconds to Lift-Off

After verifying your email, Log-in to your account at JARVYS and you’ll land on your user dashboard.  Your dashboard is where all the information regarding your backups will be contained.  At the very top, there is a curl command that you can copy and paste onto the system you want backed up.  Execute that command which should look similar to this:

sudo curl --silent --data '{"user_api_key":"long_hash_value_with_numbers_
and_letters_unique_to_your_account"}' https://v1.jarvys.io/setup/ > jarvys-setup.sh && sh jarvys-setup.sh

In between the quotes above will be a long hash key that is unique to every user account.  Obviously, you’ll need curl installed on your system and you’ll need to have sudo privileges to initiate the command (or root access).  You’ll also need a few other things:  tar, ssh-keygen, and rsync.  Most systems already have those installed so most will be ok…but if you’re on a bare server like me, you might have had to install one or two of those first.

Once you’ve initiated the curl command, that’s it.  JARVYS is installed and configured to run backups.  JARVYS will run an initial backup within 1 hour of the installation command above and there are sane defaults on what it backs up.  As an example, it won’t back-up your /proc or /sys directory…but it’s possible you might want to hone in on a single directory tree to backup.  In this case, doing some more post configuration will help and I’ll go over that below.

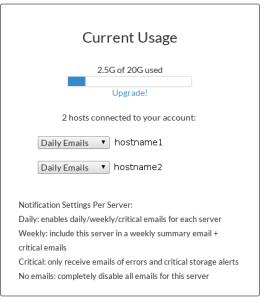
JARVYS-VISUALFor those of you who just want everything backed up, you’re done.  You initated the command and BOOM!  That’s it.  JARVYS will backup daily for you and with the free plan, you’ll have 3 backups that you can restore from.  You’ll be able to setup email notifications on your dashboard for each system you have backing up (see left).  You’ll also be able to see how much space you’re using with your snapshots.  Please keep in mind that each time the backup runs, it rotates the oldest snapshot out of existence.

If you want to initiate a manual backup, the command is jarvys backup.  Pretty simple stuff.  For those of you who would rather not backup EVERYTHING, let’s move on to configuration below.


Advanced Configuration of JARVYS

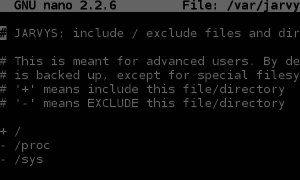
JARVYSconfigJARVYS tries to keep it simple with advanced configuration.  If you look at /var/jarvys/etc/include you’ll find that directories listed with a minus sign in front of them will not be backed up and directories with a addition sign will be.  By default, JARVYS backs up everything except /proc and /sys as you can see inside of the configuration file (see right).

You can add other directories you don’t want to backup or ones that you do…just keep in mind that this is for advanced users.  For me, I want to backup everything inside of /var/www/ as all of my web stuff is there.  In this case, I’d exclude comment out the three lines shown in the picture above.  Next, I’d add the directories I want to backup in the corresponding section of the configuration file:

+/var
+/var/www
+/var/www/**

This means that the only directories I’m backing up is all files in the /var/www path.  Next, I’d uncomment the line that states:

# - *

The line above, if commented with the ‘#’, will not be read…uncommenting it means we delete the ‘#’ and then save.  This means JARVYS will exclude everything except what you have listed with a + symbol.  In our case, it will exclude all things except those listed above in /var/www and the sub-directories.  So my finished configuration page will only have the following lines uncommented:

+/var
+/var/www
+/var/www/**
- *

If you have further questions on how to do this, please leave a comment below and refer to the JARVYS documentation page.

Restoring Files with JARVYS

Let’s go through what a restore with JARVYS is like.  I’m going to manually perform a backup right now of my newly configured JARVYS install that I just configured in the ‘Advanced Configuration’ section above.  So I’ll initiate a command:

 jarvys backup

Now I’m going to do something either really smart or really dumb depending on how you view it.

rm -rf /var/www/linux-blog.org/logs

The command above removes all of my error and access logs for my website.  Now I’m going to restore these files with JARVYS:

jarvys restore /var/www/linux-blog.org/logs/ 1

JARVYS will make sure you are absolutely certain that you want to do the restore and then will restore your files into the directory /root/jarvys-restore and from there you can move your files in their entirety from there.  It’s as simple as that.

Are There Any Caveats?

Sure there are.  There always is!  For one, you can’t delete snapshots from a host that is no longer valid.  As an example, if you have 2 Linux servers…perhaps one as Test and one as Production…and you destroy the Test box after a few months of testing…you cannot get rid of this system from your JARVYS status page.  This means that the last 3 snapshots from that client are never going away.  I contacted JARVYS support about this and they said they could manually remove it for me.  They also said that features were in the works to give you granular control over your backups/snapshots including removing clients.  We’ll have to see what happens.

Secondly, I didn’t notice where JARVYS restored my files the first time I restored them.  I think part of the reason was the scrolling text on the screen but also because my eyes weren’t drawn to the text stating where they were restored.  I also mentioned this to JARVYS support and they stated that they would pass this along and thought it was a really great idea to highlight the restoration folder.

In closing, the support is fantastic and they are open to suggestion to improve things…which is great for any product.  It’s easy to get started and is really a ‘set it and forget it’ backup solution.  The company puts Linux front and center which is a nice change for backup solutions.  If you’d like to give JARVYS a try, head on over and signup for their free plan.  If it’s everything you hoped it would be, you can use the code ‘linux-blog‘ during checkout and you’ll get 20% off for the lifetime of your subscription.  Thanks again for reading!

Creative Commons License
Except where otherwise noted, the content on this site is licensed under a Creative Commons Attribution-NonCommercial-ShareAlike 4.0 International License.