Sony Violates the LGPL3 and Steals KDE Icon

Looks like Sony has gone from prosecuting pirates to becoming one.  Only days after the PS4 announcement too.

Over at the KDE Blog, Jonathan Riddell explains that Sony is using a KDE icon in violation of the LGPL3 license under which it is released:

“Nowhere on their website terms of use does it list the LGPL 3 licence it may be copied under (It does say “Any unauthorised use or copying of site content, or use of site content which breaches these Terms (or their spirit) may violate trade mark, copyright and other proprietary rights, and have civil and criminal consequences” although it also says “You must seek and obtain the written consent the operator of this site before creating any link to this site” so I don’t give that page any legal credit.)”

The page in question is a ‘Choose your Vaio‘ webpage on the Sony UK site.

What does one do in cases like this?  It seems that legal action would be a waste of time and money…hopefully, Sony takes note of this and corrects the issue.  They’ve been heavily invested in Linux and Open Source for many years now with their platforms and I’d like to think they’d have learned from their rootkit debacle that you should act quickly to fix things before they blow up on the internet.

Comic Books, Linux and KDE 4

Sometimes I read comic books.  I would hope that some of you do as well.  I collected the paper version of comic books when I was a kid (Mostly Superman and Spiderman) and I’ve graduated up to the digital version now.  Comic books in digital format usually use the .cbz or .cbr file extension.  To read these in Windows or on my Linux desktop (I was running XFCE for the year or so) I had to use a specialized application…a comic reader…to do this.

The program I used in Linux was called Comix and it did a great job when I used XFCE.  I know you can also use Evince and I’m sure it does every bit a good job as Comix does.  Both are GTK applications though.  Since I now use KDE 4 on my primary workstation, I wanted to see if there was a Qt application that I could use and I was very disappointed when I didn’t find any.  So, there I was with comics in my Home Directory collecting dust with nothing preferable (read: Qt based) to open them up to read them.  I double clicked on one of them in frustration….and I was surprised when it opened right up.

Okular, the do-it-all reader for KDE4 opens up every comic book I throw at it.  I was saved…rather, my comic collection was saved.  Very handy that the KDE4 devs put in such a great tool to open so many formats.  So if you’re looking for something that can handle your comic collection, look no further than Okular which comes preinstalled with most KDE4 based distributions.

okular
Okular with PDF

Ubuntu 12.04, Amahi, and Linux Not Detecting Hard Disks

It’s been quite a long time since I’ve had this much trouble with Linux detecting a hard drive.  It brought me back to Ye Olde Linux days when 14 floppy disks housed your distribution and more times than not you didn’t have compatible hardware and had to find out via BBS what modem worked with what kernel…sometimes, it was a major pain…and that was the fun in it 🙂

In today’s installation of Linux…I thought I’d left those days behind.  I was wrong, unfortunately.

I downloaded Ubuntu 12.04 to install so that I could put Amahi on my video/picture/file/tv/movie share Linux machine.  Amahi is pretty much the best program on the face of the planet to use for this purpose…I’d put it up against any ‘samba-like’ distribution of Linux out there and I think it would come out on top.  Anyway, I went to install Ubuntu 12.04 and I immediately hit a problem:  it wasn’t detecting my hard drive.  I got out my notes for when I last installed an operating system on this server and it happened to be the last release of Amahi on Fedora…which was Fedora 14.  In that instance, I had to pass the nodmraid option in order for my hard drive to detect.

Easy enough.  I went into the Ubuntu options for booting.  Chose F6 and then selected nodmraid.  It booted fine and I went to a desktop.  Once there, I clicked the install icon.  Things were looking good until I went to the part of the installer where you choose a hard disk…which didn’t give me any hard disks.  I tried this process again and again…often times putting in other options such as noapic, nolapic and other awesome boot parameters using the F6 portion of the boot prompt.  No joy on any of these tries.  What could it be?

After a few minutes of brainstorming, I realized that Ubuntu wasn’t actually honoring the boot parameter for nodmraid.  Since this was the case, the hard drive wasn’t detecting.  In order to get the hard drive detecting, I should remove the dmraid information from my hard drive and see if this made a difference.  So, here’s how I fixed this problem:

  1. Instead of booting to install Ubuntu, select the option to Try it first
  2. Once there, hit up the dashboard, click on all applications, and search through all 78 until you find Terminal
  3. Once the terminal is up, type sudo su and hit enter.  You’re now root.
  4. type fdisk -l and take note of the letter designation of your hard drive that is having problems detecting (sda in my case).
  5. type dmraid -E -r /dev/sdX where ‘X’ is the letter designation of your hard drive.
  6. Answer yes to the question it asks of if you wish to remove the dmraid information on the drive.
  7. Reboot and Install Ubuntu.  It should now detect.

Not a hard thing to figure out…but it might be for some new users…and I’m almost certain Amahi users will run across this…because many of them are converts from Windows Home Server.  In this case, they’d probably be pretty freaked out having to drop down to a command line and issue commands.  Hopefully, this article will be a handy tool for them to use in order to get Ubuntu and subsequently, Amahi installed on their computer.  Thanks for reading!

Oddity with Delicious Bookmarks and RSS Feed

So today, bookmarks posted from delicious.com onto the Yet Another Linux Blog RSS feed.  This isn’t normal…I don’t post bookmarks from that service here…in fact, I haven’t used them since they were bought out.  I remember experimenting with bookmarks posting to your blog for the first month I had my delicious account…but never kept it on.

But suddenly, somebody’s bookmarks post and show up in the RSS feed here.  For that, I apologize to my RSS readers.  Rest assured, it shouldn’t happen again as I’ve deleted my delicious account.

Creating Symlinks – How and Why

As part of your Linux journey, you’ve probably heard of symlinks which are also known as symbolic links.  I figured that since I fixed an error using symbolic links to setup an environment to allow my son to learn program.  I am using something called HacketyHack which can be found here:  http://hackety.com

The problem is that on Ubuntu or Debian, the libssl and libcrypto libraries are out of date.  Hackety Hack’s program requires versions greater than 1.0.0 and 0.9.8 is installed.  The fix is of course a symbolic link.  But how do we do this and more importantly, WHY do we have to do this to fix it?  Let’s go through what they are first.

What is a Symbolic Link?

Look on your computers’ desktop right now.  If you’re like most people, you’ll have many shortcuts to different programs that you access daily.  On my Windows 7 machine at work, I have around 40-50 shortcuts to commonly used tools and places I access to accomplish my job.  Those are, in a nutshell, what symlinks are.  They’re pretty much just advanced shortcuts and with the case I’m going to present today…shortcuts without an icon.  Symlinks redirect a computer to an end location OR make a computer think the end location is where the shortcut is…and since they perform these 2 functions, there are 2 types of them.

  1. Hard Links
  2. Soft Links

Soft Link – When you click on/open a soft link, you’re redirected to the location it is pointing to.  For example, if you click on ‘My Documents’ on your desktop, you’re redirected to a path on the C: drive where your documents are stored.

Hard Link – A hard link makes the computer think that the shortcut is the actual end location.  So, using our ‘My Documents’ example above…the computer would look at the ‘My Documents’ shortcut and it would see it as the actual end location instead of a pointer to the end location.

What Would I Use a Symbolic Link For?

Do you use dropbox or box.net or any other cloud storage system to share files/store files/backup files?  Then a symbolic link might be a good option for you.  Imagine that you setup a folder on your desktop that is named ‘send-to CLOUD’ and when you drag and drop files to that folder, it sends it directly to those cloud storage systems.  This is something that symbolic links can accomplish.

Another case might be if you need files stored in 2 different locations.  Maybe you want to have settings files for an application be redirected to dropbox so that you can access it and use it on another computer.  As you can see, there are many different reasons for using symbolic links.

How Do I Setup a Symbolic Link?

In Linux, you use the command ‘ln’.  To setup a soft link, you use the -s flag like this:

ln -s /usr/lib/library.so.0.9.8 /usr/lib/library.so.1.0.0

So, in the example above, the file library.so.1.0.0 is LINKED or pointed back to the actual file library.so.0.9.8.  To setup a hard link you’d drop the -s flag:

ln /tmp /other/location/tmp

In the above example, your /tmp folder will now appear in 2 locations…both /tmp and the /other/location/tmp.  Please understand that /other/location/tmp has to actually exist <em>before</em> you issue the command.

To remove a symbolic link, just use the ‘rm’ command.  I usually use -rf as flags so that it recursively deletes and forces it to occur without confirmation but it is up to you:

rm /other/location/tmp

How Do I Fix Hackety Hack on Debian?

As promised, the solution to fixing Hackety Hack on Debian.  First, you need to find/locate the libraries that it complains about.  In the first error I received, it was looking for libssl.so.1.0.0.  I use the mlocate package which has the command ‘locate’ to find libssl.so as follows:

devnet@lostlap:~$ locate libcrypto
/lib/libssl.so.0.9.8
/usr/lib/libssl.so.0.9.8

The output tells me that there is a libssl.so.0.9.8 in two locations:  /usr/lib and /lib.  I’ll need to symbolically link both of those with a soft link so that when the program looks for the file libssl.so.1.0.0 it finds it and the link points it back to libssl.so.0.9.8.

sudo ln -s /usr/lib/libssl.so.0.9.8 /usr/lib/libssl.so.1.0.0


sudo ln -s /lib/libssl.so.0.9.8 /lib/libssl.so.1.0.0

Now that those to locations are created, we need to follow up with libcrypto which resides in the same two directories as libssl.

sudo ln -s /usr/lib/libcrypto.so.0.9.8 /usr/lib/libcrypto.so.1.0.0


sudo ln -s /lib/libcrypto.so.0.9.8 /lib/libcrypto.so.1.0.0

Now that both of those are linked to our actual ssl and crypto libraries, you can try running the file from Hackety Hack again.

For me, this fixed the initial two problems but I still have a failure when the installer does a hard check for OpenSSL 1.0.0 and unfortunately, I don’t have a complete solution for it yet.  So, I suppose I lied a bit with the ‘fix’ for Hackety Hack.  The above information is good though for other programs that might require libraries similar to the ones we linked.

Hopefully, you now have a decent understand of how and why to use symbolic links.

Security 101 – Passwords for the Web

In the past few weeks, I’ve come to realize 2 things.  First, the collegiate football (American) offseason is somewhat boring…bring on the SEASON!  Second, people’s Gmail accounts are getting hacked….a lot.  I’ve seen 2 of my friends have their accounts hacked in the past month and a half.

While there is nothing I can do about the first one, there is something I can do about the second.

I figured it might be a good idea to share how I generate passwords for web resources like Gmail and any other web based service.  I can do this in ANY browser…Opera, Chromium, and Firefox…and any operating system; because I use a tool called LastPass.

LastPass is a password vault for your browser.  It can remember any password you type on the web and it can also fill out forms for you (if you’d like).  I’ve been using it for about years now but have only recently taken advantage of their handy tools to generate passwords.  I’m going to walk you through setting it up in Firefox and generating passwords.  Hopefully, this will inspire you to change your password to something a little more complex to thwart hackers.

First of course, install the add-on/extension.  This process will differ depending on your browser.  Once LastPass is installed, make sure you sign up for an account or sign in to your existing one.  Remember, LastPass allows you to use a master password to keep a lock on your entire array of of websites you visit.  It takes security a step further by way of password generation.

Password Generation

You already have passwords for email, Facebook, Twitter, and other places on the web.  Is your password complex enough to thwart hackers attempts to crack it?  Most likely the answer is no…and if that’s the case, it would be a great idea to change your passwords to randomly generated ones and use last pass to remember it.  Imagine your password being the following:

hank65yankees

With LastPass it can become

S&Wllj98oCDFZ*

Which one seems harder for hackers to figure out to you?  So let’s get started.  During the installation for LastPass it should have told you how to access the menu…either through a standard menu or perhaps a button.  Once you access the LastPass menu, look for ‘tools’ and then choose ‘Generate Secure Password’.

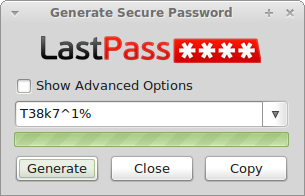
This should bring up the LastPass password generation tool.  It will look something like this:

LastPass Password GeneratorAs you can see, the generator is ready to randomly generate more passwords for you by clicking the ‘generate’ button and you can copy it to your clipboard with the ‘copy’ button.  However, 8 digit passwords (default setting) may not be good enough for you.  In that case, click the ‘Show Advanced Options’ toggle.  This will bring up the following options:

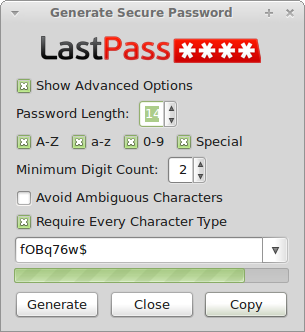
Advanced Options

As you can see, you can increase the number of digits for password length…I’ve increased mine to 14 characters…and you can increase the Minimum Digit Count.  I’ve done so and moved it up to 2 digits.  Customize it however you like and once you have it set the way you like it, you can click ‘close’.  The options will save for the next time you go to generate a password.

Changing the Password

Now it’s time for us to actually change a password.  How do we do this?  Well, if you already had a LastPass account, you can visit your password vault and search for the site you would like to change.  Once you find it, you can open up the password generator and generate a new password…then edit the site inside your password vault and paste the new password.  Your job isn’t over yet though as you need to go to the actual site and change the password there as well.

If you haven’t used LastPass before, just visit the site you would like to change the password at and login.  LastPass will detect that you’re logging in and will ask if you want to remember the site you just logged in to.  You should select ‘save site’.

After you’ve logged in, go to whatever password change link the site provides and go ahead and change the password using the LastPass password generation tool pictured above.  LastPass should detect that you’re changing the password and ask if you want to update the site.  Remember, you can always manually edit the password inside the LastPass Vault.

Why Generate Passwords

I’ve shown this process to people I work with in Information Technology and they scoff at this idea of having randomly generated passwords.  They often say ‘how will I remember the randomly generated password?’ and that’s the beauty of LastPass.  It remembers so you don’t have to.  Once I tell them this, they generally move onto the question ‘well, what do I do if LastPass isn’t installed on the computer I’m using?’ and once again, the solution is LastPass.  Just head over to www.lastpass.com and login using your account details.  You’ll be redirected to your online password vault.  You’ll be able to fully manage everything as if you were using the extension in your browser.  You’ll also be able to copy and paste passwords by clicking ‘edit’ on the sites and ‘show’ beside the password field.  Sure it’s a bit more work…but it’s also quite a bit more secure.

Don’t put your trust in things you think are difficult for hackers to guess…chances are, it isn’t that hard for them to do so…allow LastPass to randomly generate them for you.  That way, you’ll never have your email account hacked like my friends did these past few months…unless you really do want to support the sale of pharmaceuticals or would like to enhance certain appendages.  I hope this helps you to use secure passwords in the future!  If you have questions, please let me know in the comments and I’ll do my best to answer them!  Thanks for reading!

Creative Commons License
Except where otherwise noted, the content on this site is licensed under a Creative Commons Attribution-NonCommercial-ShareAlike 4.0 International License.