Fix VMWare Player Resolution with Solus (All Versions)

Beggars Can’t be Choosers

Recently, in my “all Windows all the time” job I have felt the need to have some virtual desktops on my Home PC that I can spin up in a few moments notice so that I can scratch the Linux itch.  Dual boot won’t work because I have to stay connected to my VPN and we don’t support Linux for this 🙁  Obviously, this is where virtualization software comes into play.

State of Virtualization 2020

However, virtualization software seems to want to make running a Linux desktop in 2020 problematic with their programs chock full of buginess.

Hyper-V?  Not if you run Windows Home and no support for graphics.  Not to mention, you’ll have to gut install it via powershell and when it fails, gut it via powershell and elect to go with another option.  Hyper-V is an afterthought by Microsoft now as well for desktop players.

How about Oracle Virtualbox?  It works great for simple things like Ubuntu and Debian…but you can no longer change resolutions for most because it doesn’t support older formats of Display drivers.  Often times for things like Solus, you boot to a black screen and can do little else, let alone install anything even with additions installed.

None of the aforementioned solutions are able to go full screen on every Linux distribution I take for a spin.

Enter VMware Player.

With some light hacking to get VMware tools installed on Solus, full screen magic can be had again.  I’m going to walk you through how to get any flavor of Solus up and running with VMware Tools installed and therefore, magnificent, full screen splendor.

VMWare Tools Installation on Solus

I’m going to assume you were able to get Solus installed on VMware Player and you’ve just booted up to a fresh desktop.  Install any updates required through the software center and if you need to reboot for a kernel update, please do so.

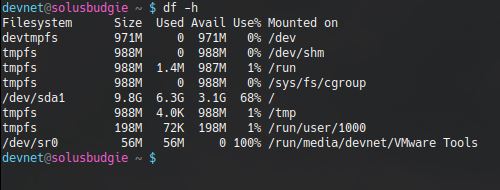
Once you’re at the desktop, select Player >> Manage >> Install VMware Tools.  Click “Yes” when prompted.  After this, launch a console and ensure that VMware Tools has mounted as a separate device (I use df- h to make sure it’s mounted).  If they haven’t mounted, launch the file explorer utility and click on the VMware Tools device in the left hand pane.  They should mount and you should be able to see them inside the console as follows:


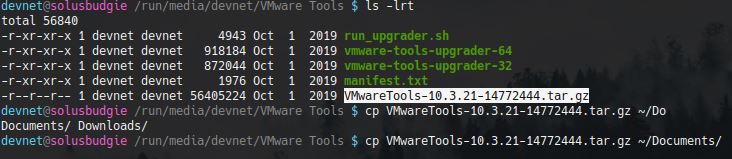
Navigate to that location and list the contents.  You should see a file named something like  “VMwareTools-10.3.21-14772444.tar.gz”.  Copy this file to a location of your choosing.  I copied it to my documents.


Next, unzip and untar the files:


Once the files are extracted, enter into the directory and run the following command (use sudo if you aren’t in root group like I am) to see what we need to do:


Follow the prompts pressing return for default values and you should hit a snag on the following:


So VMware Tools is looking for rc directories, but they don’t exist on Solus (for good reason!).  So let’s give VMware Tools what it wants.  Control-C to drop out of the installer and let’s create those files as root:


Run the installer again, pressing return for all defaults.  Let it fail on “Unable to copy the source file /usr/lib/vmware-tools/configurator/pam.d/vmtoolsd to the destination file /etc/pam.d/vmtoolsd

Since that path doesn’t exist, let’s create it


Now let’s run that command to install the tools again (vmware-install.pl) and select all defaults by pressing return.

VMware Tools should finish installing completely at this time.  Reboot the VM.  Log back in.

Attempt to change the resolution and things should be right as rain at this point in time…before the tools install, not so much.  Make sure in the VM settings in player that you have the 3D acceleration checkbox checked and you should have quite a nice experience running VM’s using VMware Player.

Questions? Concerns?  Please do let me know below and I’ll attempt to help in any way I can.  Opinions?  I like those too!  Let me know how crap I am below!  Thanks much for reading!

A Lightweight Low-Battery Warning Monitor for GTK+ 3.x desktops

A laptop’s battery gives us the comfort of storing power which we can use later. However, sometimes this comfort turns into pain.  For example, if we take our laptop with us, thinking that it’s charged (but it actually isn’t), or if we leave our laptop powered on and it silently turns off resulting in the loss of valuable work.

It is with this in mind that a programmer developed a simple battery monitor in Python with the following capabilities:

  1. The program should be customizable and lightweight.
  2. It should work in the background without any disturbance.
  3. It can allow the user to set a minimum charge threshold.
  4. Upon reaching that threshold, the program should not only display a desktop notification but also play a sound to force the user to plug in the charger.
  5. When the charger is connected, it should stop the notifications immediately but remain running to watch for future problems.

The program has been tested on Arch, Ubuntu and Mint, so, if this sounds like something you’d be interested in, why not give it a try!

How To Patch The Debian 6 Squeeze Shellshock Bug

Debian I run a few webservers at work that are internal facing only (intranet) that run Debian 6 Squeeze.  I’ve been monitoring the Shellshock exploit since it was discovered a few weeks ago and have been looking for a way to get those few systems patched…despite them existing only internally.  Patches for Squeeze-lts (long term release) were released quickly and then just a last week, another patch was put into play as well.  I decided to go ahead and patch these internal systems and since I couldn’t find much out there for blog posts on how to do it…I decided to share how I did it.

Difference Between Squeeze and Squeeze-lts

The difference between Squeeze general and Squeeze-lts is that the LTS (long term support) repositories will continue to receive backported patches from the current release tree (which is version 7 for Debian).  I didn’t originally install/setup these two internal servers so the first thing I have to do is get the version of Debian these servers are running and then check to see if they are using the LTS repositories.

Finding Your Version of Debian

lsb_release -a

This command returns a vanilla squeeze install for me.

Changing Repositories to LTS

Now to see which repositories are enabled.

nano /etc/apt/sources.list

You should open your sources list with your favorite text editor.  If you just have vanilla sources like the two servers I have you can just comment out the sources listed there and paste the following:


deb http://http.debian.net/debian/ squeeze main contrib non-free
deb-src http://http.debian.net/debian/ squeeze main contrib non-free

deb http://security.debian.org/ squeeze/updates main contrib non-free
deb-src http://security.debian.org/ squeeze/updates main contrib non-free

deb http://http.debian.net/debian squeeze-lts main contrib non-free
deb-src http://http.debian.net/debian squeeze-lts main contrib non-free

Now that your sources have changed, update and patch your system:

 apt-get update && apt-get upgrade && apt-get dist-upgrade

Checking To See if You still Vulnerable

You can use bash itself to see if you’re vulnerable to the bug.  Execute the following command:

env x='() { :;}; echo vulnerable' bash -c 'echo hello'

This should return the following if you are patched:

bash: warning: x: ignoring function definition attempt
bash: error importing function definition for `x'
hello

If you’re not patched…the word ‘vulnerable’ will appear in your results.

Further Reading on Shellshock

You can read further about how to switch to LTS repositories here:  https://wiki.debian.org/LTS/Using

For more reading on the Shellshock bug, how it is being exploited and the history/timeline, see here:  http://www.troyhunt.com/2014/09/everything-you-need-to-know-about.html

2 Amazing Google Reader Replacements You Haven’t Heard Of

It’s that time my friends.  Time for us all to shuffle ourselves off of Google Reader.  I’m very sad because I’ve used it every single day since it was offered to Google users.  It replaced BlogBridge, my favorite RSS client due to its lightweight server side always-available-on-every-platform appeal.  But it’s shutting down within the next few weeks.  These are sad times my friends.

We’ve all seen the discussions on sites like Lifehacker, PCWorld, and TechCrunch all claiming that there are multiple replacements and/or alternatives.  I’ve cycled through the gamut of them and found two relatively unknown gems I’d like to share with you.  I’ve used both of these for a couple of days and I can honestly say…depending on your focus when using a reader, they’re quite nice and can replace Google Reader completely for you…and chances are you haven’t heard of them.

Let me start by saying if you’re a fan of magazine style flipboard readers, nothing beats Feedly.  However, I don’t really think Feedly fits exactly with what Google Reader did.  So while I don’t mind using it for say, things to post on Pinterest…it’s not exactly what I need to get through tons of news quickly.  I find the magazine style pictures distracting when I attempt to make it through hundreds of feeds daily with a focus on news reading.  If you’re not like me, Feedly will work fine for you.  If you are like me, read on and I’ll show you 2 fantastic Reader replacements that you probably haven’t heard of.

InoReader, the Best I’ve Found

Let’s start with the best reader I’ve found to replace Google Reader…InoReader.  InoReader is a free online reader that allows unlimited feeds with a nice, minimalist UI.

InoReader

I can’t find anything wrong with the look and feel…it’s very comforting since it is very Google Reader-like.  There are some amazing options available…for instance, if you care little for social networks, you can disable anything social from appearing in your feeds:

DisableSocial

Other options you might be interested in is the ability to eliminate double posts.  This means that if you have a couple of feeds that feature redundant posts, this will eliminate one of them.  Handy if you read tons every single day:

ArticleFilterDouble

I’ve found the speed of displaying feeds to be fantastic…it’s every bit as fast as Google Reader was.  I’ve also found keyboard shortcuts to be functional and fast.  There are 2 feed layouts available and that is full articles (expanded view) and lined articles (list view).  This is perfect for someone with as many feeds as I have.

Do you want statistics?  InoReader has them.  It’s very comparable to Google Readers Trend section.

Inoreader StatsAll in all, I’ve found InoReader to be EXACTLY what I need in a Google Reader replacement.  I’m sure some people will find small, niggling things that stick out for them…but for me, it does everything I need it to.  I was able to import my Google Reader subscription file from Google Takeout in a matter of seconds…this in itself is head and shoulders above another reader I tried called “The Old Reader” which took 2 weeks to import my feeds.

InoReader also has a mobile version of its website that autosyncs with my feeds in the browser which is nice when I’m using my tablet or phone.  While there is no Android application as of the writing of this article, the mobile site is quite nice and simple and allows me to do everything I need to do and looks very similar to Google Reader’s mobile site.  There is a Chrome App also available in the Chrome Web Store.  Add things in like ability to search through your feeds, multilanguage support, as well as Pocket and Instapaper integration and you’ll understand why I think that this is the best Google Reader replacement available.

Final Verdict? It’s going to be sticking as my reader for a very long time.

Pros:  Fast, simple, good mobile experience, Android App due for release in July, Standalone login or Google authentication, uses own engine to drive feeds, sound alerts, desktop notifications, ability to change skins/themes.

Cons:  No tags yet (planned for later), Reordering of feeds not yet available (also planned), a few other small things detailed here.

Homepage:  http://inoreader.com

Red Tree Reader – Beauty in Simplicity

Maybe InoReader has too much going on for you.  If that’s the case, you’ll love the minimalist approach of Red Tree Reader.  Please be aware that Red Tree Reader is DEAD simple…as in, there are absolutely NO distractions or features that get in the way of your feeds.  The news is front and center.

red tree readerWith both whole article view (expanded) and a compact view (list) you can cycle through news quite quickly.  Red Tree Reader supports the same keyboard shortcuts you’ve come to know and love in Google Reader.  It’s creators GUARANTEE it is bug free…and you can read more about this nice minimal reader here.

If you’re looking for a reader that matches Google Reader but doesn’t attempt to plug into every social network on the planet while implementing whiz bang bells and whistles that you’ll never use or want to use, Red Tree Reader is for you.  I tried the mobile site in my phones browser and found it functional but all together NOT ideal.  If mobile RSS is your thing, give it a go and see what you think…I think this would work better on a tablet than on a phone.

My final verdict on this reader is that it will find a home with those of us who hate fluff and think content is king.

Pros:  Lightweight, fast, support for keyboard shortcuts, minimalistic, imports feeds quickly and imports google feeds in seconds, quick feed displays

Cons: Not for social network people, very plain and thus not for people who want anything flashy, can’t reorder feeds, no feed icons, mobile site isn’t the best feed experience at all but works.

Homepage:  http://redtreereader.com

Summary

These 2 RSS readers have a lot going for them and I haven’t seen any of the big tech news websites say anything about them.  This is really a shame because they’re two of the best ones I’ve found over the past few months since I started looking.  I hope this post helps you make a decision in your quest to replace Google Reader.  If you have further questions about these readers, I’ll do my best to answer them in the comments.  Thanks for reading!

Comic Books, Linux and KDE 4

Sometimes I read comic books.  I would hope that some of you do as well.  I collected the paper version of comic books when I was a kid (Mostly Superman and Spiderman) and I’ve graduated up to the digital version now.  Comic books in digital format usually use the .cbz or .cbr file extension.  To read these in Windows or on my Linux desktop (I was running XFCE for the year or so) I had to use a specialized application…a comic reader…to do this.

The program I used in Linux was called Comix and it did a great job when I used XFCE.  I know you can also use Evince and I’m sure it does every bit a good job as Comix does.  Both are GTK applications though.  Since I now use KDE 4 on my primary workstation, I wanted to see if there was a Qt application that I could use and I was very disappointed when I didn’t find any.  So, there I was with comics in my Home Directory collecting dust with nothing preferable (read: Qt based) to open them up to read them.  I double clicked on one of them in frustration….and I was surprised when it opened right up.

Okular, the do-it-all reader for KDE4 opens up every comic book I throw at it.  I was saved…rather, my comic collection was saved.  Very handy that the KDE4 devs put in such a great tool to open so many formats.  So if you’re looking for something that can handle your comic collection, look no further than Okular which comes preinstalled with most KDE4 based distributions.

okular
Okular with PDF

Creating Symlinks – How and Why

As part of your Linux journey, you’ve probably heard of symlinks which are also known as symbolic links.  I figured that since I fixed an error using symbolic links to setup an environment to allow my son to learn program.  I am using something called HacketyHack which can be found here:  http://hackety.com

The problem is that on Ubuntu or Debian, the libssl and libcrypto libraries are out of date.  Hackety Hack’s program requires versions greater than 1.0.0 and 0.9.8 is installed.  The fix is of course a symbolic link.  But how do we do this and more importantly, WHY do we have to do this to fix it?  Let’s go through what they are first.

What is a Symbolic Link?

Look on your computers’ desktop right now.  If you’re like most people, you’ll have many shortcuts to different programs that you access daily.  On my Windows 7 machine at work, I have around 40-50 shortcuts to commonly used tools and places I access to accomplish my job.  Those are, in a nutshell, what symlinks are.  They’re pretty much just advanced shortcuts and with the case I’m going to present today…shortcuts without an icon.  Symlinks redirect a computer to an end location OR make a computer think the end location is where the shortcut is…and since they perform these 2 functions, there are 2 types of them.

  1. Hard Links
  2. Soft Links

Soft Link – When you click on/open a soft link, you’re redirected to the location it is pointing to.  For example, if you click on ‘My Documents’ on your desktop, you’re redirected to a path on the C: drive where your documents are stored.

Hard Link – A hard link makes the computer think that the shortcut is the actual end location.  So, using our ‘My Documents’ example above…the computer would look at the ‘My Documents’ shortcut and it would see it as the actual end location instead of a pointer to the end location.

What Would I Use a Symbolic Link For?

Do you use dropbox or box.net or any other cloud storage system to share files/store files/backup files?  Then a symbolic link might be a good option for you.  Imagine that you setup a folder on your desktop that is named ‘send-to CLOUD’ and when you drag and drop files to that folder, it sends it directly to those cloud storage systems.  This is something that symbolic links can accomplish.

Another case might be if you need files stored in 2 different locations.  Maybe you want to have settings files for an application be redirected to dropbox so that you can access it and use it on another computer.  As you can see, there are many different reasons for using symbolic links.

How Do I Setup a Symbolic Link?

In Linux, you use the command ‘ln’.  To setup a soft link, you use the -s flag like this:

ln -s /usr/lib/library.so.0.9.8 /usr/lib/library.so.1.0.0

So, in the example above, the file library.so.1.0.0 is LINKED or pointed back to the actual file library.so.0.9.8.  To setup a hard link you’d drop the -s flag:

ln /tmp /other/location/tmp

In the above example, your /tmp folder will now appear in 2 locations…both /tmp and the /other/location/tmp.  Please understand that /other/location/tmp has to actually exist <em>before</em> you issue the command.

To remove a symbolic link, just use the ‘rm’ command.  I usually use -rf as flags so that it recursively deletes and forces it to occur without confirmation but it is up to you:

rm /other/location/tmp

How Do I Fix Hackety Hack on Debian?

As promised, the solution to fixing Hackety Hack on Debian.  First, you need to find/locate the libraries that it complains about.  In the first error I received, it was looking for libssl.so.1.0.0.  I use the mlocate package which has the command ‘locate’ to find libssl.so as follows:

devnet@lostlap:~$ locate libcrypto
/lib/libssl.so.0.9.8
/usr/lib/libssl.so.0.9.8

The output tells me that there is a libssl.so.0.9.8 in two locations:  /usr/lib and /lib.  I’ll need to symbolically link both of those with a soft link so that when the program looks for the file libssl.so.1.0.0 it finds it and the link points it back to libssl.so.0.9.8.

sudo ln -s /usr/lib/libssl.so.0.9.8 /usr/lib/libssl.so.1.0.0


sudo ln -s /lib/libssl.so.0.9.8 /lib/libssl.so.1.0.0

Now that those to locations are created, we need to follow up with libcrypto which resides in the same two directories as libssl.

sudo ln -s /usr/lib/libcrypto.so.0.9.8 /usr/lib/libcrypto.so.1.0.0


sudo ln -s /lib/libcrypto.so.0.9.8 /lib/libcrypto.so.1.0.0

Now that both of those are linked to our actual ssl and crypto libraries, you can try running the file from Hackety Hack again.

For me, this fixed the initial two problems but I still have a failure when the installer does a hard check for OpenSSL 1.0.0 and unfortunately, I don’t have a complete solution for it yet.  So, I suppose I lied a bit with the ‘fix’ for Hackety Hack.  The above information is good though for other programs that might require libraries similar to the ones we linked.

Hopefully, you now have a decent understand of how and why to use symbolic links.

Creative Commons License
Except where otherwise noted, the content on this site is licensed under a Creative Commons Attribution-NonCommercial-ShareAlike 4.0 International License.