Security 101 – Passwords for the Web

In the past few weeks, I’ve come to realize 2 things.  First, the collegiate football (American) offseason is somewhat boring…bring on the SEASON!  Second, people’s Gmail accounts are getting hacked….a lot.  I’ve seen 2 of my friends have their accounts hacked in the past month and a half.

While there is nothing I can do about the first one, there is something I can do about the second.

I figured it might be a good idea to share how I generate passwords for web resources like Gmail and any other web based service.  I can do this in ANY browser…Opera, Chromium, and Firefox…and any operating system; because I use a tool called LastPass.

LastPass is a password vault for your browser.  It can remember any password you type on the web and it can also fill out forms for you (if you’d like).  I’ve been using it for about years now but have only recently taken advantage of their handy tools to generate passwords.  I’m going to walk you through setting it up in Firefox and generating passwords.  Hopefully, this will inspire you to change your password to something a little more complex to thwart hackers.

First of course, install the add-on/extension.  This process will differ depending on your browser.  Once LastPass is installed, make sure you sign up for an account or sign in to your existing one.  Remember, LastPass allows you to use a master password to keep a lock on your entire array of of websites you visit.  It takes security a step further by way of password generation.

Password Generation

You already have passwords for email, Facebook, Twitter, and other places on the web.  Is your password complex enough to thwart hackers attempts to crack it?  Most likely the answer is no…and if that’s the case, it would be a great idea to change your passwords to randomly generated ones and use last pass to remember it.  Imagine your password being the following:

hank65yankees

With LastPass it can become

S&Wllj98oCDFZ*

Which one seems harder for hackers to figure out to you?  So let’s get started.  During the installation for LastPass it should have told you how to access the menu…either through a standard menu or perhaps a button.  Once you access the LastPass menu, look for ‘tools’ and then choose ‘Generate Secure Password’.

This should bring up the LastPass password generation tool.  It will look something like this:

LastPass Password Generator
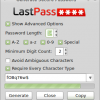
As you can see, the generator is ready to randomly generate more passwords for you by clicking the ‘generate’ button and you can copy it to your clipboard with the ‘copy’ button.  However, 8 digit passwords (default setting) may not be good enough for you.  In that case, click the ‘Show Advanced Options’ toggle.  This will bring up the following options:

Advanced Options

As you can see, you can increase the number of digits for password length…I’ve increased mine to 14 characters…and you can increase the Minimum Digit Count.  I’ve done so and moved it up to 2 digits.  Customize it however you like and once you have it set the way you like it, you can click ‘close’.  The options will save for the next time you go to generate a password.

Changing the Password

Now it’s time for us to actually change a password.  How do we do this?  Well, if you already had a LastPass account, you can visit your password vault and search for the site you would like to change.  Once you find it, you can open up the password generator and generate a new password…then edit the site inside your password vault and paste the new password.  Your job isn’t over yet though as you need to go to the actual site and change the password there as well.

If you haven’t used LastPass before, just visit the site you would like to change the password at and login.  LastPass will detect that you’re logging in and will ask if you want to remember the site you just logged in to.  You should select ‘save site’.

After you’ve logged in, go to whatever password change link the site provides and go ahead and change the password using the LastPass password generation tool pictured above.  LastPass should detect that you’re changing the password and ask if you want to update the site.  Remember, you can always manually edit the password inside the LastPass Vault.

Why Generate Passwords

I’ve shown this process to people I work with in Information Technology and they scoff at this idea of having randomly generated passwords.  They often say ‘how will I remember the randomly generated password?’ and that’s the beauty of LastPass.  It remembers so you don’t have to.  Once I tell them this, they generally move onto the question ‘well, what do I do if LastPass isn’t installed on the computer I’m using?’ and once again, the solution is LastPass.  Just head over to www.lastpass.com and login using your account details.  You’ll be redirected to your online password vault.  You’ll be able to fully manage everything as if you were using the extension in your browser.  You’ll also be able to copy and paste passwords by clicking ‘edit’ on the sites and ‘show’ beside the password field.  Sure it’s a bit more work…but it’s also quite a bit more secure.

Don’t put your trust in things you think are difficult for hackers to guess…chances are, it isn’t that hard for them to do so…allow LastPass to randomly generate them for you.  That way, you’ll never have your email account hacked like my friends did these past few months…unless you really do want to support the sale of pharmaceuticals or would like to enhance certain appendages.  I hope this helps you to use secure passwords in the future!  If you have questions, please let me know in the comments and I’ll do my best to answer them!  Thanks for reading!

Conky Always on Top Fix in Openbox

I hit a snag recently when installing Openbox on the newest Alpha2 for Unity Linux.  I initiated Conky in my autostart.sh and it was always on top…of everything on my desktop.  That’s not a good thing when you’re trying to browse the web with your Conky layout on top of your browser.  After thinking about some of the settings, I thought maybe that own_window setting might be good to play around with in conky settings…however, after a few tries, that didn’t pan out and fix this problem.

I recalled something similar with wbar in Openbox…it would draw itself on top only and have a large black box around it.  No matter what I tried, I couldn’t get it to not display the bar nor get it to stop displaying on top.  I eventually would have to kill the PID and restart the program; then I tried something…on accident actually…pypanel, my previous panel, displayed so fast I had to make it sleep to avoid problems.  So I just replaced pypanel with wbar and let it go.  Wouldn’t you know it, Wbar displayed fine and in all it’s glory after that.

I tried the same with Conky and I am happy to report it works just fine to solve the “always on top” issue.  To make a task sleep before running in your autostart.sh, alter it as follows:

(sleep 6 && program) &

Where 6 is the number of seconds you want things to sleep and program is the program you wish to run.  Hopefully this helps a few people out…it threw me for a loop for a while before I was able to solve it.  Gratuitous and obligatory screenshot is below:

openbox and conky
openbox, conky & tint2

Some Random Helpful Hints

I’ve been slowly collecting a few commands that are useful to me for various things while using Linux.  I figured that I would share some of these handy commands.  In no particular order, they are:

To copy, preserving permissions AND structure AND recursively, from a remote system to your local system:

rsync -r -a -v -e ssh server1.address.com:/dir/youwant/to/copy/ /local/location/for/directory/

Please note that the code above assumes that you are using key based authentication and not password.  For password based authentication, it would look more like this:

rsync -r -a -v -e ssh remoteuser@server1.address.com:/dir/youwant/to/copy/ /local/location/for/directory/

To remove all files matching a certain extension (xml in my example) in a directory:

find . -type f -name "*.xml" -exec rm -f {} \;

To go into a location, find all files that match a certain extension (jpg in my example) and move them to a different directory:

find . -name "*.jpg" | xargs -i mv '{}' /location/to/move/them/to/ 

To recursively remove empty directory from the directory you are currently in (your pwd):

find -depth -type d -empty -exec rmdir {} \;

These are a few of the commands that I’ve found useful in the past few weeks.  I hope you find them useful as well.  I’ll be test driving quite a few different distributions and reporting back what I find as well as experimenting with various different commands…I really like find because it is so powerful so look for some more posts with uses of the find command.  Thanks for reading and sorry for my lapse in posting this past month!

Install Firefox 4 on Linux Mint Debian Edition (LMDE)

I am testing out Linux Mint Debian Edition (LMDE) and wanted to benefit from Firefox 4 and all its speediness.  It’s not available in the repositories and since LMDE uses Firefox and NOT Iceweasel, you really can’t install it from the Mozilla Debian repository.  So, I decided to manually install things.

Normally I don’t like to manually install things outside the repository because when updates are pushed, there is no upstream source to differentiate from…so your chances of running outdated software increase unless you are vigilant.  Luckily, I consider myself vigilant.  Unfortunately, I’m not as vigilant as I consider myself to be…so I’ve added in reminders for myself on my Google calendar to check for Firefox 4 updates.

So, here’s how to get Firefox 4 onto your LMDE desktop…First, uninstall the version of Firefox you have using Synaptic or the software center.  Open a terminal up and let’s get started.

Create a temporary directory to house a downloaded and unzipped Firefox:

cd ~/ && mkdir tmp && cd tmp/

Next, let’s download and unzip it (please note this is for en-US version only…you’ll have to adjust the URL for diff. languages):

32bit

wget http://releases.mozilla.org/pub/mozilla.org/firefox/releases/latest-4.0/linux-i686/en-US/firefox-4.0.tar.bz2

64bit

wget http://releases.mozilla.org/pub/mozilla.org/firefox/releases/latest-4.0/linux-x86_64/en-US/firefox-4.0.tar.bz2

Now let’s unzip and extract it:

tar -xvjf firefox*.tar.bz2

Now let’s move the newly extracted items to /usr/local so it can be used by the system:

sudo mv firefox /usr/local/firefox4

Now we need to create a link so that applications calling firefox 4 access it correctly:

sudo ln -s /usr/local/firefox4/firefox /usr/local/bin/firefox4

Ok, the hard part is done…but you don’t have a menu entry for it nor a shortcut you can execute.  Let’s do that now.  Right click your mint menu and choose “edit menu”.  Now, select the “Internet” menu in the left hand pane.  Click the “New Item” button.  The following window will pop up…fill it in with the information contained in the picture below:

The command line should be (remember the link we made above? let’s use it!):

/usr/local/firefox4/firefox %u

launcher properties

Notice in the picture above the Firefox icon is present…yours most likely isn’t.  In order to set the icon, click the area where it appears above and then select the following image:

When you’re finished, click close.  Firefox 4 should now appear under “Internet” in your Mint Menu.  You can now right click that item and add it to your favorites if you wish.

Now let’s make sure you list Firefox 4 as the default web browser for Gnome.  Do this by opening up the control center in the Mint Menu.  Select “Preferred Applications” inside the control center.  Make sure that you choose ‘custom’ in the drop down menu shown below and the path for the command will be the same as it was for your launcher but instead of a %u you can use a %s at the end of the command (as shown in the picture below):

preferred applications

That should be everything you need to have a good Firefox 4 experience in LMDE.  To uninstall things, you can simply delete the menu items and then delete the directories we created during the install process.

Hopefully this will help those of you out there who want Firefox 4 on your LMDE install!

Chasing Your ‘Tail’ With Linux

‘GNU tail’ is a small utility which prints (by default) the last 10 lines of any file. This an amazing piece of software not only allows you to see the last part of a file but also enables you to monitor a file’s changes without opening the file.

‘tail’ can be used alone or can be combined with other commands like ‘grep’, ‘ls’ etc.

To use ‘tail’, let’s first create a text file. You can create the file by issuing following command in terminal;

touch my_file

Now open my_file with your favorite text editor (nano in my case) and write some lines. For this article, I have written the following 15 lines;

this is the 1st line
this is the 2nd line
this is the 3rd line
this is the 4th line
this is the 5th line
this is the 6th line
this is the 7th line
this is the 8th line
this is the 9th line
this is the 10th line
this is the 11th line
this is the 12th line
this is the 13th line
this is the 14th line
this is the 15th line

Now issue the following command in terminal;

tail my_file

It will print the last 10 lines which would be the “this is the 6th line” through “this is the 15th line”.

You can control the number of lines which ‘tail’ will print. You can either increase or decrease the number of lines. For example, if you want ‘tail’ to show only last 3 lines, you can do this by issuing the following command;

tail -n 3 my_file

Now it will print only last 3 lines. You can use any number of lines instead of 3. Or you can use a plus sign like;

tail -n+7 my_file

‘tail’ will start printing from 7th line to the end of the file.

You can view the desired file with respect to size. Issue the following command in terminal;

tail -c 14 my_file

And it will show the output of last 14 bytes. In my case, the output was;

the 15th line

‘tail’ not only displays the static output of a file but it can also monitor the file for changes. A ‘-f’ option is used with ‘tail’ and it starts acting like a monitoring tool which not only displays the last few lines but also constantly updates the output as the file changes. Here is a very popular example;

tail -f /var/log/message

‘tail’ will print the last 10 lines of ‘message’ file. If you now plug-in you USB stick, you will notice that the change in ‘message’ file will instantly be reported by ‘tail’. To release the cursor press Ctrl+c.

There are many other useful options which you can use with ‘tail’ like;

tail -q my_file        # never output headers
tail -v my_file        # always outputs headers

You can combine ‘tail’ with other utilities like ‘ls’, ‘grep’, ‘head’ etc.

You can combine ‘tail’ with ‘grep’ to get lines with some specific ‘word’.

tail -n 5 my_file | grep 14

It will print only those lines out of last 5 which contains the word ’14’. In my case the output was:

this is 14th line # ’14’ will be highlighted

‘tail’ can also be combined with ‘ls’ to get the list of last few files/folders. For example, if you issue the following command;

ls -l | tail -n 2

It will give a long listing of files/folders but will show the last 2 entries of the working directory.

These are just two examples of combining ‘tail’ with other utilities. There are countless examples of combination of ‘tail’ and other softwares.

‘GNU tail’ is a very handy tool. It can output any amount of data depending upon the options used. It makes the work of an ordinary user much easer and helps him/her find information in files more efficiently. To become an expert in Linux, this is a mandatory utility over which a user must have complete mastery. Hopefully, this tutorial gets you started chasing your tail!

Using ‘Alias’ in Linux

There comes a time in every Linux users’ life when you will open the Terminal more often than not because you have realized that it is faster, more efficient and more powerful than GUI (Graphical User Interface).  You’ll have started to learn more and more commands and now feel more comfortable with command prompt.  The command prompt is all about commands – short commands as well as long commands.  If you are like me then you may not like to type the long commands (or even small commands) 🙂

You may be thinking about some way to avoid typing commands over and over. Enter the ‘alias’.

The ‘alias’ tool is a way to make the complicated things simple (and simple things simpler). You can use ‘alias’ instead of long (or even short) commands.  Now let’s see how the ‘alias’ works.

‘alias’ can make difficult and lengthy commands easy. The general format of ‘alias’ is:

alias Any_Word=”Command”

It means you linked an existing command to a (New) Word. This ‘Any_Word’ may contain anything – any alpha-numeric symbol, ‘Any_Word’ as well as ‘Command’ are interchangeable and can be used for the same purpose.

Simple Commands Made Simpler

As an example, ‘ls -l’  is used for listing directory contents in ‘long listing format’. This ‘ls -l’ can be replaced with a simpler alias. You can set the ‘alias’ for ‘ls –l’ as follows:

alias ll=”ls –l”

Now you just have to type ‘ll’ (without quotes) to get ‘long listing format’.

Or if you frequently misspell ‘ls’ as ‘sl’ and don’t want to install ‘sl’ package, then, you can use the following alias:

alias sl=”ls”

Now, whenever you type ‘sl’ in terminal, it will give you same results as ‘ls’.

Now consider even simpler example. To close a Terminal (or logout), you have to type ‘exit’ in Terminal. This ‘exit’ command can be made even simpler by using the following ‘alias’:

alias x="exit"

Now, you only have to type ‘x’ in Terminal to ‘exit’

Other examples of ‘alias’ are:

alias cp="cp -iv"
#make copy operation interactive and verbose
alias rm="rm -iv"
#make remove operation interactive and verbose
alias mv="mv -iv"
#make move operation interactive and verbose

Make Package Management A Bit Simpler

If you use Debian (or its derivatives) then you will be familiar with APT.  It is an excellent package manager.

In Ubuntu, to install software using APT, you have to use the following command:

sudo apt-get install <sofware_name>

It is a long command and consumes a lot of your time and energy 🙂

You can shorten this command by using ‘alias’.  Issue the following command in Terminal:

alias Install=”sudo apt-get install”

You can obviously use your own word instead of ‘Install’.

Now, you just have to type:

Install <software_name>

to install the (same) software. Simple, isn’t it?

You can simplify other aspects of APT. For example, you can use the following ‘alias’:

alias Remove=”sudo apt-get remove”

to uninstall a software.

Some other examples of attaching APT with ‘alias’ are:

alias Update=”sudo apt-get update”
alias Upgrade=”sudo apt-get upgrade”
alias Search=”apt-cache search”
alias Autoremove=”sudo apt-get autoremove”
alias Autoclean=”sudo apt-get autoclean”
alias Purge=”sudo apt-get remove –purge”

and so on…

A Very Interesting ‘alias’ For A Difficult Keyboard Button

On some keyboards, the dot (.) button is at very difficult position and if you have to use it more than once, it becomes even more difficult.  That’s why ‘cd ..’ is the command which I mistype the most.  This complication can be easily removed by using following ‘alias’ (you can use any other word instead of a dot):

alias .=”cd ..”
alias ..=”cd ../..”
alias ...=”cd ../../..”
alias ....=”cd ../../../..”

Using Internet From Terminal

If you regularly use lynx to browse the internet in terminal then you have to type long urls with lynx to visit the web pages.  You can simplify these long urls by using ‘alias’:

alias Google=”lynx http://www.google.com/”
alias Yahoo=”lynx http://www.yahoo.com/”
alias yalb =”lynx http://linux-blog.org/”

and so on…

Now just type Google, Yahoo or yalb to visit the respective web sites.

Simple ‘alias’ For More Complicated Commands

Long commands are not only difficult to remember but also take more time to type; when you have to use them on daily basis, you become frustrated when typing them again and again and again… So, ‘alias’ are more suitable for long and complicated commands.

Let’s consider an example.

To find the top 10 largest files in your system, you can set the following ‘alias’:

alias top10files=”find . -type f -exec ls -sh {} \; | sort -n -r | head -10”

You can even mix different commands with ‘alias’.  For instance, if you regularly use ‘tail’ and direct its output to file to later view that file, you can set a very simple ‘alias’ to do this cumbersome operation in 1 word:

alias Tail=”tail /var/log/messages > hello.txt;cat hello.txt”

Now just enter ‘Tail’ and viola! All is done at once.

You can use any file with tail and direct its output and you can even use ‘nano’ or ‘vi’ to view/edit its output.

Here’s another example… ‘alias’ to connect to a remote server:

alias any_name=”ssh <remote_server_address> -l <username> -p <port>”

You can even create ‘alias’ for your bash scripts, like:

alias clc=”sh /home/user/myscripts/calc.sh”

Now that you have set a few different ‘alias’  you might want to check that which ‘alias’ are set on your system.  To do that, just issue the following command:

alias

and it will list all the set ‘alias’ you have.

To remove an ‘alias’, just issue the ‘unalias’ command, like:

unalias Google

and now typing Google in terminal will do nothing (as it was set with lynx).

To remove all the ‘alias’, issue the following command and all the ‘alias’ are gone:

unalias –a

We have discussed the way of setting the ‘alias’ for different kinds of commands.  But setting ‘alias’ in this way be temporary.  When you reboot you PC, all the ‘alias’ which you have set will be gone.  This does not mean that you have to set all the ‘alias’ every time you boot your PC.  If you have set an ‘alias’ and you liked it so much that you want it to permanently reside in you PC, just add this alias in ‘.bashrc’ file in you home directory. For example, if you want ‘alias’:

Install <software_name>

to permanently reside in your PC then user your favorite text editor and add the following line in your ‘~/.bashrc’ file:

alias Install=”sudo apt-get install”

Now this ‘alias’ will not vanish into thin air when you reboot your PC. Only those ‘alias’  which are listed in ‘~/.bashrc’ file will be permanent.

This guide is just a preview about ‘alias’.  It is just about basic ways of using ‘alias’ to make your life simpler.  ‘GNU alias’ is a tool which can simplify your life immensely.  But unfortunately this tool is not given the attention it deserves.  In short, it is such a powerful tool that if you give it proper time, it can make you forget typing 🙂

Creative Commons License
Except where otherwise noted, the content on this site is licensed under a Creative Commons Attribution-NonCommercial-ShareAlike 4.0 International License.