I love CrunchBang Linux. In my opinion, it’s one of the best distributions of Linux for older computers (heck, any computer) that is actively developed.
I pieced together a Gateway M250 laptop a year or so ago (3 bad ones parted out into 1 good one) and loaded it up with max RAM (2GB). It’s now a handy little 14 inch laptop with a 1.73Ghz single core Centrino processor. Not bad…but when playing videos or streaming them, it can really struggle. So keeping the operating system lightweight on it is a definite must.
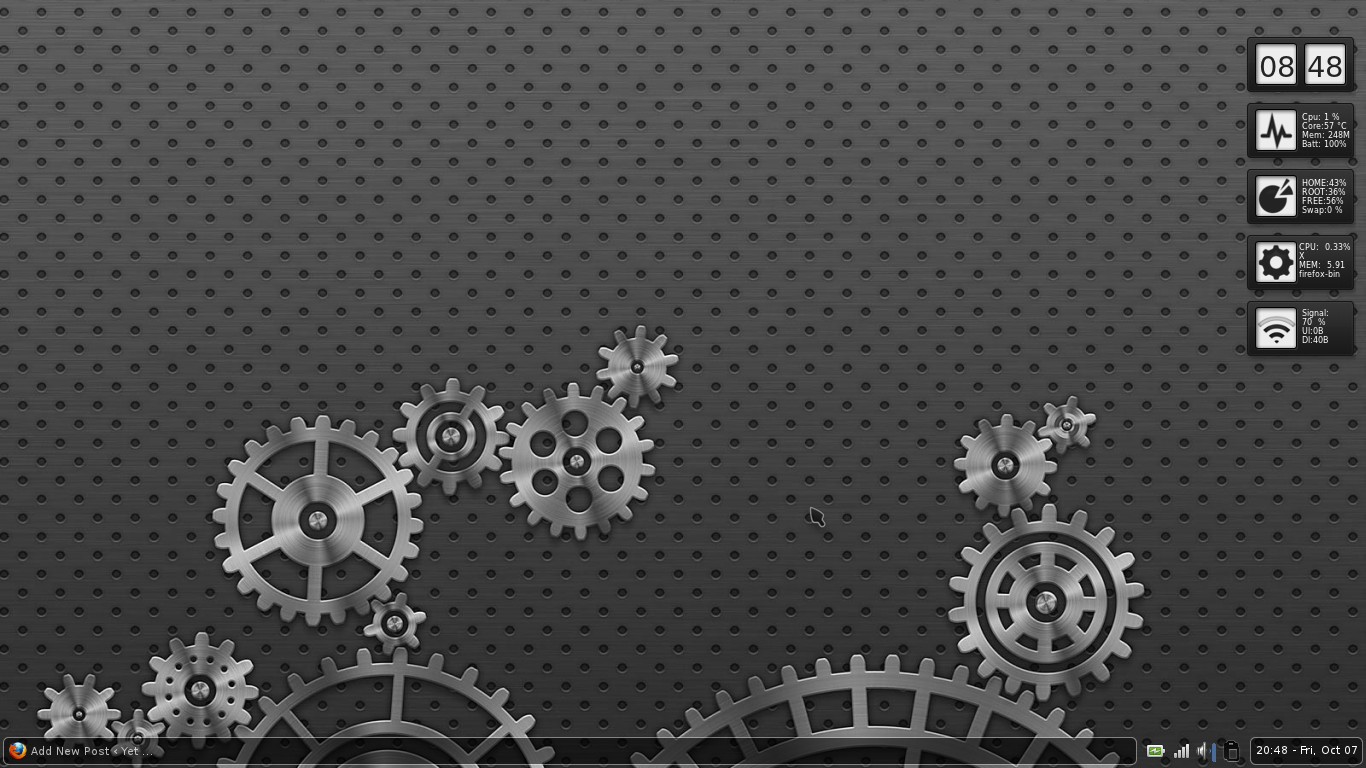
Enter, CrunchBang. It’s small and fast. It’s elegant and slick. Just look at this screenshot:
Simple and sleek, CrunchBang gives feelings of order and uniformity while breaking the speed limit signs. I’d like to take some time to show you why I feel CrunchBang Linux should be the next distribution of Linux you put on your laptop. Let’s get started…
In the screenshot above we find the login screen that greets you after installing CrunchBang. It’s very basic and sleek…it gives the impression that CrunchBang has things together. It’s impressive but you won’t get to the most impressive portion of CrunchBang Linux until you login for the first time after installing. I’m going to assume that you already have CrunchBang installed and are booting it for the first time in this review since the install is very easy to do. After the installation, you’ll be greeted by a command line first run wizard (see below):
This wizard will take you through a plethora of tasks…including, but not limited to, getting you connected to the internet, installing development tools, installing web server tools, installing software development tools, and of course…updating your install. You’ll be able to select each that you want to perform or skip each depending on your need/desire. THIS is how a first run wizard should be.
This wizard is just a simple script but it does more in the first few minutes for new users than any first run wizard I’ve ever seen. In my opinion, this tool puts CrunchBang head and shoulders above just about any other distribution of Linux out there. This lightweight approach to things permeates the entire install.
Now that you’ve made it through the first run wizard, we can explore the various applications installed by default. For a list, please see the CrunchBang wiki entry. I’ve found that there is a lightweight replacement for everything I’m accustomed to. You access these applications by right clicking ON the desktop…which is the standard way to do this using the Openbox window manager.
As you can see, there is a well organized menu structure for the applications that are installed and the appearance provides a uniform appearance just like all other areas of the distro do. The theme is modern and elegant and continues throughout the menu structure.
Are you a Firefox, Opera or Chromium fan? Doesn’t matter. Install scripts are provided inside the menu to get you the right browser right away. Just a small detail that shows the creator of the distro isn’t thinking about only themselves but rather, the standard user.
I recommend CrunchBang Linux for ANYONE out there…regardless of skill level…who wants a lightweight, complete, and polished distribution of Linux with very few hassles.
I hit a snag recently when installing Openbox on the newest Alpha2 for Unity Linux. I initiated Conky in my autostart.sh and it was always on top…of everything on my desktop. That’s not a good thing when you’re trying to browse the web with your Conky layout on top of your browser. After thinking about some of the settings, I thought maybe that own_window setting might be good to play around with in conky settings…however, after a few tries, that didn’t pan out and fix this problem.
I recalled something similar with wbar in Openbox…it would draw itself on top only and have a large black box around it. No matter what I tried, I couldn’t get it to not display the bar nor get it to stop displaying on top. I eventually would have to kill the PID and restart the program; then I tried something…on accident actually…pypanel, my previous panel, displayed so fast I had to make it sleep to avoid problems. So I just replaced pypanel with wbar and let it go. Wouldn’t you know it, Wbar displayed fine and in all it’s glory after that.
I tried the same with Conky and I am happy to report it works just fine to solve the “always on top” issue. To make a task sleep before running in your autostart.sh, alter it as follows:
(sleep 6 && program) &
Where 6 is the number of seconds you want things to sleep and program is the program you wish to run. Hopefully this helps a few people out…it threw me for a loop for a while before I was able to solve it. Gratuitous and obligatory screenshot is below:
I was running Unity Linux 2010.2 with KDE 4.5 for around the last month. I really like what has been done there but it seemed a bit heavy for my Gateway M250…the CPU fan was always on which told me it was always in high use.
I checked out Gnome 2.30 on Unity and found it to be delightful on my resources; however, Gnome doesn’t make me feel warm and tingly when I use it. I find myself frustrated with its lack of configuration options…specifically, right click menu. So I rolled my own using the base install of Unity. That worked quite nicely but lacked much of the polish I became accustomed to when using KDE. What I wanted and needed was a happy medium. I found that happy place with TinyMe Linux.
TinyMe is based on Unity Linux 2010 and was previously based on PCLinuxOS. It uses LXPanel, PCManFM and the Openbox Window Manager to handle the heavy desktop lifting. The ISO I used was a release candidate and lacked much of the polish of the TinyMe stable release of the past. Even though it’s a release candidate, I still found it quite stable and usable…especially since I know my way around the openbox window manager.
After a few adjustments of adding my favorite programs I was in business.
TinyMe RC 2010
Even without some of the programs that made TinyMe famous (like the TinyCC) this distro is both stable and robust which is a testament to the underlying Unity Linux core. If this release candidate is any indication, look for GREAT things to come from TinyMe 2010’s full release…something I will be looking forward to!
My friend Og Maciel originally introduced me to Openbox a while back and I’ve been using it ever since. I love the lightweight feel, the ability to customize and the center around having NO icons on my desktop. I don’t feel cluttered when I work! Today, we’re going to go over installing Openbox with some added tools. This tutorial is tailored for Foresight Linux but the guide may very well serve other distros as well.
What is Openbox?
From the Openbox homepage, “Openbox is a minimalistic, highly configurable, next generation window manager with extensive standards support.” From using it, I often think of it as fluxbox-like with the benefits of being able to dip into Gnome or KDE for the items that I want to use. Your desktop will then run with speed and simplicity using only the elements you want to use with it.
So…Let’s get Started…
This How-To will assume that you’re running Foresight Linux, you’re logged into Gnome and that you’re familiar with conary, the package manager for Foresight. First and foremost, install openbox:
This installs the needed components to run Openbox on your system. Openbox is minimal by default though so if you login to the environment now for the first time, there will be no taskbars, nothing…just a large blank area for you to work with. We will need to install some extra components to give a bit more functionality. If you’d like a panel menu, I recommend using tint2. I used to use pypanel which is a small panel written in python but this panel is no longer developed.
There are other panels that are packaged with openbox in mind for Foresight; fbpanel is available, which is a very fast and functional menu bar. I like lxpanel also, which is fbpanel with some easier configuration options. For a full list, please see openbox documentation. For our purposes here, we will install tint2:
Now we need to copy the default configuration file for tint2 so we can build our panel to our liking. You’ll have to create the default path for the tint2rc configuration file. To do this and copy the config file:
Now tint2 has a configuration file in place and is ready for Openbox to start.
Let the Configuration Begin!
The hard part (install) is now out of the way thanks to the conary package manager. Now we need to configure Openbox so that it’s ready for us when we log out of Gnome. The configuration files will need to be copied to /home/user/.config/openbox. Of course, this path doesn’t exist yet so we’ll need to create it like this:
Visiting there now will show that there aren’t any files in this directory. The file we’ll absolutely need to place there is autostart.sh. Other files that will be in here are rc.xml which is for obconf (openbox configuration) and menu.xml (openbox menu system). We’ll copy menu.xml from a default copy there later. The other file should auto-create when loading for the first time (rc.xml)
The autostart.sh file is what starts all of our services and our tint2 panel we just installed as well as setup our wallpaper and other items. Instead of going through the options you can place in here, I’m going to share my autostart.sh to get you up and running quickly. Please note that if you chose not to install fbpanel and use the gnome-panel or other panel instead, you’ll need to comment the pypanel line below and uncomment what you’ll be using:
[devnet@lostlap Desktop]$  cat autostart.sh
# This shell script is run before Openbox launches.
# Environment variables set here are passed to the Openbox session.
##############################################################
# Panel Section
##############################################################
# pypanel, my favorite panel for openbox
#(sleep 3 && pypanel) &
# Use the wbar Launcher if you would like.  Don't forget to install it before uncommenting
# wbar &
(sleep 3 && tint2) &

#############################################################
# Gnome Integration Section
#############################################################
# This section let's Gnome give us some of its desktopiness
gnome-power-manager &
nm-applet --sm-disable &
/usr/libexec/gnome-settings-daemon &
gnome-volume-manager --sm-disable &
gnome-keyring-daemon &

###########################################################
# Other Add-on's for Openbox
###########################################################
# Make your wallpaper restore to last setting using Nitrogen.
nitrogen --restore &
parcellite &
volumeicon &
################################# End ###################
To create the menu system file for openbox, we’ll copy from the default installation to our .config/openbox directory (so we can use obmenu…otherwise, that command will give us an error) so use the following command in a terminal:
Now you’re ready to login and reap what you have sown 🙂 Logout of Gnome and change sessions in GDM to Openbox. Notice that your tint2 panel starts up and has the gnome applications we recorded in the autostart.sh file above running and docked! You can add more options to your autostart.sh file and you can also edit tint2rc (in your /home/user/.config/tint2 directory) to store settings for your panel.
I’ve Installed and am Running, Now What?
Now you get to customize the Openbox menu with your favorite applications. Menus are activated by right clicking anywhere on the desktop. There are a few default applications…I choose obconf right away so that I can choose a theme I like and increase the text size since I’m using a high resolution. After that is done, I right click for the menu again and go to applications >> xterm. When the terminal pops up, I type obmenu. From there, I’ll be able to edit my right click menu.
Now instead of entering obmenu in a terminal each time, let’s add it to our right click options. In the obmenu window that you opened in the last paragraph, expand the Openbox 3 option. Find obconf and highlight it. Click ‘new item’ and add obmenu for a label, execute for action, and obmenu for Execute. This will add obmenu to your right click options so you don’t have to open a terminal each time to do things. You can also customize any of the items you find in applications…I put a few things I normally need such as thunderbird, firefox, gnome-terminal, etc. Feel free to add whatever you need…you can have many submenu’s . It’s setup is pretty straightforward.
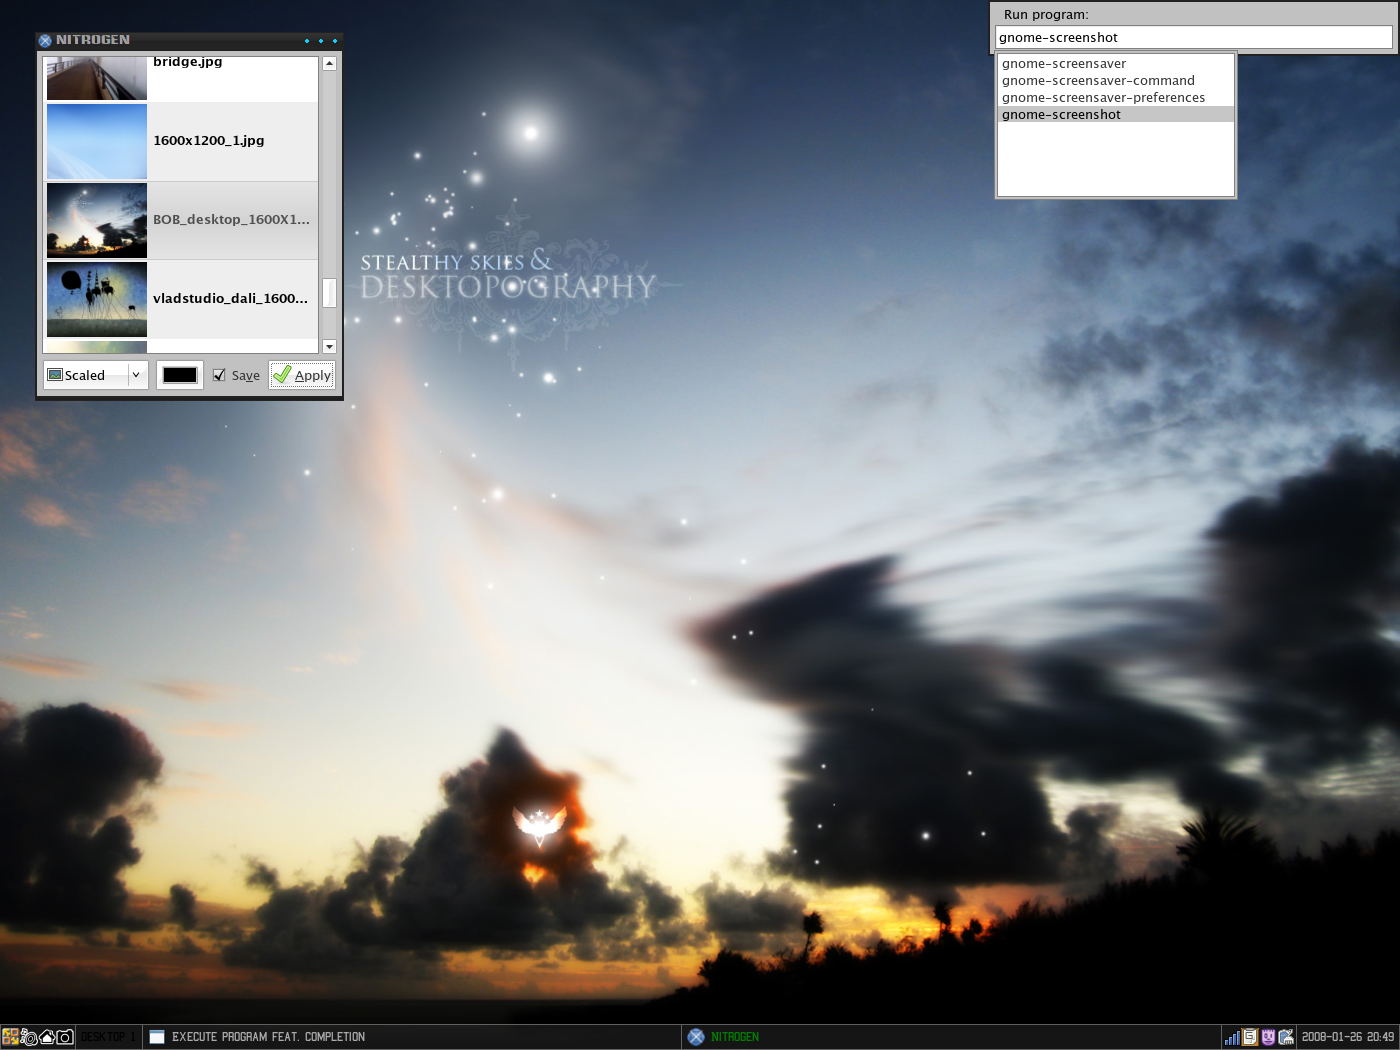
Nitrogen, the wallpaper manager, requires a small tweak as well to get working. What I did was create a /home/username/Photos/Wallpaper directory and then loaded it up with my favorite desktop wallpaper. Good places to go for cool wallpapers are desktopography.com and vladstudio.com. Next, install Nitrogen:
After your first login, you’ll need to add a menu entry using obmenu to call the nitrogen browser. So create the menu entry and the action you call is:
nitrogen /home/username/Photos/wallpaper
Of course, replace ‘username’ with your users name. This will allow you to open up all the wallpaper photos inside of that directory.
So What Have we Done?
Today, we’ve installed Openbox on Foresight Linux. We’ve given it a tint2 panel so we have a place to dock applications and we’ve customized the Openbox right click menu and added a wallpaper program called Nitrogen. Hopefully, this shows you the customizable features of Openbox and also shows you the speed that Openbox operates at. It’s a very minimalistic environment, yet one that can be very powerful.
Installation Notes of Interest
tint2
Tint2 is my newly crowned favorite panel for openbox. It’s lightweight and is able to be configured in so many ways. I added the sleep command inside my autostart.sh to make sure that the desktop is loaded before the tint2 panel tries to load…mostly, this is due to network manager wanting to animate while the panel loads. This isn’t as much problem with tint2 as it is with pypanel (see below).
pypanel
Some things I’ve noticed when running openbox…network manager has problems with pypanel. I added the sleep command inside my autostart.sh and this is much better now…but there may be similar problems with network manager. It’s really NM searching for a network and it causes the panel to flicker a bit. Not a real show stopper.
Gnome-panel
Gnome-panel running inside openbox causes a few errors to pop up when I login. This could be due to the fact that I’ve started things in my autostart.sh out of order…I’m also not all together sure what is causing these errors. The problem seems to be with the docking area of gnome-panel as when I minimize programs they are not docked. Easily fixable, but annoying nonetheless.
Alternative Panels
There are quite a few alternative panels out there. Fbpanel is one. Perlpanel is another. Fbpanel and lxpanel are available in the Foresight repositories. You can also add other launchers like wbar if you so desire.
My friend Og Maciel and I had a short package session today where we updated some openbox items that we use such as Nitrogen for wallpaper, pypanel, and something we didn’t package before…gmrun. Install it with:
sudo conary update gmrun
I’ve patched the default gmrunrc file so that when it executes, it places itself toward the top right hand side of the desktop. To override this, create a .gmrunrc from the default.
cp /usr/share/gmrun/gmrunrc ~/.gmrunrc
alter the left and top values to move it around on the screen. Width may also be adjusted. You can also use openbox to bind this to Alt-F2 or a key combo of your choosing. Open up ~/.config/openbox/rc.xml and add the following in the <keyboard> section:
There are also some built in macros for using gmrun that can be found on the homepage here. it’s quite a handy tool and works quite well for openbox 😀 Screenshot showing updated nitrogen and gmrun below:
Cookie Consent
We use cookies to improve your experience on our site. By using our site, you consent to cookies.
Contains information related to marketing campaigns of the user. These are shared with Google AdWords / Google Ads when the Google Ads and Google Analytics accounts are linked together.
90 days
__utma
ID used to identify users and sessions
2 years after last activity
__utmt
Used to monitor number of Google Analytics server requests
10 minutes
__utmb
Used to distinguish new sessions and visits. This cookie is set when the GA.js javascript library is loaded and there is no existing __utmb cookie. The cookie is updated every time data is sent to the Google Analytics server.
30 minutes after last activity
__utmc
Used only with old Urchin versions of Google Analytics and not with GA.js. Was used to distinguish between new sessions and visits at the end of a session.
End of session (browser)
__utmz
Contains information about the traffic source or campaign that directed user to the website. The cookie is set when the GA.js javascript is loaded and updated when data is sent to the Google Anaytics server
6 months after last activity
__utmv
Contains custom information set by the web developer via the _setCustomVar method in Google Analytics. This cookie is updated every time new data is sent to the Google Analytics server.
2 years after last activity
__utmx
Used to determine whether a user is included in an A / B or Multivariate test.
18 months
_ga
ID used to identify users
2 years
_gali
Used by Google Analytics to determine which links on a page are being clicked
30 seconds
_ga_
ID used to identify users
2 years
_gid
ID used to identify users for 24 hours after last activity
24 hours
_gat
Used to monitor number of Google Analytics server requests when using Google Tag Manager


 As you can see, there is a well organized menu structure for the applications that are installed and the appearance provides a uniform appearance just like all other areas of the distro do. The theme is modern and elegant and continues throughout the menu structure.
 Are you a Firefox, Opera or Chromium fan? Doesn’t matter. Install scripts are provided inside the menu to get you the right browser right away. Just a small detail that shows the creator of the distro isn’t thinking about only themselves but rather, the standard user.