How To Patch The Debian 6 Squeeze Shellshock Bug

Debian I run a few webservers at work that are internal facing only (intranet) that run Debian 6 Squeeze.  I’ve been monitoring the Shellshock exploit since it was discovered a few weeks ago and have been looking for a way to get those few systems patched…despite them existing only internally.  Patches for Squeeze-lts (long term release) were released quickly and then just a last week, another patch was put into play as well.  I decided to go ahead and patch these internal systems and since I couldn’t find much out there for blog posts on how to do it…I decided to share how I did it.

Difference Between Squeeze and Squeeze-lts

The difference between Squeeze general and Squeeze-lts is that the LTS (long term support) repositories will continue to receive backported patches from the current release tree (which is version 7 for Debian).  I didn’t originally install/setup these two internal servers so the first thing I have to do is get the version of Debian these servers are running and then check to see if they are using the LTS repositories.

Finding Your Version of Debian

lsb_release -a

This command returns a vanilla squeeze install for me.

Changing Repositories to LTS

Now to see which repositories are enabled.

nano /etc/apt/sources.list

You should open your sources list with your favorite text editor.  If you just have vanilla sources like the two servers I have you can just comment out the sources listed there and paste the following:


deb http://http.debian.net/debian/ squeeze main contrib non-free
deb-src http://http.debian.net/debian/ squeeze main contrib non-free

deb http://security.debian.org/ squeeze/updates main contrib non-free
deb-src http://security.debian.org/ squeeze/updates main contrib non-free

deb http://http.debian.net/debian squeeze-lts main contrib non-free
deb-src http://http.debian.net/debian squeeze-lts main contrib non-free

Now that your sources have changed, update and patch your system:

 apt-get update && apt-get upgrade && apt-get dist-upgrade

Checking To See if You still Vulnerable

You can use bash itself to see if you’re vulnerable to the bug.  Execute the following command:

env x='() { :;}; echo vulnerable' bash -c 'echo hello'

This should return the following if you are patched:

bash: warning: x: ignoring function definition attempt
bash: error importing function definition for `x'
hello

If you’re not patched…the word ‘vulnerable’ will appear in your results.

Further Reading on Shellshock

You can read further about how to switch to LTS repositories here:  https://wiki.debian.org/LTS/Using

For more reading on the Shellshock bug, how it is being exploited and the history/timeline, see here:  http://www.troyhunt.com/2014/09/everything-you-need-to-know-about.html

Adding Color to Bash List Command Part II

I previously blogged about how to add color to the ‘ls’ command utilizing an config file and alias.  I then stumbled across a nugget of wisdom from a Foresight Linux user on the developers mailing list who gave a handy command that remedies some problems with missing color in a terminal.

On some distributions, the system-wide /etc/DIR_COLORS* files are removed or not present.  This results in no colors being given inside of a terminal when looking for color directories and filenames.  If you find yourself in this boat, try the following command to re-populate this setting:

devnet-> cd ~/
devnet-> dircolors -p >.dircolors

This should create a default profile for colors for your session if it hasn’t been done or was accidentally removed.  For more information on the dircolors command try ‘man dircolors’.  Please also note that dircolors command uses the environmental variable LS_COLORS to set your session.

For more information on LS_COLORS and how it pertains to the terminal/shell/cli/prompt, there are a few blog posts that do an excellent job explaining here, here and here.

Adding Color to Bash List Command

One of the things I love is being able to enter into a directory via terminal, list the contents, and quickly see which ones are executable or not and which ones are directories or are not directories IN COLOR (not everyone is perfect right?).  This is specifically handy as I move through working with Slackware based distributions like the one I’m using now, Zenwalk Linux 6 and the /etc/rc.d/ directory.  Most of the Red Hat based distributions out there that I’ve used have this set automatically…so I’m used to it.  When I opened up a terminal in Zenwalk I found no color. A quick investigation of ~/.bashrc showed me that there are aliases set to display color…instead of ls I’d just use the letter L; 2 l’s for another option, 3 for another.  It’s interesting, but not normally how I do business.  See bashrc below:

devnet[~]$ cat ~/.bashrc
alias lll="ls -al --color"
alias ll="ls -l --color"
alias l='ls --color'<br />alias search='find . -name'
alias aterm="aterm -fg white -tr"
alias version='cat /etc/zenwalk-version'
alias dh='df -h'<br />export PS1='\u[\W]\$ '
export PAGER="most"<br />devnet[~]$

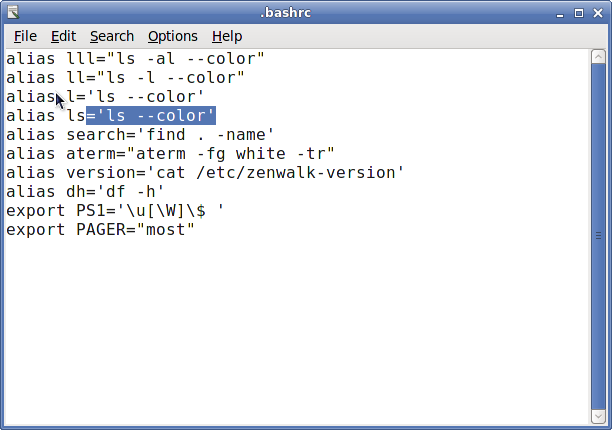
I don’t use those aliases much…others of you might do the ‘ll’ or ‘lll’ but it’s just not part of my routine.  So, I added in just after line 4 in the code above:

alias ls='ls --color'

You can do this a few different ways…with any command line editor like emacs, vi, or nano/pico. It’s really up to you. The easiest way for new users is to use a text editor:

devnet[~]$ mousepad ~/.bashrc

This will launch the mousepad text editor in XFCE. If you’re in Gnome, try gedit. If KDE, give kwrite a try. You should see something like the following window pop up for editing:

bashrcYou should see in the picture above, I’ve added in the alias needed to make me comfortable.  After that, File >> Save.  You’re set!  Except, you may notice that when you type the command ‘ls’ there are no colors.  So what gives?  Well, we haven’t loaded our ./bashrc since we changed it.  You don’t have to logout and back in to get things to work though…you can do this right from the terminal:

devnet[~]$ exec bash

Now try giving the ‘ls’ command a try again and you should see that it is in color.  I know a lot of the more advanced Linux guys out there are probably saying, “why’d he waste a post on this!  It’s easy” and you’d be right for a majority of users out there…I hope that this post finds some new user out there that may be stuck for an answer on how to do this.  One final note on this as well: You will have to do this as the root user and change /root/.bashrc in order for your root user to also have color.  Thanks for reading!

Find Files & Directories Not Visible to Others for Webserver

I wanted a quick way to be able to find out what files weren’t visible to others (and therefore, not visible to website visitors).  Messing with arguments and the file command, you can do the following:

find -type f ! -perm -444

This locates all files not visible to ‘others’ in the current directory.  You can apply this to directories as well:

find -type d ! -perm -111

Hope this helps people like it helped me. 🙂

BASH Prompt Fun

The Bourne Again Shell aka BASH has been around for a while. For those of us that also have been around for a while…this shell possibly could be the one you choose to use for your Linux distro. I first started using BASH when I was in college. We had Solaris 2.0 Servers that allowed me to mess around quite a bit back then.

But most new users fear the shell (or as windows likes to call it, command line) and venture there as little as possible. The prompt that greets most users that open a Linux shell is static and unyielding; yet, there are small adjustments that can make your Linux shell bend to the will of your force. Today, I’ll be going over some simple and fun ways to alter your .bashrc file, which is where your BASH “profile” is kept and read each time you login. Changes to this file can make your Linux shell a little bit friendly and less frightning.

Most shell’s look similar to this by default:

[devnet@lostgate root]$

This doesn’t do much for you other than tell you who you are, what your hostname is, and what directory you are in. If you are like me, you want some useful information to be there so that what is above, becomes what is below:

(devnet@lostgate:/var/www/html)#

Why is this so different? For starters, after seeing how to add color to your prompt you’ll be able to add your own color scheme to things. You’ll also be able to check out various ways to display information you want such as dates, times, whether you have mail, and your directory path you are in. Do you need l33t programming skills to accomplish this? Not at all! If you’re ready, let’s give this thing a try…

Continue reading “BASH Prompt Fun”

Creative Commons License
Except where otherwise noted, the content on this site is licensed under a Creative Commons Attribution-NonCommercial-ShareAlike 4.0 International License.