After the Long Hiatus

Hi everyone.  It’s been a while since I posted.  Real life happens sometimes.  I moved to a new state, have had two new jobs and am finally stable enough in my professional position that I can write again.  With that being said, I should be writing quite a bit more as I’ve landed in a position that deals with Unix and Linux every single day.

Please accept my apologies on being gone for so long.  I promise 2017 will be a much better year for this site as I plan on posting reviews, more tips/tricks, and even a bit of commentary as I’ve done in the past.  Thanks for sticking with me for so long and thanks for reading!

Getting Started with JARVYS Backups

I previously interviewed the creators of JARVYS, a Linux backup solution that makes backups and restores as easy as a single command.  I wanted to post a follow-up to show just how easy it is to setup and use on a Linux system.  I’ll be using a virtual server running Debian 7 as my test environment and I’d like to disclose that JARVYS is a sponsor of this blog.

Sign-up to Back-up

If you haven’t registered to receive a free account with JARVYS, head over to their plans page and signup.  Please note that if you checkout with the coupon code “linux-blog” you’ll get 20% off any paid plan.   However, I know most of you will want to test drive the car before purchasing so the always free plan is a good starting point that will give you 3 backups that you can restore from.  Once you’ve done that, head back here and let’s get started.

60 Seconds to Lift-Off

After verifying your email, Log-in to your account at JARVYS and you’ll land on your user dashboard.  Your dashboard is where all the information regarding your backups will be contained.  At the very top, there is a curl command that you can copy and paste onto the system you want backed up.  Execute that command which should look similar to this:

sudo curl --silent --data '{"user_api_key":"long_hash_value_with_numbers_
and_letters_unique_to_your_account"}' https://v1.jarvys.io/setup/ > jarvys-setup.sh && sh jarvys-setup.sh

In between the quotes above will be a long hash key that is unique to every user account.  Obviously, you’ll need curl installed on your system and you’ll need to have sudo privileges to initiate the command (or root access).  You’ll also need a few other things:  tar, ssh-keygen, and rsync.  Most systems already have those installed so most will be ok…but if you’re on a bare server like me, you might have had to install one or two of those first.

Once you’ve initiated the curl command, that’s it.  JARVYS is installed and configured to run backups.  JARVYS will run an initial backup within 1 hour of the installation command above and there are sane defaults on what it backs up.  As an example, it won’t back-up your /proc or /sys directory…but it’s possible you might want to hone in on a single directory tree to backup.  In this case, doing some more post configuration will help and I’ll go over that below.
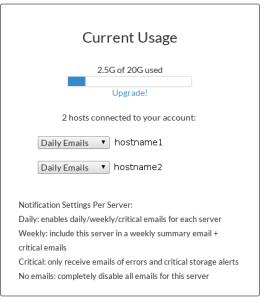
JARVYS-VISUALFor those of you who just want everything backed up, you’re done.  You initated the command and BOOM!  That’s it.  JARVYS will backup daily for you and with the free plan, you’ll have 3 backups that you can restore from.  You’ll be able to setup email notifications on your dashboard for each system you have backing up (see left).  You’ll also be able to see how much space you’re using with your snapshots.  Please keep in mind that each time the backup runs, it rotates the oldest snapshot out of existence.

If you want to initiate a manual backup, the command is jarvys backup.  Pretty simple stuff.  For those of you who would rather not backup EVERYTHING, let’s move on to configuration below.


Advanced Configuration of JARVYS
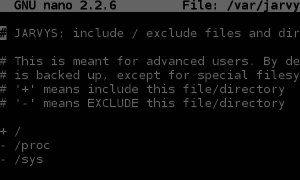
JARVYSconfigJARVYS tries to keep it simple with advanced configuration.  If you look at /var/jarvys/etc/include you’ll find that directories listed with a minus sign in front of them will not be backed up and directories with a addition sign will be.  By default, JARVYS backs up everything except /proc and /sys as you can see inside of the configuration file (see right).

You can add other directories you don’t want to backup or ones that you do…just keep in mind that this is for advanced users.  For me, I want to backup everything inside of /var/www/ as all of my web stuff is there.  In this case, I’d exclude comment out the three lines shown in the picture above.  Next, I’d add the directories I want to backup in the corresponding section of the configuration file:

+/var
+/var/www
+/var/www/**

This means that the only directories I’m backing up is all files in the /var/www path.  Next, I’d uncomment the line that states:

# - *

The line above, if commented with the ‘#’, will not be read…uncommenting it means we delete the ‘#’ and then save.  This means JARVYS will exclude everything except what you have listed with a + symbol.  In our case, it will exclude all things except those listed above in /var/www and the sub-directories.  So my finished configuration page will only have the following lines uncommented:

+/var
+/var/www
+/var/www/**
- *

If you have further questions on how to do this, please leave a comment below and refer to the JARVYS documentation page.

Restoring Files with JARVYS

Let’s go through what a restore with JARVYS is like.  I’m going to manually perform a backup right now of my newly configured JARVYS install that I just configured in the ‘Advanced Configuration’ section above.  So I’ll initiate a command:

 jarvys backup

Now I’m going to do something either really smart or really dumb depending on how you view it.

rm -rf /var/www/linux-blog.org/logs

The command above removes all of my error and access logs for my website.  Now I’m going to restore these files with JARVYS:

jarvys restore /var/www/linux-blog.org/logs/ 1

JARVYS will make sure you are absolutely certain that you want to do the restore and then will restore your files into the directory /root/jarvys-restore and from there you can move your files in their entirety from there.  It’s as simple as that.

Are There Any Caveats?

Sure there are.  There always is!  For one, you can’t delete snapshots from a host that is no longer valid.  As an example, if you have 2 Linux servers…perhaps one as Test and one as Production…and you destroy the Test box after a few months of testing…you cannot get rid of this system from your JARVYS status page.  This means that the last 3 snapshots from that client are never going away.  I contacted JARVYS support about this and they said they could manually remove it for me.  They also said that features were in the works to give you granular control over your backups/snapshots including removing clients.  We’ll have to see what happens.

Secondly, I didn’t notice where JARVYS restored my files the first time I restored them.  I think part of the reason was the scrolling text on the screen but also because my eyes weren’t drawn to the text stating where they were restored.  I also mentioned this to JARVYS support and they stated that they would pass this along and thought it was a really great idea to highlight the restoration folder.

In closing, the support is fantastic and they are open to suggestion to improve things…which is great for any product.  It’s easy to get started and is really a ‘set it and forget it’ backup solution.  The company puts Linux front and center which is a nice change for backup solutions.  If you’d like to give JARVYS a try, head on over and signup for their free plan.  If it’s everything you hoped it would be, you can use the code ‘linux-blog‘ during checkout and you’ll get 20% off for the lifetime of your subscription.  Thanks again for reading!

Finding Files Modified in the Past Few Days

It’s said that with age comes distinction and wisdom. If we believe that, then we’re talking about people and not files.  Working with older files doesn’t make you wise beyond your years…one could argue that it makes you a glutton for punishment :).  That doesn’t always have to be the case as we can solve finding and working with older files using the ‘find’ command.

Recently, I was tasked with finding files that had been modified in the past 5 days. I was to copy these files from a SAN Snapshot and move them over to a recover area that anyone could get to (read: Windows File Share).

We were doing this in Linux because the snapshot, which was a NTFS filesystem would only mount in Linux.  It seems that Linux is more forgiving of errors on a hard disk than Windows is when dealing with NTFS.

So, the snapshot was located on a server designated as X.X.X.X below.  I decided to use the find command to locate all files that were modified in the past 5 days.  The find command can be summarized succinctly using the following logic statement:  find where-to-look criteria what-to-do.  Keeping this logic in mind, I used the following command to get what I needed:

find . -mtime 4 -daystart -exec cp -a {} /home/devnet/fileshare\$ on\ X.X.X.X/RECOVER/ \;

Let’s break down what the above command is doing.  First and foremost, the find command when used in conjunction with a period means to search the current directory (where-to-look in logic statement above).  If you need to specify where to search via path, replace the period with the path to the directory you’ll be searching in  Next, I’ve added the following flags (criteria in logic statement above) which I’ll define:

  1. -mtime:  stands for ‘modified time’.  This means I’m searching for only files modified in the past 4 days.
  2. -daystart:  This flag is used to measure time from the beginning of the current day instead of 24 hours ago which is default.  So in the example above, it would find files 4 days from the start of today (which equates to 5 days from midnight versus 4 days from 24 hours ago for my task)
  3. -exec:  specifies that with the results, a new command should be executed.

The {} above is where the results of our find command are passed.  It will do the command after -exec for each result from the find command.

So, we’re copying with the cp -a command and flag, which will copy recursively, preserving file structure and attributes thanks to our -a flag.  That command copies all the files we’ve found using the find command to the path stated next (what-to-do in our logic statement above).  The last symbols \; are the end statement for our -exec flag.  This must always be present for our -exec command…and the exec flag should be the last option given in the find command as well.

It’s important to note above that I mounted the NTFS SAN snapshot using the GUI like I would any NTFS volume on a Linux desktop and that I executed this find command while I was located in the root of the directory I wanted to search on that snapshot.  The server I was copying the files to noted as X.X.X.X above was a Windows File Server on our network that had open permissions for me to copy to.  I used Samba to mount this server in the directory ‘fileshare’ in my home directory.  The RECOVER directory was made by me to house all the files I’ve found so I could keep them separate from any other files in the root of the file server directory.  I had to manually create this folder prior to issuing the command.

There are more than a couple of different ways to do what I did above.  There are also numerous ways to alter the command and adapt it for your needs.  For example, perhaps you want to find all files that are 3 days old and delete them…and you’re not a stickler for the -daystart option.  In this case:

find . -mtime -3 -exec rm -rf {} \;

Maybe you want to copy mp3’s from a directory to a separate location:

find . -name '*.mp3' -exec cp -a {} /path/to/copy/stuff/to \;

There are lots of ways to adapt this to help locate and deal with files.  The command line/shell are always more than powerful enough to help you get what you need.  I hope this helps you and if you have questions or just want to say thanks…please don’t hesitate to let me know in the comments below.

Linux, Technology, and Blogging

I sometimes write articles for other blogs and post how-to’s on different wiki’s and forums.  I would love to publish these helpful and handy articles but…they don’t all deal with just linux.

In my day job, I am a Server Administrator at a medium sized hospital.  This means I deal with Unix, Linux, and Windows servers on a daily basis…but with most of my time spent on Windows Server administration.  Many times, I’ll run across a solution to a problem that is hard to solve and would love to share this solution…to Open Source the information so to speak…but my blog here does not give me platform to do that.  For example, if I published Windows Server stuff on a Linux Blog, thousands of voices may shout “KAHN!!!!!!!” in unison in my general direction.  It’s just something you don’t do.

The bad part about this is that many times when finding a solution for a problem in a Windows environment…I’m thinking of how to properly do the same thing on a Linux server…but the lack of platform for writing the Windows solution sweeps the rug out from under me when I begin to write about the solution in Linux…I’m not happy about that but it’s a fact..

Writing and blogging is a process that is best done all the time.  As you continue to publish entries, you begin to develop a desire to continue to publish entries.  If you go stagnant with your posts…it takes more motivation to get you back to where you’re posting with regularity.  If you are limited in what you write about, that takes away from the spectrum of things you might blog about even more.  I feel I’m limiting the scope of what I could post here on Yet Another Linux Blog…and I’ve set out to correct this.

I still will NOT recycle news in the same way other blogs do…I really don’t see a point to that.  But I’ve begun setting up a new blog to absorb this one…this blog will cover more than just Linux…it will cover all of the areas of technology that I deal with in my job and at home.  I’ve also recruited another writer to assist me in this endeavor to give more perspective to anything and everything we cover there.  I’m hoping that my posting frequency will increase and that readers will continue to benefit from how-to’s and tips that I post.

Rest assured, Yet Another Linux Blog will still exist and posts will continue to be posted.  The RSS Feed will still be active and no change will be required by any reader.    We’ll just be broadening the spectrum a bit by providing other RSS feeds dealing with various topics.  I’m an exchange administrator at work so look to see posts on exchange and exchange alternatives running in Linux.  I also work with Sharepoint servers at work so look for alternatives to Sharepoint posts.  I’m hoping to widen out quite a bit all while continuing the tradition and quality that Yet Another Linux Blog has had since 2004.  Keep in mind, I’m a Unity Linux developer…so I’m not going to stop blogging about Linux anytime soon 🙂

Questions? Comments?  Just drop me a comment and I’ll answer right away.

Broken Sound in Foresight Linux 2.0.?

Sound is broken in Foresight Linux 2.0.4 and above.  This is a sporadic problem…but I know that most HDA Intel Sigmatel chipsets are having this problem (like the one on my Dell D630 Latitude).  It is my understanding that this is a kernel based problem…and if it is, the last 4 released kernels onto Foresight Linux 2 stable branch have not fixed sound.

I was able to backpedal to the 2.6.27.5-3 kernel and had all of my sound problems automagically fix.  I’m not sure what the problem is, nor how to fix it…but I do know that I’m not the only one with sound problems as of late.  I also know that no one is motivated to fix things right now…as a developer in Foresight, I have heard nothing about a fix for this problem and even my own bug postings have went without comment.

I am attempting to draw attention to this through this post and also by creating a rollup bug listing for all sound related problems in Foresight Linux 2.  If you have a problem, please visit http://issues.foresightlinux.org and file an issue there and drop a comment on my roll-up issue FL-1931 letting me know you’d like to link up to it.

Until that time, I’ve enjoyed the silence for 1 1/2 months.  Some users are going on 6 months.  I hope we can fix this major problem.

Creative Commons License
Except where otherwise noted, the content on this site is licensed under a Creative Commons Attribution-NonCommercial-ShareAlike 4.0 International License.