Beggars Can’t be Choosers
Recently, in my “all Windows all the time” job I have felt the need to have some virtual desktops on my Home PC that I can spin up in a few moments notice so that I can scratch the Linux itch. Dual boot won’t work because I have to stay connected to my VPN and we don’t support Linux for this 🙁 Obviously, this is where virtualization software comes into play.
State of Virtualization 2020
However, virtualization software seems to want to make running a Linux desktop in 2020 problematic with their programs chock full of buginess.
Hyper-V? Not if you run Windows Home and no support for graphics. Not to mention, you’ll have to gut install it via powershell and when it fails, gut it via powershell and elect to go with another option. Hyper-V is an afterthought by Microsoft now as well for desktop players.
How about Oracle Virtualbox? It works great for simple things like Ubuntu and Debian…but you can no longer change resolutions for most because it doesn’t support older formats of Display drivers. Often times for things like Solus, you boot to a black screen and can do little else, let alone install anything even with additions installed.
None of the aforementioned solutions are able to go full screen on every Linux distribution I take for a spin.
Enter VMware Player.
With some light hacking to get VMware tools installed on Solus, full screen magic can be had again. I’m going to walk you through how to get any flavor of Solus up and running with VMware Tools installed and therefore, magnificent, full screen splendor.
VMWare Tools Installation on Solus
I’m going to assume you were able to get Solus installed on VMware Player and you’ve just booted up to a fresh desktop. Install any updates required through the software center and if you need to reboot for a kernel update, please do so.
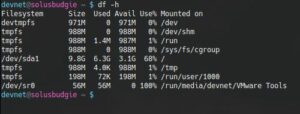
Once you’re at the desktop, select Player >> Manage >> Install VMware Tools. Click “Yes” when prompted. After this, launch a console and ensure that VMware Tools has mounted as a separate device (I use df- h to make sure it’s mounted). If they haven’t mounted, launch the file explorer utility and click on the VMware Tools device in the left hand pane. They should mount and you should be able to see them inside the console as follows:
Navigate to that location and list the contents. You should see a file named something like “VMwareTools-10.3.21-14772444.tar.gz”. Copy this file to a location of your choosing. I copied it to my documents.
Next, unzip and untar the files:
Once the files are extracted, enter into the directory and run the following command (use sudo if you aren’t in root group like I am) to see what we need to do:
Follow the prompts pressing return for default values and you should hit a snag on the following:
So VMware Tools is looking for rc directories, but they don’t exist on Solus (for good reason!). So let’s give VMware Tools what it wants. Control-C to drop out of the installer and let’s create those files as root:
Run the installer again, pressing return for all defaults. Let it fail on “Unable to copy the source file /usr/lib/vmware-tools/configurator/pam.d/vmtoolsd to the destination file /etc/pam.d/vmtoolsd”
Since that path doesn’t exist, let’s create it
Now let’s run that command to install the tools again (vmware-install.pl) and select all defaults by pressing return.
VMware Tools should finish installing completely at this time. Reboot the VM. Log back in.
Attempt to change the resolution and things should be right as rain at this point in time…before the tools install, not so much. Make sure in the VM settings in player that you have the 3D acceleration checkbox checked and you should have quite a nice experience running VM’s using VMware Player.
Questions? Concerns? Please do let me know below and I’ll attempt to help in any way I can. Opinions? I like those too! Let me know how crap I am below! Thanks much for reading!


