Adding Color to Bash List Command

One of the things I love is being able to enter into a directory via terminal, list the contents, and quickly see which ones are executable or not and which ones are directories or are not directories IN COLOR (not everyone is perfect right?).  This is specifically handy as I move through working with Slackware based distributions like the one I’m using now, Zenwalk Linux 6 and the /etc/rc.d/ directory.  Most of the Red Hat based distributions out there that I’ve used have this set automatically…so I’m used to it.  When I opened up a terminal in Zenwalk I found no color. A quick investigation of ~/.bashrc showed me that there are aliases set to display color…instead of ls I’d just use the letter L; 2 l’s for another option, 3 for another.  It’s interesting, but not normally how I do business.  See bashrc below:

devnet[~]$ cat ~/.bashrc
alias lll="ls -al --color"
alias ll="ls -l --color"
alias l='ls --color'<br />alias search='find . -name'
alias aterm="aterm -fg white -tr"
alias version='cat /etc/zenwalk-version'
alias dh='df -h'<br />export PS1='\u[\W]\$ '
export PAGER="most"<br />devnet[~]$

I don’t use those aliases much…others of you might do the ‘ll’ or ‘lll’ but it’s just not part of my routine.  So, I added in just after line 4 in the code above:

alias ls='ls --color'

You can do this a few different ways…with any command line editor like emacs, vi, or nano/pico. It’s really up to you. The easiest way for new users is to use a text editor:

devnet[~]$ mousepad ~/.bashrc

This will launch the mousepad text editor in XFCE. If you’re in Gnome, try gedit. If KDE, give kwrite a try. You should see something like the following window pop up for editing:
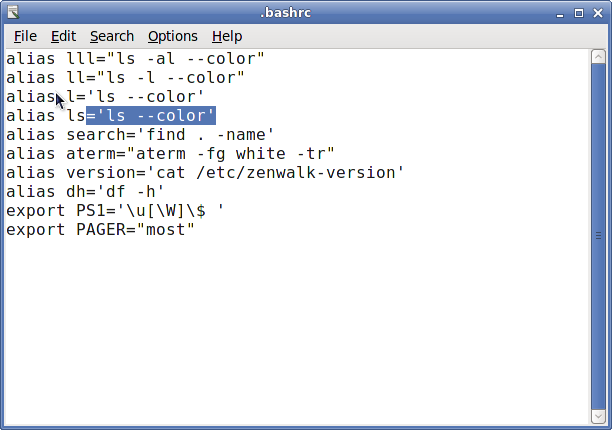
bashrcYou should see in the picture above, I’ve added in the alias needed to make me comfortable.  After that, File >> Save.  You’re set!  Except, you may notice that when you type the command ‘ls’ there are no colors.  So what gives?  Well, we haven’t loaded our ./bashrc since we changed it.  You don’t have to logout and back in to get things to work though…you can do this right from the terminal:

devnet[~]$ exec bash

Now try giving the ‘ls’ command a try again and you should see that it is in color.  I know a lot of the more advanced Linux guys out there are probably saying, “why’d he waste a post on this!  It’s easy” and you’d be right for a majority of users out there…I hope that this post finds some new user out there that may be stuck for an answer on how to do this.  One final note on this as well: You will have to do this as the root user and change /root/.bashrc in order for your root user to also have color.  Thanks for reading!

Laptop Multimedia Keys and PCLinuxOS 2009

I installed PCLinuxOS 2009 recently on a Dell D630 Latitude and was disappointed to see that I couldn’t get the hardware volume (up/down/mute) buttons didn’t work out of the box.  I thought a bit about kmilo, a program that was previously used for laptop buttons (thinkpad buttons though) and I searched around a bit inside the KDE Control Center for keyboard shortcuts to see if I could assign the keys manually.  However, I couldn’t find any volume setting inside this menu.

Then, it hit me, I had remembered seeing volume settings before…inside kmix; there is an area for assigning global shortcuts for volume and mute!  This should work for anyone running KDE 3.5.8 and above (I think).  Left click on Kmix in your tray and choose the mixer button.  From there, choose Settings >> Configure Global Shortcuts.  Now assign the volume up, down, and mute keys manually by clicking in the blank and pressing the hardware button.  This should work for a majority of people out there.  For me though, this didn’t work.  When pressing the keys, nothing happened.  I thought I was doomed.

I researched a bit more and found that installing a program called keytouch would allow me to, at the very least, program my keyboard in any way I wanted to program it.  I opened Synaptic and installed keytouch and keytouch-editor.  After install, I went to Kmenu >> System >> Configuration >> Hardware >> Keytouch.  It prompted me to choose my keyboard.  Since it didn’t have the Dell D630, I chose the closest thing which was the Dell D800.  I closed the application and now the volume buttons and mute button works!  Keytouch also has the ability to manually edit and also to import keytouch ‘schemas’ to give maximum flexibility.  Hopefully, this helps some of you out there that cannot get your multimedia keys working in PCLinuxOS and KDE to work!

Force Firefox to Remember Initial Window Setting in KDE

I have a laptop with the resolution of 1440×900…so when I installed the latest TR6 from PCLinuxOS, I was dismayed to find out that when launching Firefox, it opened up in a window that was 1024 pixels. Of course, I maximized this and then closed it thinking that Firefox would remember my settings. The problem is…it didn’t remember my settings.

When I opened Firefox up again, it popped up to say hello once again at 1024 pixels.  Sure, you can right click on the Firefox window bar and drill down into application specific settings via KDE (yes, it’s that configurable) but I didn’t want to have to do this…because if I did, ALL Firefox windows would open up maximized…and that includes any pop-ups as well.  I also know that you can drill down even further to fix THAT problem.  However, it should ‘just work’ right?  You shouldn’t have to change anything at all correct?  Well, I’ve found a fix that is pretty easy to accomplish…and I hope it helps the hundreds of people I found when searching through google on this.

Open up Firefox and it will open at the smaller screen size…in my case, it opened up 1024 px in width on my 1440px screen.  Then, hover over the top right hand corner with your mouse until you get the resize arrow.  Resize the window click dragging it to the top, right hand corner of the screen.  It should ‘snap-in’ once you get close to maximized size.  Now close the window, and open Firefox again.  It should open up fully maximized.

I sure hope this saves someone time…because I spent the better part of a morning trying to fix this.

Install the Latest Kernel in PCLinuxOS

Do you run PCLinuxOS 2007 or Minime 2008 and would you like to take advantage of the latest kernel for PCLinuxOS?  You can do this by enabling the ‘testing’ portion of the repository.

Read about Repository Control in PCLinuxOS

You’ll be looking for the ‘sections’ blank when viewing repository details and you’ll just need to add ‘testing’ to the end of the line (don’t replace the entires there already).  Once that is done, click the reload button in Synaptic and allow it to refresh your local rpm cache.

Click the ‘search’ button and search for the keyword ‘kernel’.  Look for the highest number of kernel that is returned.  At the time of this writing, the 2.6.26.8 kernel was the newest kernel for PCLinuxOS (it has .27 patches all over in it…so it’s quite a nice kernel).  Click and install that kernel and allow it to select any packages it needs to install.  Once installed, you can remove the word testing from the repository (this is recommended to prevent your system from downloading ALL testing packages/updates) and click the reload button for Synaptic.

Reboot and choose the new kernel on your grub menu.  Test things to see how they work.  If everything is good to go, congratulations!  You’ve just installed the latest kernel in PCLinuxOS.

To make this kernel the default one, you can use the PCLinuxOS Control Center and Change the Way the System Boots.  I’ll cover this in a later post.  Hope this helps a few of you out there.  I know it is often asked on IRC.

Find Files & Directories Not Visible to Others for Webserver

I wanted a quick way to be able to find out what files weren’t visible to others (and therefore, not visible to website visitors).  Messing with arguments and the file command, you can do the following:

find -type f ! -perm -444

This locates all files not visible to ‘others’ in the current directory.  You can apply this to directories as well:

find -type d ! -perm -111

Hope this helps people like it helped me. 🙂

Read & Display Single Line of a File

Sometimes when I’m troubleshooting a PHP error and a function is called in the debugger that gives me a line number of a file to look at, I want to know what that line says without opening up the file.  Using the command line, you can accomplish this in the following way:

head -n 96 filename.php | tail -n 1

This allows you to quickly display the 96th line of filename.php. Hope this helps someone like it has me.

Creative Commons License
Except where otherwise noted, the content on this site is licensed under a Creative Commons Attribution-NonCommercial-ShareAlike 4.0 International License.