Fix VMWare Player Resolution with Solus (All Versions)

Beggars Can’t be Choosers

Recently, in my “all Windows all the time” job I have felt the need to have some virtual desktops on my Home PC that I can spin up in a few moments notice so that I can scratch the Linux itch.  Dual boot won’t work because I have to stay connected to my VPN and we don’t support Linux for this 🙁  Obviously, this is where virtualization software comes into play.

State of Virtualization 2020

However, virtualization software seems to want to make running a Linux desktop in 2020 problematic with their programs chock full of buginess.

Hyper-V?  Not if you run Windows Home and no support for graphics.  Not to mention, you’ll have to gut install it via powershell and when it fails, gut it via powershell and elect to go with another option.  Hyper-V is an afterthought by Microsoft now as well for desktop players.

How about Oracle Virtualbox?  It works great for simple things like Ubuntu and Debian…but you can no longer change resolutions for most because it doesn’t support older formats of Display drivers.  Often times for things like Solus, you boot to a black screen and can do little else, let alone install anything even with additions installed.

None of the aforementioned solutions are able to go full screen on every Linux distribution I take for a spin.

Enter VMware Player.

With some light hacking to get VMware tools installed on Solus, full screen magic can be had again.  I’m going to walk you through how to get any flavor of Solus up and running with VMware Tools installed and therefore, magnificent, full screen splendor.

VMWare Tools Installation on Solus

I’m going to assume you were able to get Solus installed on VMware Player and you’ve just booted up to a fresh desktop.  Install any updates required through the software center and if you need to reboot for a kernel update, please do so.

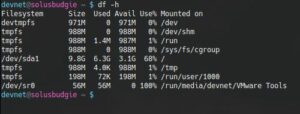
Once you’re at the desktop, select Player >> Manage >> Install VMware Tools.  Click “Yes” when prompted.  After this, launch a console and ensure that VMware Tools has mounted as a separate device (I use df- h to make sure it’s mounted).  If they haven’t mounted, launch the file explorer utility and click on the VMware Tools device in the left hand pane.  They should mount and you should be able to see them inside the console as follows:


Navigate to that location and list the contents.  You should see a file named something like  “VMwareTools-10.3.21-14772444.tar.gz”.  Copy this file to a location of your choosing.  I copied it to my documents.


Next, unzip and untar the files:


Once the files are extracted, enter into the directory and run the following command (use sudo if you aren’t in root group like I am) to see what we need to do:


Follow the prompts pressing return for default values and you should hit a snag on the following:


So VMware Tools is looking for rc directories, but they don’t exist on Solus (for good reason!).  So let’s give VMware Tools what it wants.  Control-C to drop out of the installer and let’s create those files as root:


Run the installer again, pressing return for all defaults.  Let it fail on “Unable to copy the source file /usr/lib/vmware-tools/configurator/pam.d/vmtoolsd to the destination file /etc/pam.d/vmtoolsd

Since that path doesn’t exist, let’s create it


Now let’s run that command to install the tools again (vmware-install.pl) and select all defaults by pressing return.

VMware Tools should finish installing completely at this time.  Reboot the VM.  Log back in.

Attempt to change the resolution and things should be right as rain at this point in time…before the tools install, not so much.  Make sure in the VM settings in player that you have the 3D acceleration checkbox checked and you should have quite a nice experience running VM’s using VMware Player.

Questions? Concerns?  Please do let me know below and I’ll attempt to help in any way I can.  Opinions?  I like those too!  Let me know how crap I am below!  Thanks much for reading!
How To Patch The Debian 6 Squeeze Shellshock Bug

Debian I run a few webservers at work that are internal facing only (intranet) that run Debian 6 Squeeze.  I’ve been monitoring the Shellshock exploit since it was discovered a few weeks ago and have been looking for a way to get those few systems patched…despite them existing only internally.  Patches for Squeeze-lts (long term release) were released quickly and then just a last week, another patch was put into play as well.  I decided to go ahead and patch these internal systems and since I couldn’t find much out there for blog posts on how to do it…I decided to share how I did it.

Difference Between Squeeze and Squeeze-lts

The difference between Squeeze general and Squeeze-lts is that the LTS (long term support) repositories will continue to receive backported patches from the current release tree (which is version 7 for Debian).  I didn’t originally install/setup these two internal servers so the first thing I have to do is get the version of Debian these servers are running and then check to see if they are using the LTS repositories.

Finding Your Version of Debian

lsb_release -a

This command returns a vanilla squeeze install for me.

Changing Repositories to LTS

Now to see which repositories are enabled.

nano /etc/apt/sources.list

You should open your sources list with your favorite text editor.  If you just have vanilla sources like the two servers I have you can just comment out the sources listed there and paste the following:


deb http://http.debian.net/debian/ squeeze main contrib non-free
deb-src http://http.debian.net/debian/ squeeze main contrib non-free

deb http://security.debian.org/ squeeze/updates main contrib non-free
deb-src http://security.debian.org/ squeeze/updates main contrib non-free

deb http://http.debian.net/debian squeeze-lts main contrib non-free
deb-src http://http.debian.net/debian squeeze-lts main contrib non-free

Now that your sources have changed, update and patch your system:

 apt-get update && apt-get upgrade && apt-get dist-upgrade

Checking To See if You still Vulnerable

You can use bash itself to see if you’re vulnerable to the bug.  Execute the following command:

env x='() { :;}; echo vulnerable' bash -c 'echo hello'

This should return the following if you are patched:

bash: warning: x: ignoring function definition attempt
bash: error importing function definition for `x'
hello

If you’re not patched…the word ‘vulnerable’ will appear in your results.

Further Reading on Shellshock

You can read further about how to switch to LTS repositories here:  https://wiki.debian.org/LTS/Using

For more reading on the Shellshock bug, how it is being exploited and the history/timeline, see here:  http://www.troyhunt.com/2014/09/everything-you-need-to-know-about.html

Finding Files Modified in the Past Few Days

It’s said that with age comes distinction and wisdom. If we believe that, then we’re talking about people and not files.  Working with older files doesn’t make you wise beyond your years…one could argue that it makes you a glutton for punishment :).  That doesn’t always have to be the case as we can solve finding and working with older files using the ‘find’ command.

Recently, I was tasked with finding files that had been modified in the past 5 days. I was to copy these files from a SAN Snapshot and move them over to a recover area that anyone could get to (read: Windows File Share).

We were doing this in Linux because the snapshot, which was a NTFS filesystem would only mount in Linux.  It seems that Linux is more forgiving of errors on a hard disk than Windows is when dealing with NTFS.

So, the snapshot was located on a server designated as X.X.X.X below.  I decided to use the find command to locate all files that were modified in the past 5 days.  The find command can be summarized succinctly using the following logic statement:  find where-to-look criteria what-to-do.  Keeping this logic in mind, I used the following command to get what I needed:

find . -mtime 4 -daystart -exec cp -a {} /home/devnet/fileshare\$ on\ X.X.X.X/RECOVER/ \;

Let’s break down what the above command is doing.  First and foremost, the find command when used in conjunction with a period means to search the current directory (where-to-look in logic statement above).  If you need to specify where to search via path, replace the period with the path to the directory you’ll be searching in  Next, I’ve added the following flags (criteria in logic statement above) which I’ll define:

  1. -mtime:  stands for ‘modified time’.  This means I’m searching for only files modified in the past 4 days.
  2. -daystart:  This flag is used to measure time from the beginning of the current day instead of 24 hours ago which is default.  So in the example above, it would find files 4 days from the start of today (which equates to 5 days from midnight versus 4 days from 24 hours ago for my task)
  3. -exec:  specifies that with the results, a new command should be executed.

The {} above is where the results of our find command are passed.  It will do the command after -exec for each result from the find command.

So, we’re copying with the cp -a command and flag, which will copy recursively, preserving file structure and attributes thanks to our -a flag.  That command copies all the files we’ve found using the find command to the path stated next (what-to-do in our logic statement above).  The last symbols \; are the end statement for our -exec flag.  This must always be present for our -exec command…and the exec flag should be the last option given in the find command as well.

It’s important to note above that I mounted the NTFS SAN snapshot using the GUI like I would any NTFS volume on a Linux desktop and that I executed this find command while I was located in the root of the directory I wanted to search on that snapshot.  The server I was copying the files to noted as X.X.X.X above was a Windows File Server on our network that had open permissions for me to copy to.  I used Samba to mount this server in the directory ‘fileshare’ in my home directory.  The RECOVER directory was made by me to house all the files I’ve found so I could keep them separate from any other files in the root of the file server directory.  I had to manually create this folder prior to issuing the command.

There are more than a couple of different ways to do what I did above.  There are also numerous ways to alter the command and adapt it for your needs.  For example, perhaps you want to find all files that are 3 days old and delete them…and you’re not a stickler for the -daystart option.  In this case:

find . -mtime -3 -exec rm -rf {} \;

Maybe you want to copy mp3’s from a directory to a separate location:

find . -name '*.mp3' -exec cp -a {} /path/to/copy/stuff/to \;

There are lots of ways to adapt this to help locate and deal with files.  The command line/shell are always more than powerful enough to help you get what you need.  I hope this helps you and if you have questions or just want to say thanks…please don’t hesitate to let me know in the comments below.

Comic Books, Linux and KDE 4

Sometimes I read comic books.  I would hope that some of you do as well.  I collected the paper version of comic books when I was a kid (Mostly Superman and Spiderman) and I’ve graduated up to the digital version now.  Comic books in digital format usually use the .cbz or .cbr file extension.  To read these in Windows or on my Linux desktop (I was running XFCE for the year or so) I had to use a specialized application…a comic reader…to do this.

The program I used in Linux was called Comix and it did a great job when I used XFCE.  I know you can also use Evince and I’m sure it does every bit a good job as Comix does.  Both are GTK applications though.  Since I now use KDE 4 on my primary workstation, I wanted to see if there was a Qt application that I could use and I was very disappointed when I didn’t find any.  So, there I was with comics in my Home Directory collecting dust with nothing preferable (read: Qt based) to open them up to read them.  I double clicked on one of them in frustration….and I was surprised when it opened right up.

Okular, the do-it-all reader for KDE4 opens up every comic book I throw at it.  I was saved…rather, my comic collection was saved.  Very handy that the KDE4 devs put in such a great tool to open so many formats.  So if you’re looking for something that can handle your comic collection, look no further than Okular which comes preinstalled with most KDE4 based distributions.

okular
Okular with PDF

Ubuntu 12.04, Amahi, and Linux Not Detecting Hard Disks

It’s been quite a long time since I’ve had this much trouble with Linux detecting a hard drive.  It brought me back to Ye Olde Linux days when 14 floppy disks housed your distribution and more times than not you didn’t have compatible hardware and had to find out via BBS what modem worked with what kernel…sometimes, it was a major pain…and that was the fun in it 🙂

In today’s installation of Linux…I thought I’d left those days behind.  I was wrong, unfortunately.

I downloaded Ubuntu 12.04 to install so that I could put Amahi on my video/picture/file/tv/movie share Linux machine.  Amahi is pretty much the best program on the face of the planet to use for this purpose…I’d put it up against any ‘samba-like’ distribution of Linux out there and I think it would come out on top.  Anyway, I went to install Ubuntu 12.04 and I immediately hit a problem:  it wasn’t detecting my hard drive.  I got out my notes for when I last installed an operating system on this server and it happened to be the last release of Amahi on Fedora…which was Fedora 14.  In that instance, I had to pass the nodmraid option in order for my hard drive to detect.

Easy enough.  I went into the Ubuntu options for booting.  Chose F6 and then selected nodmraid.  It booted fine and I went to a desktop.  Once there, I clicked the install icon.  Things were looking good until I went to the part of the installer where you choose a hard disk…which didn’t give me any hard disks.  I tried this process again and again…often times putting in other options such as noapic, nolapic and other awesome boot parameters using the F6 portion of the boot prompt.  No joy on any of these tries.  What could it be?

After a few minutes of brainstorming, I realized that Ubuntu wasn’t actually honoring the boot parameter for nodmraid.  Since this was the case, the hard drive wasn’t detecting.  In order to get the hard drive detecting, I should remove the dmraid information from my hard drive and see if this made a difference.  So, here’s how I fixed this problem:

  1. Instead of booting to install Ubuntu, select the option to Try it first
  2. Once there, hit up the dashboard, click on all applications, and search through all 78 until you find Terminal
  3. Once the terminal is up, type sudo su and hit enter.  You’re now root.
  4. type fdisk -l and take note of the letter designation of your hard drive that is having problems detecting (sda in my case).
  5. type dmraid -E -r /dev/sdX where ‘X’ is the letter designation of your hard drive.
  6. Answer yes to the question it asks of if you wish to remove the dmraid information on the drive.
  7. Reboot and Install Ubuntu.  It should now detect.

Not a hard thing to figure out…but it might be for some new users…and I’m almost certain Amahi users will run across this…because many of them are converts from Windows Home Server.  In this case, they’d probably be pretty freaked out having to drop down to a command line and issue commands.  Hopefully, this article will be a handy tool for them to use in order to get Ubuntu and subsequently, Amahi installed on their computer.  Thanks for reading!

Creating Symlinks – How and Why

As part of your Linux journey, you’ve probably heard of symlinks which are also known as symbolic links.  I figured that since I fixed an error using symbolic links to setup an environment to allow my son to learn program.  I am using something called HacketyHack which can be found here:  http://hackety.com

The problem is that on Ubuntu or Debian, the libssl and libcrypto libraries are out of date.  Hackety Hack’s program requires versions greater than 1.0.0 and 0.9.8 is installed.  The fix is of course a symbolic link.  But how do we do this and more importantly, WHY do we have to do this to fix it?  Let’s go through what they are first.

What is a Symbolic Link?

Look on your computers’ desktop right now.  If you’re like most people, you’ll have many shortcuts to different programs that you access daily.  On my Windows 7 machine at work, I have around 40-50 shortcuts to commonly used tools and places I access to accomplish my job.  Those are, in a nutshell, what symlinks are.  They’re pretty much just advanced shortcuts and with the case I’m going to present today…shortcuts without an icon.  Symlinks redirect a computer to an end location OR make a computer think the end location is where the shortcut is…and since they perform these 2 functions, there are 2 types of them.

  1. Hard Links
  2. Soft Links

Soft Link – When you click on/open a soft link, you’re redirected to the location it is pointing to.  For example, if you click on ‘My Documents’ on your desktop, you’re redirected to a path on the C: drive where your documents are stored.

Hard Link – A hard link makes the computer think that the shortcut is the actual end location.  So, using our ‘My Documents’ example above…the computer would look at the ‘My Documents’ shortcut and it would see it as the actual end location instead of a pointer to the end location.

What Would I Use a Symbolic Link For?

Do you use dropbox or box.net or any other cloud storage system to share files/store files/backup files?  Then a symbolic link might be a good option for you.  Imagine that you setup a folder on your desktop that is named ‘send-to CLOUD’ and when you drag and drop files to that folder, it sends it directly to those cloud storage systems.  This is something that symbolic links can accomplish.

Another case might be if you need files stored in 2 different locations.  Maybe you want to have settings files for an application be redirected to dropbox so that you can access it and use it on another computer.  As you can see, there are many different reasons for using symbolic links.

How Do I Setup a Symbolic Link?

In Linux, you use the command ‘ln’.  To setup a soft link, you use the -s flag like this:

ln -s /usr/lib/library.so.0.9.8 /usr/lib/library.so.1.0.0

So, in the example above, the file library.so.1.0.0 is LINKED or pointed back to the actual file library.so.0.9.8.  To setup a hard link you’d drop the -s flag:

ln /tmp /other/location/tmp

In the above example, your /tmp folder will now appear in 2 locations…both /tmp and the /other/location/tmp.  Please understand that /other/location/tmp has to actually exist <em>before</em> you issue the command.

To remove a symbolic link, just use the ‘rm’ command.  I usually use -rf as flags so that it recursively deletes and forces it to occur without confirmation but it is up to you:

rm /other/location/tmp

How Do I Fix Hackety Hack on Debian?

As promised, the solution to fixing Hackety Hack on Debian.  First, you need to find/locate the libraries that it complains about.  In the first error I received, it was looking for libssl.so.1.0.0.  I use the mlocate package which has the command ‘locate’ to find libssl.so as follows:

devnet@lostlap:~$ locate libcrypto
/lib/libssl.so.0.9.8
/usr/lib/libssl.so.0.9.8

The output tells me that there is a libssl.so.0.9.8 in two locations:  /usr/lib and /lib.  I’ll need to symbolically link both of those with a soft link so that when the program looks for the file libssl.so.1.0.0 it finds it and the link points it back to libssl.so.0.9.8.

sudo ln -s /usr/lib/libssl.so.0.9.8 /usr/lib/libssl.so.1.0.0


sudo ln -s /lib/libssl.so.0.9.8 /lib/libssl.so.1.0.0

Now that those to locations are created, we need to follow up with libcrypto which resides in the same two directories as libssl.

sudo ln -s /usr/lib/libcrypto.so.0.9.8 /usr/lib/libcrypto.so.1.0.0


sudo ln -s /lib/libcrypto.so.0.9.8 /lib/libcrypto.so.1.0.0

Now that both of those are linked to our actual ssl and crypto libraries, you can try running the file from Hackety Hack again.

For me, this fixed the initial two problems but I still have a failure when the installer does a hard check for OpenSSL 1.0.0 and unfortunately, I don’t have a complete solution for it yet.  So, I suppose I lied a bit with the ‘fix’ for Hackety Hack.  The above information is good though for other programs that might require libraries similar to the ones we linked.

Hopefully, you now have a decent understand of how and why to use symbolic links.

Creative Commons License
Except where otherwise noted, the content on this site is licensed under a Creative Commons Attribution-NonCommercial-ShareAlike 4.0 International License.