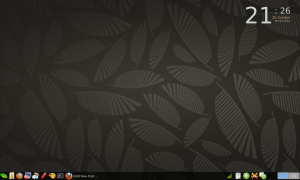
Install Firefox 4 on Linux Mint Debian Edition (LMDE)

I am testing out Linux Mint Debian Edition (LMDE) and wanted to benefit from Firefox 4 and all its speediness.  It’s not available in the repositories and since LMDE uses Firefox and NOT Iceweasel, you really can’t install it from the Mozilla Debian repository.  So, I decided to manually install things.

Normally I don’t like to manually install things outside the repository because when updates are pushed, there is no upstream source to differentiate from…so your chances of running outdated software increase unless you are vigilant.  Luckily, I consider myself vigilant.  Unfortunately, I’m not as vigilant as I consider myself to be…so I’ve added in reminders for myself on my Google calendar to check for Firefox 4 updates.

So, here’s how to get Firefox 4 onto your LMDE desktop…First, uninstall the version of Firefox you have using Synaptic or the software center.  Open a terminal up and let’s get started.

Create a temporary directory to house a downloaded and unzipped Firefox:

cd ~/ && mkdir tmp && cd tmp/

Next, let’s download and unzip it (please note this is for en-US version only…you’ll have to adjust the URL for diff. languages):

32bit

wget http://releases.mozilla.org/pub/mozilla.org/firefox/releases/latest-4.0/linux-i686/en-US/firefox-4.0.tar.bz2

64bit

wget http://releases.mozilla.org/pub/mozilla.org/firefox/releases/latest-4.0/linux-x86_64/en-US/firefox-4.0.tar.bz2

Now let’s unzip and extract it:

tar -xvjf firefox*.tar.bz2

Now let’s move the newly extracted items to /usr/local so it can be used by the system:

sudo mv firefox /usr/local/firefox4

Now we need to create a link so that applications calling firefox 4 access it correctly:

sudo ln -s /usr/local/firefox4/firefox /usr/local/bin/firefox4

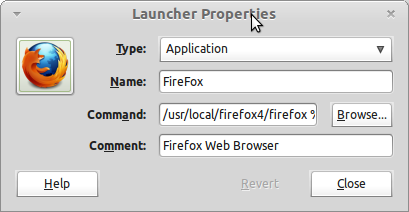
Ok, the hard part is done…but you don’t have a menu entry for it nor a shortcut you can execute.  Let’s do that now.  Right click your mint menu and choose “edit menu”.  Now, select the “Internet” menu in the left hand pane.  Click the “New Item” button.  The following window will pop up…fill it in with the information contained in the picture below:

The command line should be (remember the link we made above? let’s use it!):

/usr/local/firefox4/firefox %u

launcher properties

Notice in the picture above the Firefox icon is present…yours most likely isn’t.  In order to set the icon, click the area where it appears above and then select the following image:

When you’re finished, click close.  Firefox 4 should now appear under “Internet” in your Mint Menu.  You can now right click that item and add it to your favorites if you wish.

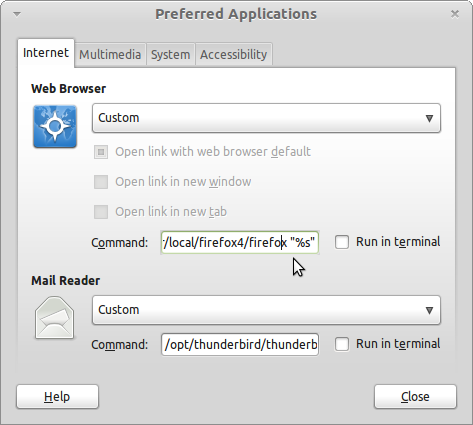
Now let’s make sure you list Firefox 4 as the default web browser for Gnome.  Do this by opening up the control center in the Mint Menu.  Select “Preferred Applications” inside the control center.  Make sure that you choose ‘custom’ in the drop down menu shown below and the path for the command will be the same as it was for your launcher but instead of a %u you can use a %s at the end of the command (as shown in the picture below):

preferred applications

That should be everything you need to have a good Firefox 4 experience in LMDE.  To uninstall things, you can simply delete the menu items and then delete the directories we created during the install process.

Hopefully this will help those of you out there who want Firefox 4 on your LMDE install!

Back to the Basics with Debian

Sometimes, you just have so many problems with the distribution you’re running that you have to wipe it out with a clean slate. I did that this past week and am now using Debian.

With using Debian there comes a feeling of being back to the very basic of Linux distros…much in the same way when you use Arch…it just feels plain, unencumbered, and basic and there is a feeling you get when build something from nothing…you start with a kernel and just enough CLI tools and create your house…then live in it.

It feels good to be stable. It feels good to not have to worry about programs crashing, the net disconnecting, or not being able to install programs.

People like to ride the unstable or testing route with most things out there…as I move forward in my Linux journey, I find myself looking to be less and less cutting edge and more and more stable. Plus, if there is a program out there that needs updating…backports are always a good way to get them.

I’m enjoying my new digs and will look to getting back into the swing of posting enjoyable articles and how-to’s in the upcoming weeks.

Disillusioned by the Community

There are times when I don’t want to admit that I use and love Linux.

It’s true…at times, I’m embarrassed to tell people that I’m part of the community as a whole.

You may wonder when these times are…right now is one of those times.  I despise infighting found in free and open source software…specifically, I really don’t like it when people have one sided experiences and apply their experience to ALL areas of Linux and open source software.  Case in point is this blog post on KDE 4.6 experience in Ubuntu.  For everyone out there, please be advised that Ubuntu is not equivalent with ALL Linux.  In fact, Ubuntu does Gnome very well…but it doesn’t do KDE well at all.

If you truly want to know what KDE 4.6 is like, you need to go with a KDE specific distribution like Mandriva and ride that cutting edge.  I can guarantee you won’t be greeted by crash handlers and all sorts of nonsense that you’ll get inside Ubuntu when you install KDE along side of your Gnome install.

Posts like the one I linked to above make me angry…it’s like driving a Volvo compact car and then dismissing every other car company that makes a compact car as equivalent the experience on the Volvo.  To me, you need to drive each implementation (each companies interpretation) and make an informed decision as to what you find.  Taking a test drive of a Volvo compact and then bad mouthing all compact cars is ignorant…and in my opinion, that is what the person above does with KDE 4.x

I’m a staunch defender of KDE 4.x and I’ve blogged about ignorance surrounding it in the past.  Not all gripes about it are ignorant…but a majority of people’s problems they have with it are simply people band-wagoning together to trounce something because it’s cool to do so.  Much the same is M. Night Shyamalan’s Airbender movie…people talked so much crap about the movie and him as a director, I thought that the movie was going to be the worst movie of all time.  It wasn’t near as bad as people were making it out to be and Shyamalan isn’t the worst director out there by any means.

I think overall, KDE 4.x has become the M. Night Shyamalan of the Linux world…a very talented director(project) that everyone was accustomed to making great movies(desktops) that doesn’t want to be pigeon holed into fitting what others feel it should fit.  KDE 4 is not KDE 3 and for good reason.  It’s being coded and made into something different yet subtly similar because it’s 2011 and not 1996.  If you don’t like it, don’t use it.

IF you don’t use it…don’t trash talk it.

If you want an HONEST representation of it, go to a distribution that prides itself on providing a good implementation of it.  Saying “Ubuntu is the most popular and people are going to try it out on Ubuntu” is wrong…because I don’t know of many end users that will enable a PPA repository and possibly jack up their Gnome install to give it a go…when they can just pop in a Live CD and give it a try….I think the poster of the blog entry above forgot about the magic of Live CD’s for his ‘review’.  It’s too bad that he feels Ubuntu’s lack of attention to all things KDE are representative to KDE as a whole…and it’s too bad his attempt at ascribing this notion comes off as troll-like.

I don’t use Ubuntu at all yet you don’t see me trolling the Ubuntu boards talking about how crappy I feel it is.  If you use Linux you are a part of the Linux community as a whole.  This community encompasses all distributions and all desktop environments.  You have a responsibility therefore; if you want to see Linux succeed, be tolerant and understanding of opposing distros/desktops. Talking trash about other opposing opinions is irresponsible and juvenile.  I hope someday people take this inherent and implied cordiality to heart.  Until then, we have posts like the one above…whether inadvertently geared to bash KDE or absolutely geared to bash KDE…it nonetheless bashed it.  I hope we can grow past things like this in the future.

Linux File Permissions, Groups, and Users

Why Are Permissions Important?

Permissions are important for keeping your data safe and secure.   Utilizing permission settings in Linux can benefit you and those you want to give access to your files and you don’t need to open up everything just to share one file or directory (something Windows sharing often does).  You can group individual users together and change permissions on folders (called directories in Linux) and files and you don’t have to be in the same OU or workgroup or be part of a domain for them to access those files.  You can change permissions on one file and share that out to a single group or multiple groups.  Fine grained security over your files places you in the driver seat in control of your own data.

Some will argue that it may be too much responsibility…that placing this onto the user is foolish and other aforementioned operating systems don’t do this.  You’d be right…XP doesn’t do this.  However, Microsoft saw what Linux and Unix do with the principle of least privilege and have copied this aspect from them.  While the NTFS filesystem employs user access lists with workgroups and domains…it cannot mirror the fine grained, small scale security of Linux for individual files and folders.  For the home user, Linux empowers control and security.

I’m going to go over how users and directory/file permissions work.  So, let’s setup an example that will allow us to explore file permissions.  If you have any questions, just ask it in the comments section at the end of the article.

File Permissions Explained

permissionsThe picture to your left is a snapshot of my $HOME directory.  I’ve included this “legend” to color code and label the various columns.  Let’s go through the labels and names of things first and then work on understanding how we can manipulate them in the next section.

As noted in the picture, the first column (orange) explains whether or not the contents listed is a directory or not.  If any of these happened NOT to be a directory, a dash (-) would be in place of the d at the beginning of the listing on the far left.

In the second, third, and fourth column (Green, Blue and Red) we find permissions.  Looking at the gray box in the bottom-right corner gives us an explanation of what each letter represents in our first few columns.  These tell us whether or not each user, group, or other (explained in detail later in this article) have read, write, and execute privileges for the file or folder/directory.

In the 5th column (white) the number of hard links is displayed.  This column shows the number of actual physical hard links.  A hard link is a directory reference, or pointer, to a file on a storage volume that is a specific location of physical data.  More information on hard links vs. symbolic (soft) links can be found here.

In column 6 (light blue) we find the user/owner of the file/directory.  In column 7 (gray blue), the group that has access to the file/folder is displayed.  In column 8 (pink), the size of the file or folder is shown in kilobytes.  In column 9 (fluorescent green), the last date the file or folder was altered or touched is shown.  In column 10 (grey), the file or directory name is displayed.

We’re going to pay specific attention to the first four columns in the next section and then follow that up by working with the sixth and seventh by going over user/owner and group.  Let’s move on to go over all of those rwx listings and how we can make them work for us.

Read, Write, Execute – User, Group, Other

First, let’s go over what different permissions mean.  Read permission means you can view the contents of a file or folder.  Write permission means you can write to a file or to a directory (add new files, new subdirectories) or modify a file or directory.  Execute permission means that you can change to a directory and execute ( or run ) a file or script for that file or directory.

The User section shown in green in the picture above shows whether or not the user can perform the actions listed above.  If the letter is present, the user has the ability to perform that action.  The same is true for the Group shown in blue above…if a member of the group that has access to the file or directory looks in this column, they will know what they can or can’t do (read,write, or execute).  Lastly, all others (noted in the red column above).  Do all others have read, write, and execute permissions on the file or folder?  This is important for giving anonymous users access to files in a file server or web server environment.

You can see how fine grained you might be able to set things up with…For example, you may give users read only access while allowing a group of 5 users full control of the file or directory.  You may want to switch that around.  It’s entirely up to you how you want to setup permissions.

More about Groups

Let’s go through setting up a group and adding a few users to it and then assigning that group permissions to access a directory and file.

Create a file inside your home directory by opening up a shell or terminal and typing:

touch ~/example.txt

You’ve now created a file called example.txt inside your home directory.  If you are already there, you can list the contents with the ‘ls’ command.  Do that now.  If you’re not already there, type ‘cd ~/’ and you will be taken to your home directory where you can ‘ls’ list the files.  It should look similar to the following:

[devnet@lostlap ~]$ ls -l
total 40
drwxr-xr-x  2 devnet devnet 4096 2010-05-24 17:04 Desktop
drwxr-xr-x  6 devnet devnet 4096 2010-05-24 13:10 Documents
drwxr-xr-x  9 devnet devnet 4096 2010-05-27 15:25 Download
-rw-rw-r--  1 devnet devnet    0 2010-05-28 10:21 example.txt
drwxr-xr-x 13 devnet devnet 4096 2010-05-26 16:48 Music
drwxr-xr-x  3 devnet devnet 4096 2010-05-24 13:09 Pictures
drwxr-xr-x  3 devnet devnet 4096 2010-05-24 13:04 Videos

Next up, let’s create a new group and a couple of new users.  After creating these we’ll assign the users to the new group.  After that, we’ll move the file and lock it down to the new group only.  If everything works as planned, the file should be accessible to root and the other 2 users but NOT accessible to your current user. You’ll need to be root for all of these commands (or use sudo for them). Since I have sudo and don’t want to continually type sudo, I used the command “sudo -s” and entered my root password to permanently log in as root in a terminal for the duration of this how-to. OK, Let’s get started:

[root@lostlap ~]$ useradd -m -g users -G audio,lp,optical,storage,video,wheel,games,power -s /bin/bash testuser1
[root@lostlap ~]$ useradd -m -g users -G audio,lp,optical,storage,video,wheel,games,power -s /bin/bash testuser2

The above commands will create two users that should be pretty close to your current logged in user (as far as group membership goes).  If the groups you’re adding the user to do not exist, you may get a warning that the groups don’t exist…no worries, just continue.  If the above commands don’t work on your system (I used Arch Linux to do this) then you can use the GUI elements to manage users and add a new one.  You won’t need to add them to any extra groups since we just need a basic user.  Next, let’s create our ‘control’ group.

[root@lostlap ~]$ groupadd testgroup

The above command creates the ‘testgroup’ group. Now let’s add the two users we created to this group.

[root@lostlap ~]$ gpasswd -a testuser1 testgroup
[root@lostlap ~]$ gpasswd -a testuser2 testgroup

The command above adds both our test users to the test group we created. Now we need to lock the file down so that only those users inside of ‘testgroup’ can access it. Since your current logged in user is NOT a member of ‘testgroup’ then you shouldn’t be able to access the file once we lock access to that group.

[root@lostlap ~]$ chgrp testgroup example.txt

The above command changes the group portion of file permission (discussed earlier) from a group your currently logged in user is a member of to our new group ‘testgroup’. We still need to change the owner of the file so a new terminal opened up as your current user won’t be the owner of example.txt.  To do this, let’s assign example.txt a new owner of Testuser2.

[root@lostlap ~]$ chown testuser2 example.txt

Now when you try to access the file example.txt you won’t be able to open it up as your standard user (root still will be able to access it) because you don’t have the permissions to do so. To test this, open up a new terminal (one where you are not root user) and use your favorite text editor and try to open up example.txt.

[devnet@lostlap ~]$ nano example.txt

Both testuser1 and testuser2 will be able to access example.txt because testuser2 owns the file and testuser1 is in the testgroup that has access to this file. However, your current logged in user will also have READ rights to it but will not be able to access it. Why? Let’s take a look at the permissions on example.txt

[devnet@lostlap ~]$ ls -l example.txt
-rw-r--r-- 1 testuser1 testgroup 8 2010-05-28 10:21 example.txt

Notice that the user, group, and other (1st, 2nd, and 3rd position of r,w,x – see the handy diagram I made above) have permissions assigned to them. The user can read and write to the file. The group can read it. Others can also read it. So let’s remove a permission to lock this file down. Go back to your root terminal that is open or ‘sudo -s’ to root again and do the following:

[root@lostlap ~]$ chmod o-r example.txt

Now go back to your user terminal and take a look at the file again:

[devnet@lostlap ~]$ ls -l example.txt
-rw-r----- 1 testuser1 testgroup 8 2010-05-28 10:21 example.txt

Once that has been accomplished, try and open the file with your favorite text editor as your currently logged in user (devnet for me):

[devnet@lostlap ~]$ nano example.txt

Your user now should get a permission denied error by nano (or whatever text editor you used to open it). This is how locking down files and directories works. It’s very granular as you can give read, write, and execute permissions to individual users, groups of users, and the general public. I’m sure most of you have seen permissions commands with 777 or 644 and you can use this as well (example, chmod 666 filename) but please remember you can always use the chmod ugo+rwx or ugo-rwx as a way to change the permissions as well. I liked using letters as opposed to the numbers because it made more sense to me…perhaps you’ll feel the same.

Hopefully you now have a general understanding how groups, users and permissions work and can appreciate how the complexity of it is also elegant at the same time. If you have questions, please fire away in the comments section. Corrections? Please let me know! Thanks for reading!
TinyMe Linux For The Win

I was running Unity Linux 2010.2 with KDE 4.5 for around the last month.  I really like what has been done there but it seemed a bit heavy for my Gateway M250…the CPU fan was always on which told me it was always in high use.

I checked out Gnome 2.30 on Unity and found it to be delightful on my resources; however, Gnome doesn’t make me feel warm and tingly when I use it.  I find myself frustrated with its lack of configuration options…specifically, right click menu.  So I rolled my own using the base install of Unity.  That worked quite nicely but lacked much of the polish I became accustomed to when using KDE.  What I wanted and needed was a happy medium.   I found that happy place with TinyMe Linux.

TinyMe is based on Unity Linux 2010 and was previously based on PCLinuxOS.  It uses LXPanel, PCManFM and the Openbox Window Manager to handle the heavy desktop lifting.  The ISO I used was a release candidate and lacked much of the polish of the TinyMe stable release of the past.  Even though it’s a release candidate, I still found it quite stable and usable…especially since I know my way around the openbox window manager.

You can snag the TinyMe release candidate here:  http://distro.ibiblio.org/pub/linux/distributions/tinyme/

After a few adjustments of adding my favorite programs I was in business.

TinyMe RC 2010

Even without some of the programs that made TinyMe famous (like the TinyCC) this distro is both stable and robust which is a testament to the underlying Unity Linux core.  If this release candidate is any indication, look for GREAT things to come from TinyMe 2010’s full release…something I will be looking forward to!

Installing Openbox on Foresight Linux

My friend Og Maciel originally introduced me to Openbox a while back and I’ve been using it ever since. I love the lightweight feel, the ability to customize and the center around having NO icons on my desktop.  I don’t feel cluttered when I work! Today, we’re going to go over installing Openbox with some added tools.  This tutorial is tailored for Foresight Linux but the guide may very well serve other distros as well.

What is Openbox?

From the Openbox homepage, “Openbox is a minimalistic, highly configurable, next generation window manager with extensive standards support.”  From using it, I often think of it as fluxbox-like with the benefits of being able to dip into Gnome or KDE for the items that I want to use.  Your desktop will then run with speed and simplicity using only the elements you want to use with it.

So…Let’s get Started…

This How-To will assume that you’re running Foresight Linux, you’re logged into Gnome and that you’re familiar with conary, the package manager for Foresight.  First and foremost, install openbox:

[devnet@lostlap Desktop]$ sudo conary update openbox obmenu obconf

This installs the needed components to run Openbox on your system. Openbox is minimal by default though so if you login to the environment now for the first time, there will be no taskbars, nothing…just a large blank area for you to work with. We will need to install some extra components to give a bit more functionality. If you’d like a panel menu, I recommend using tint2. I used to use pypanel which is a small panel written in python but this panel is no longer developed.

There are other panels that are packaged with openbox in mind for Foresight; fbpanel is available, which is a very fast and functional menu bar. I like lxpanel also, which is fbpanel with some easier configuration options. For a full list, please see openbox documentation. For our purposes here, we will install tint2:

[devnet@lostlap Desktop]$ sudo conary update tint2

Now we need to copy the default configuration file for tint2 so we can build our panel to our liking.  You’ll have to create the default path for the tint2rc configuration file.  To do this and copy the config file:

[devnet@lostlap Desktop]$ mkdir -p ~/.config/tint2/
[devnet@lostlap Desktop]$ cp /etc/xdg/tint2/tint2rc ~/.config/tint2/

Now tint2 has a configuration file in place and is ready for Openbox to start.

Let the Configuration Begin!

The hard part (install) is now out of the way thanks to the conary package manager. Now we need to configure Openbox so that it’s ready for us when we log out of Gnome. The configuration files will need to be copied to /home/user/.config/openbox.  Of course, this path doesn’t exist yet so we’ll need to create it like this:

[devnet@lostlap Desktop]$ mkdir -p ~/.config/openbox/

Visiting there now will show that there aren’t any files in this directory.  The file we’ll absolutely need to place there is autostart.sh. Other files that will be in here are rc.xml which is for obconf (openbox configuration) and menu.xml (openbox menu system).  We’ll copy menu.xml from a default copy there later.  The other file should auto-create when loading for the first time (rc.xml)

The autostart.sh file is what starts all of our services and our tint2 panel we just installed as well as setup our wallpaper and other items.  Instead of going through the options you can place in here, I’m going to share my autostart.sh to get you up and running quickly.  Please note that if you chose not to install fbpanel and use the gnome-panel or other panel instead, you’ll need to comment the pypanel line below and uncomment what you’ll be using:

[devnet@lostlap Desktop]$  cat autostart.sh
# This shell script is run before Openbox launches.
# Environment variables set here are passed to the Openbox session.
##############################################################
# Panel Section
##############################################################
# pypanel, my favorite panel for openbox
#(sleep 3 && pypanel) &
# Use the wbar Launcher if you would like.  Don't forget to install it before uncommenting
# wbar &
(sleep 3 && tint2) &

#############################################################
# Gnome Integration Section
#############################################################
# This section let's Gnome give us some of its desktopiness
gnome-power-manager &
nm-applet --sm-disable &
/usr/libexec/gnome-settings-daemon &
gnome-volume-manager --sm-disable &
gnome-keyring-daemon &

###########################################################
# Other Add-on's for Openbox
###########################################################
# Make your wallpaper restore to last setting using Nitrogen.
nitrogen --restore &
parcellite &
volumeicon &
################################# End ###################

Download my autostart.sh

To create the menu system file for openbox, we’ll copy from the default installation to our .config/openbox directory (so we can use obmenu…otherwise, that command will give us an error) so use the following command in a terminal:

[devnet@lostlap Desktop]$ cp /etc/xdg/openbox/menu.xml ~/.config/openbox/

Now you’re ready to login and reap what you have sown 🙂 Logout of Gnome and change sessions in GDM to Openbox.  Notice that your tint2 panel starts up and has the gnome applications we recorded in the autostart.sh file above running and docked! You can add more options to your autostart.sh file and you can also edit tint2rc (in your /home/user/.config/tint2 directory) to store settings for your panel.

I’ve Installed and am Running, Now What?

Now you get to customize the Openbox menu with your favorite applications. Menus are activated by right clicking anywhere on the desktop. There are a few default applications…I choose obconf right away so that I can choose a theme I like and increase the text size since I’m using a high resolution. After that is done, I right click for the menu again and go to applications >> xterm. When the terminal pops up, I type obmenu. From there, I’ll be able to edit my right click menu.

Now instead of entering obmenu in a terminal each time, let’s add it to our right click options. In the obmenu window that you opened in the last paragraph, expand the Openbox 3 option. Find obconf and highlight it. Click ‘new item’ and add obmenu for a label, execute for action, and obmenu for Execute. This will add obmenu to your right click options so you don’t have to open a terminal each time to do things. You can also customize any of the items you find in applications…I put a few things I normally need such as thunderbird, firefox, gnome-terminal, etc. Feel free to add whatever you need…you can have many submenu’s . It’s setup is pretty straightforward.

Nitrogen, the wallpaper manager, requires a small tweak as well to get working. What I did was create a /home/username/Photos/Wallpaper directory and then loaded it up with my favorite desktop wallpaper. Good places to go for cool wallpapers are desktopography.com and vladstudio.com.  Next, install Nitrogen:

[devnet@lostlap Desktop]$ sudo conary update Nitrogen

After your first login, you’ll need to add a menu entry using obmenu to call the nitrogen browser. So create the menu entry and the action you call is:

nitrogen /home/username/Photos/wallpaper

Of course, replace ‘username’ with your users name.  This will allow you to open up all the wallpaper photos inside of that directory.

So What Have we Done?

Today, we’ve installed Openbox on Foresight Linux. We’ve given it a tint2 panel so we have a place to dock applications and we’ve customized the Openbox right click menu and added a wallpaper program called Nitrogen. Hopefully, this shows you the customizable features of Openbox and also shows you the speed that Openbox operates at. It’s a very minimalistic environment, yet one that can be very powerful.

Installation Notes of Interest

tint2

Tint2 is my newly crowned favorite panel for openbox.  It’s lightweight and is able to be configured in so many ways.  I added the sleep command inside my autostart.sh to make sure that the desktop is loaded before the tint2 panel tries to load…mostly, this is due to network manager wanting to animate while the panel loads.  This isn’t as much problem with tint2 as it is with pypanel (see below).

pypanel

Some things I’ve noticed when running openbox…network manager has problems with pypanel. I added the sleep command inside my autostart.sh and this is much better now…but there may be similar problems with network manager. It’s really NM searching for a network and it causes the panel to flicker a bit. Not a real show stopper.

Gnome-panel

Gnome-panel running inside openbox causes a few errors to pop up when I login. This could be due to the fact that I’ve started things in my autostart.sh out of order…I’m also not all together sure what is causing these errors. The problem seems to be with the docking area of gnome-panel as when I minimize programs they are not docked. Easily fixable, but annoying nonetheless.

Alternative Panels

There are quite a few alternative panels out there.  Fbpanel is one.  Perlpanel is another.  Fbpanel and lxpanel are available in the Foresight repositories. You can also add other launchers like wbar if you so desire.

Screenshot

Openbox on Foresight
Creative Commons License
Except where otherwise noted, the content on this site is licensed under a Creative Commons Attribution-NonCommercial-ShareAlike 4.0 International License.